

What is a linter and formatter?
Linters and formatters are technically two different things, but perform similar operations.
A linter uses static analysis to review your code to find issues whether related to code style or bugs and returns a report of those errors or warnings.
A formatter on the other hand does a similar thing, but instead of simply returning an error report, it tries to fix the issues. If it can’t fix an issue, it returns the error or warning in a report, similar to linting.
Both are typically customizable, though modern formatters come with opinionated configurations that are encouraged to stick with, to avoid bike-shedding, or wasting time over trivial things.
What is Biome?
Biome is a new open-source linter and formatter built on top of Rust that promises to be faster than other popular linters and formatters like ESLint and Prettier.
Similar to Prettier, Biome comes with its own set of opinionated configurations, which are actually pretty similar to Prettier’s, but improves on speed and fixes some potential issues.
What are we going to build?
We’re going to see how we can set up Biome in a JavaScript project.
Biome supports most of the popular file formats, like JavaScript, Typescript, JSX, and TSX, but be sure to check out language support, as it only has partial support for frameworks like Vue and Svelte while not supporting Markdown at all at the time of writing this.
Step 1: Installing & Configuring Biome
Getting started, let’s first install Biome in our project:
npm install --save-dev --save-exact @biomejs/biomeThis will install Biome as a dev dependency and pin to an exact version. Biome recommends pinning the version to ensure anyone installing dependencies on a team always have the same version.
Next we can initialize Biome by running:
npx @biomejs/biome initOnce it completes, you should have a new biome.jsonc file in your project with a few basic configurations including Biome’s recommended settings.
It will also list some steps to take to get up and running, but we’ll walk through each of those steps below in a slightly different order.
Step 2: Migrating ESLint or Prettier Configurations
If you already are using something like ESLint or Prettier in your app, you likely already configured it in a specific way, so it probably makes sense to migrate that configuration.
However, if you’re starting from scratch, feel free to skip this step.
No matter what kind of project you’re using, we can migrate our existing ESLint or Prettier settings relatively easy.
Be’ll use the Biome migrate command while specifying the tool we’re currently using.
If using Prettier, run:
npx biome migrate prettier --writeOr if using ESLint, run:
npx biome migrate eslint --writeThis will update your biome.json file with your existing configuration.
But wait! If you’re using Next.js and the built-in ESLint, you might have ran into an issue.
Note: If not using Next.js, feel free to move on to the next step!
Somewhere in how ESLint is managed in Next.js, there’s a dependency that isn’t happy when trying to migrate the configuration.
This is a known issue, and unfortunately it looks like it might not be addressed soon? But they offer a solution for unblocking and getting it up and running.
Tip: Alternatively, you could start from scratch and set up some of the important configurations like a11y manually.
To fix it, we’ll do a bit of hacking, but opening up a file inside of our node_modules directory at node_modules/eslint-config-next/index.js.
Inside that file, comment out the following line:
require('@rushstack/eslint-patch/modern-module-resolution')Once saved, try running the migrate command again:
npx biome migrate eslint --writeAnd now you’ll get a message stating that your biome.json file was properly updated!
From here, you can go ahead and uninstall any ESLint dependencies as well as get rid of your ESLing config file, such as .eslintrc.json.
But now, we’re ready to start running this thing!
Step 3: Linting & Formatting with Biome
Biome has a few different options for how we can run it. We can run it as a linter with the lint command, a formatter with the format command, or both with the check command!
Depending on how you want to set things up, you can configure scripts to run each to your liking, but I think it makes sense to use both the linter and formatter unless you have good reason not so, so let’s set up a script to run both in our project.
Inside of the package.json file, you might already have lint or format scripts, or something similarly named. We can reuse those existing commands and replace that’s inside or if you don’t already have them, create new scripts (or create new ones anyways!).
Under scripts, create a lint property under scripts and add:
"scripts": {
  ...
  "lint": "biome check <Location>"
},
In the above, replace <Location> with the directory that you want to run it on, such as . meaning the entire project or src if only running on the src directory.
Now even though check technically does linting and formatting, I’m still using the script name lint to describe the difference between not formatting and formatting, which is where we’ll create a format script. You could use another name if preferred.
If you now try to run your script:
npm run lintYou’ll likely get a console full of errors!
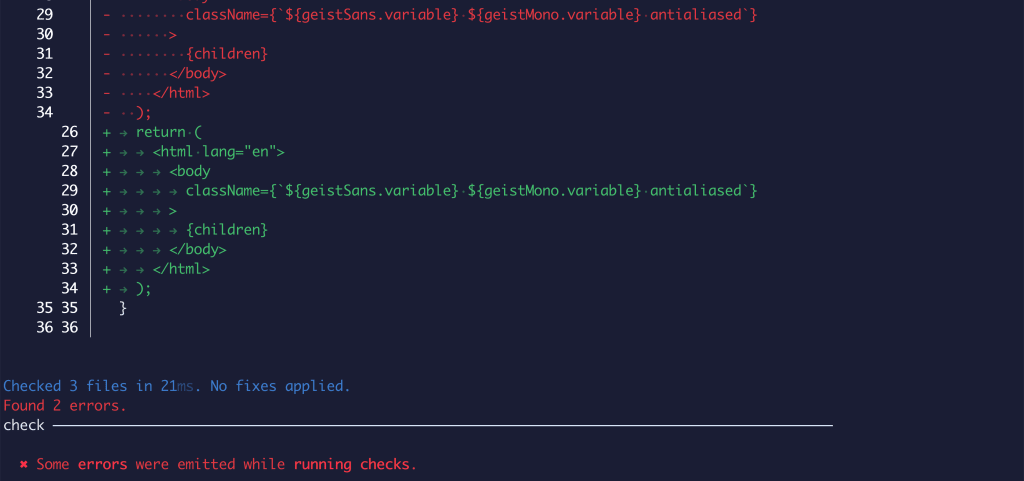
Now there’s a few things that we want to pay attention to:
- There are way too many errors, that will take a ton of time to update
- But don’t worry, the next script we’re going to write will automatically format, so don’t try to correct these
- You might see some changes you don’t like (like tabs 👀), we’ll see later how we can update the configuration
So next let’s actually set up that formatter.
Create another script called format and add:
"scripts": {
  ...
  "lint": "biome check <Location>",
  "format": "biome check --write <Location>"
},
The difference here is we’re passing in the --write flag, which tells Biome we want to make the changes.
Warning: The next step will run the formatter and make the changes. I recommend that you save your existing changes, or at least stash them, to avoid potentially losing those changes if you aren’t happy with the results!
So now let’s run the formatter:
npm run formatIt’s possible this time, you don’t get any errors at all!

Tip: Why do we have both a lint and a format command? When running code locally, you might want to automate or manually run a formatter, cleaning this up. In your CI tools, you usually wouldn’t want to run a formatter, which would cause unstaged changes, which you would either need to commit or handle in some way. That can be complicated, so typically people will only run the linter in the CI tool, like a GitHub Action.
Now it’s also possible that you did get errors.
Biome has the concept of safe and unsafe changes. Changes that are safe means Biome has determined that it won’t cause issues or break your code. Changes that are potentially unsafe means Biome isn’t confident it can make the change without impacting your code. That doesn’t mean that it strictly isn’t safe in your case, but Biome can’t be confident that won’t be the case in all projects.
So if you potentially have unsafe changes, Biome won’t make that change, so you’ll have to address them yourself or update your Biome configuration to mark it as a safe option (but make sure you’re confident it is!).
Now as I mentioned above, you might be a bit unsettled by some of the default configuration, particularly tabs! So let’s see how we can adjust some settings.
Step 4: Adding Custom Biome Configurations & Rules
If you’re not quite happy with the built-in settings, the good news is you have the opportunity to configure it just how you like.
Starting off with what might be a prime example for some people, are tabs.
Tip: While I personally haven’t migrated to tabs, there are some compelling reasons to use tabs, so worth considering!
The biome.json file handles all of the configuration and that’s exactly where we’ll configure our indent style.
Using Biome Recommended Settings
If you migrated your ESLint or Prettier configuration, one rule that potentially got changed was the recommended rule under linter and rules. If you want to follow along with what Biome maintains as a recommended configuration, nows the time to flip that to true:
"linter": {
    "rules": {
        "recommended": true,
If you run the formatter, you might see some changes based on their recommended settings.
Changing the Indent Style
Indent style is located under the formatter property as indentStyle, so add or update your configuration with the following:
"formatter": {
    "indentStyle": "space"
},
Once saved, if you now try to run your formatter again, you should see that all of those pesky tabs were switch back to 2 spaces!
If you’re still unhappy with the 2 spaces, and perhaps want 4, you can also update the indentSize property inside of formatter.
Removing Unused Imports
Another potentially common one is cleaning up unused code. When refactoring or making changes, you might forget about an import, so why not automate removing it?
No Unused Imports is under the linter property nested inside of correctness with the noUnusedImports property, so add or update your configuration with the following:
"linter": {
  "correctness": {
    "noUnusedImports": "error"
  }
}
If you try to run format, you might not have any changes, particularly if you don’t have any unused imports, but feel free to give it a try by importing some module and watch it get removed after running the formatter!
Organizing Tailwind Classes
If using a tool like Tailwind, you might have a mess of classes all over your app.
This is generally fine, you should be able to find what you’re looking for, but you can make it much easier on yourself.
Instead of having to scan inconsistent lines each time, why not organize them in the same way each time, reducing the load on your brain for where you need to find each class?
We can use Use Sorted Classes inside linter nested inside of nursery with the name of useSortedClasses.
Now there are two points to consider here. It’s nested in nursery which means it’s still in development. It’s also marked as an unsafe fix, so consider that you might run into issues while using it.
To use it, add or update your configuration with the following:
"linter": {
    "nursery": {
        "useSortedClasses": {
            "level": "error",
            "fix": "safe",
            "options": {}
        }
    },
}
Because of it’s state as an in-development unsafe change, we need a little extra configuration.
But if you now run the formatter, you should see your classes update with a bit of consistency!
More Options
There are a ton of other rules you can use to customize Biome to your liking. I recommend not trying to spend a ton of time running through each one and tweaking things as you go along.
You also might want to consider thinking again about the concept of bike-shedding. How much do some of these rules really matter? While semicolons certainly do, do you really need custom command settings?
Step 5: Automating Linting with GitHub Actions
One common pattern for linter usage is automating running it inside of a CI environment.
When hosting projects on GitHub, you have access to Actions, which provides a free way to run tools like linting based on conditions like a pull request or pushing code.
To set up a new Action, create a new .github directory inside of the root of your project. Inside add a workflows directory then create a new file checks.yml.
Inside, we configure what we want to run and how we want to run it.
Biome has an official GitHub Action package which makes this easy.
Add the following inside checks.yml:
name: Checks

on:
  push:
  pull_request:

jobs:
  checks:
    runs-on: ubuntu-latest
    steps:
      - uses: actions/checkout@v4
      - uses: biomejs/setup-biome@v2
        with:
          version: latest
      - run: biome ci <Location>
Note: Reminder to update the
<Location>to the same value inside of yourpackage.json.
Now there are tools to help test this locally, such as nektos/act, but for now, we can commit this file to our project and push it up to our GitHub repository.
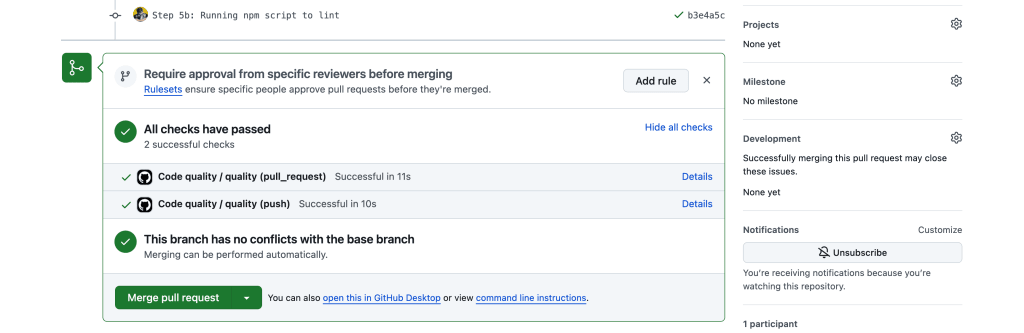
This action is running both on pushes and pull requests, so if just pushing the code, you might get an error or success on the commit, where if using it on a Pull Request, you’ll get the status inside of the Checks.
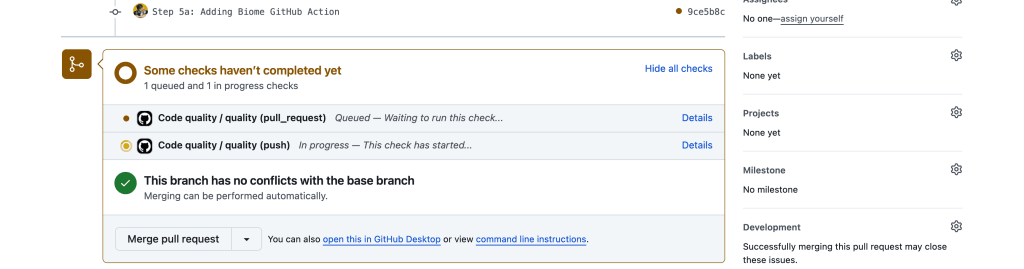
Given we ran the formatter earlier, you might see a green checkmark, unless you made additional configurations that you didn’t format and save. But if you get an error, you can click into the check and see the logs, including the steps of the Action, to see what’s wrong, including what the linter caught.
As you could imagine, this is incredibly helpful for teams or Open Source maintainers, where this helps eliminate the need to argue over stylistic changes (ahem bike-shedding).
Now alternatively, if you already have a GitHub Action running, you might already have a workflow where you’re installing dependencies, running tests, maybe building your project, etc, so you could also run the same npm script we set up earlier if preferred:
name: Code quality

on:
  push:
  pull_request:

jobs:
  quality:
    runs-on: ubuntu-latest
    # steps:
    #   - name: Checkout
    #     uses: actions/checkout@v4
    #   - name: Setup Biome
    #     uses: biomejs/setup-biome@v2
    #     with:
    #       version: latest
    #   - name: Run Biome
    #     run: biome ci src
    steps:
      - uses: actions/checkout@v4
      - uses: actions/setup-node@v3
        with:
          node-version: 20
      - run: npm install
      - run: npm run lint
But either way, you should be all set up to enforce your linting configuration through GitHub Actions!
What else can you do?
Set up a precommit hook to format locally
Though controversial, precommit hooks can be a good way to make formatting changes locally, right before any changes are actually committed. This can help reduce the feedback loop and avoid seeing a failing GitHub Action in the first place.
A common complaint is it blocks people from working if they want to just make a bunch of garbage commits, which is fair, but you can pass a --no-verify flag to skip it which makes that excuse a bit invalid.
Either way, it’s important to discuss it with your team and go with a workflow you all choose.
If you decide to move forward, tools like Husky can help get you running.
Check out my video above, towards the end, to see how you can get that set up.