

What are Github Actions?
Actions are a relatively new feature to Github that allow you to set up CI/CD workflows using a configuration file right in your Github repo.
Previously, if you wanted to set up any kind of automation with tests, builds, or deployments, you would have to look to services like Circle CI and Travis or write your own scripts. But with Actions, you have first class support to powerful tooling to automate your workflow.
What is CI/CD?
CD/CD stands for Continuous Integration and Continuous Deployment (or can be Continuous Delivery). They’re both practices in software development that allow teams to build projects together quickly, efficiently, and ideally with less errors.
Continuous Integration is the idea that as different members of the team work on code on different git branches, the code is merged to a single working branch which is then built and tested with automated workflows. This helps to constantly make sure everyone’s code is working properly together and is well-tested.
Continuous Deployment takes this a step further and takes this automation to the deployment level. Where with the CI process, you automate the testing and the building, Continuous Deployment will automate deploying the project to an environment.
The idea is that the code, once through any building and testing processes, is in a deployable state, so it should be able to be deployed.
What are we going to build?
We’re going to tackle two different workflows.
The first will be to simply run some automated tests that will prevent a pull request from being merged if it is failing. We won’t walk through building the tests, but we’ll walk through running tests that already exist.
In the second part, we’ll set up a workflow that sends a message to slack with a link to a pull request whenever a new one is created. This can be super helpful when working on open source projects with a team and you need a way to keep track of requests.
Part 0: Setting up a project
For this guide, you can really work through any node-based project as long as it has tests you can run for Part 1.
If you’d like to follow along with a simpler example that I’ll be using, I’ve set up a new project that you can clone with a single function that has two tests that are able to run and pass.
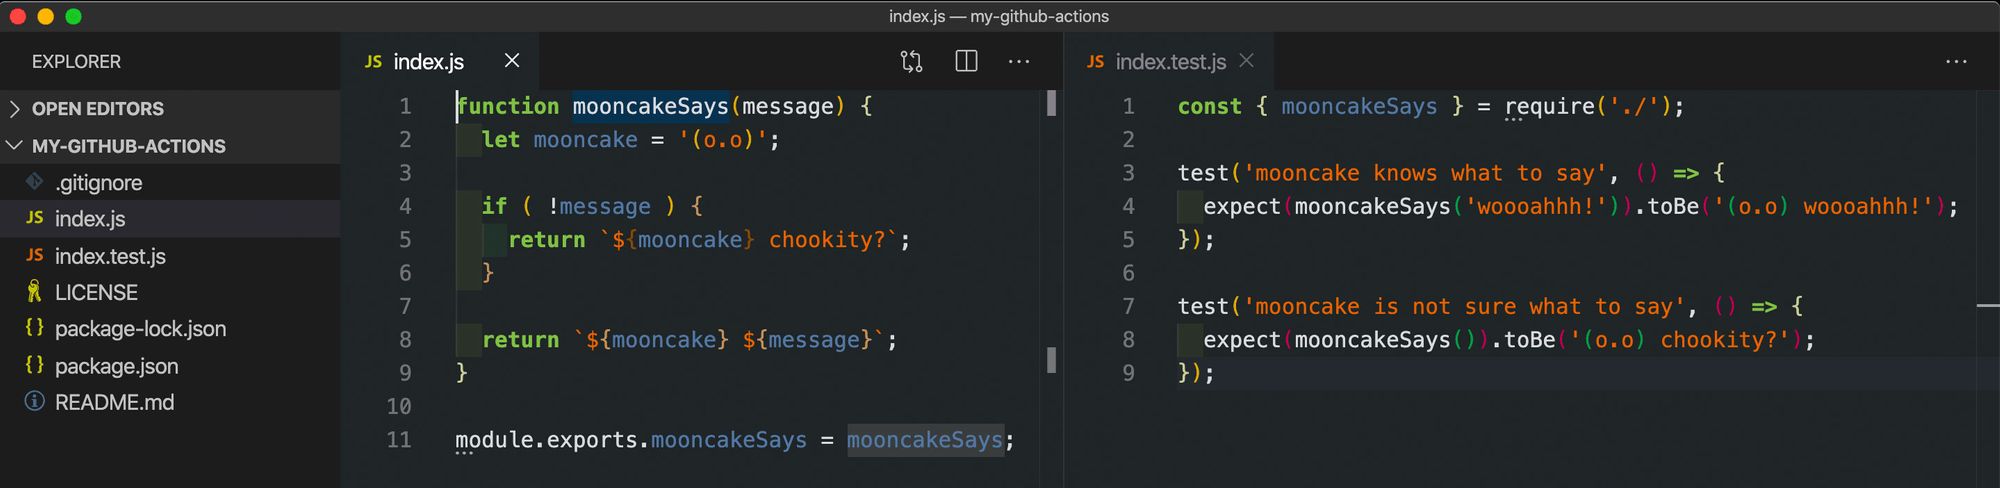
If you’d like to check out this code to get started, you can run:
git clone --single-branch --branch start git@github.com:colbyfayock/my-github-actions.git
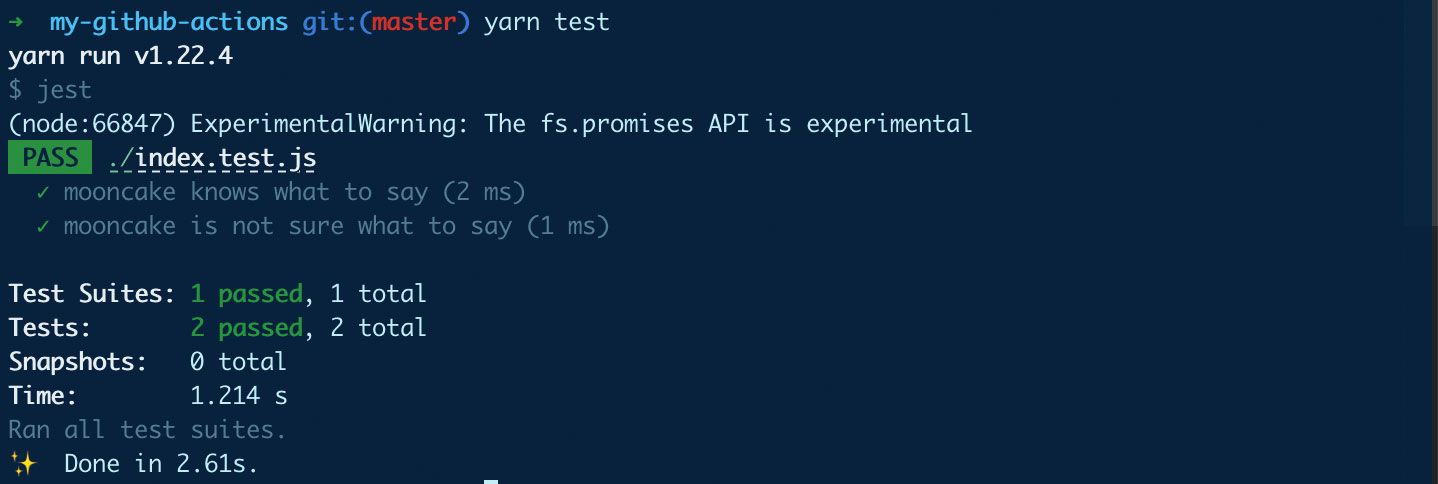
Once you have that cloned locally and have installed the dependencies, you should be able to run the tests and see them pass!
It should also be noted that you’ll be required to have this project added as a new repository on Github in order to follow along.
Part 1: Automating tests
Tests are an important part of any project that allow us to make sure we’re not breaking existing code while we work. While they’re important, they’re also easy to forget about.
We can remove the human nature out of the equation and automate running our tests to make sure we can’t proceed without fixing what we broke.
Step 1: Creating a new action
The good news, is Github actually makes it really easy to get this workflow started as it comes as one of their pre-baked options.
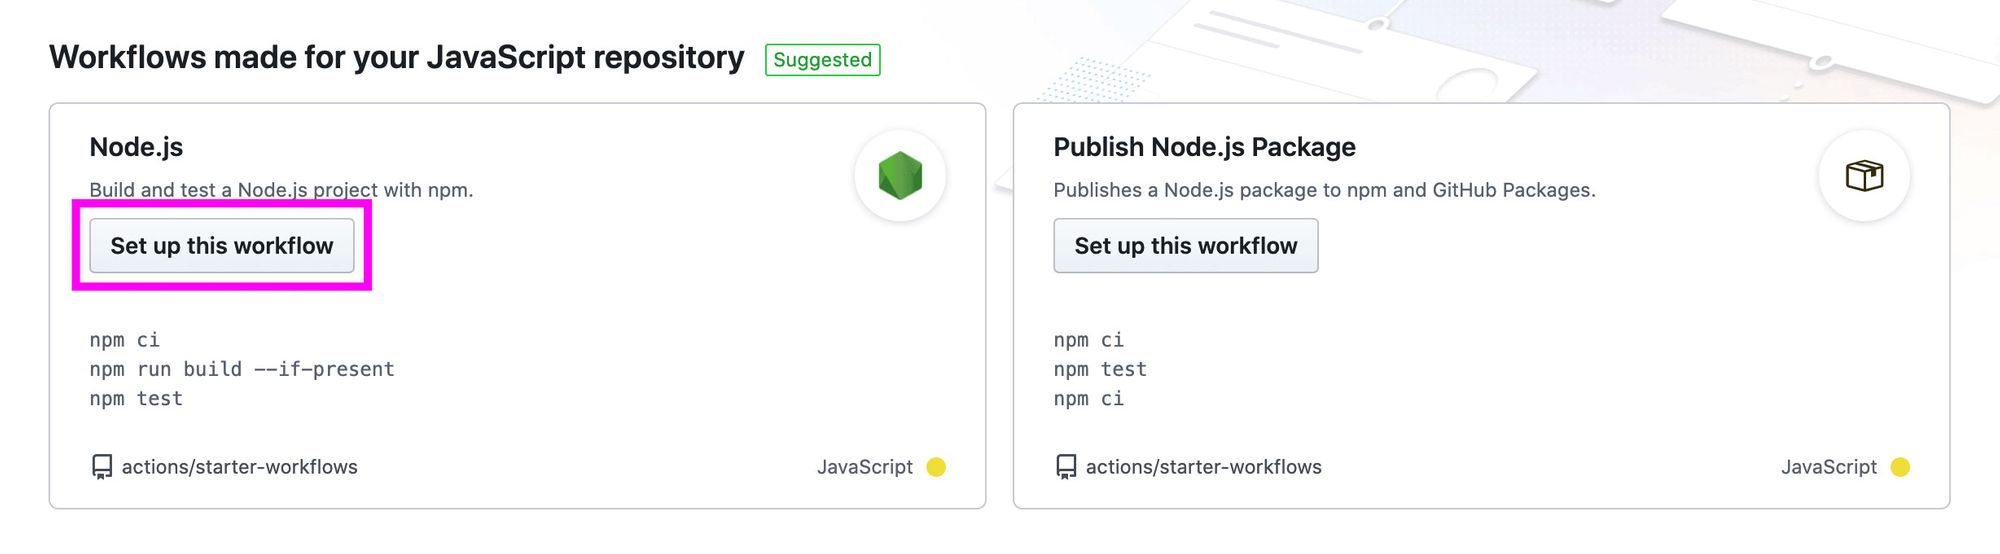
We’ll start by navigating to the Actions tab on our repository page.

Once there, we’ll immediately see some starter workflows that Github provides for us to dive in with. Since we’re using a node project, we can go ahead and click Set up this workflow under the Node.js workflow.
After the page loads, Github will land you on a new file editor that already has a bunch of configuration options added.
We’re actually going to leave this “as is” for our first step. Optionally, you can change the name of the file to tests.yml or something you’ll remember.
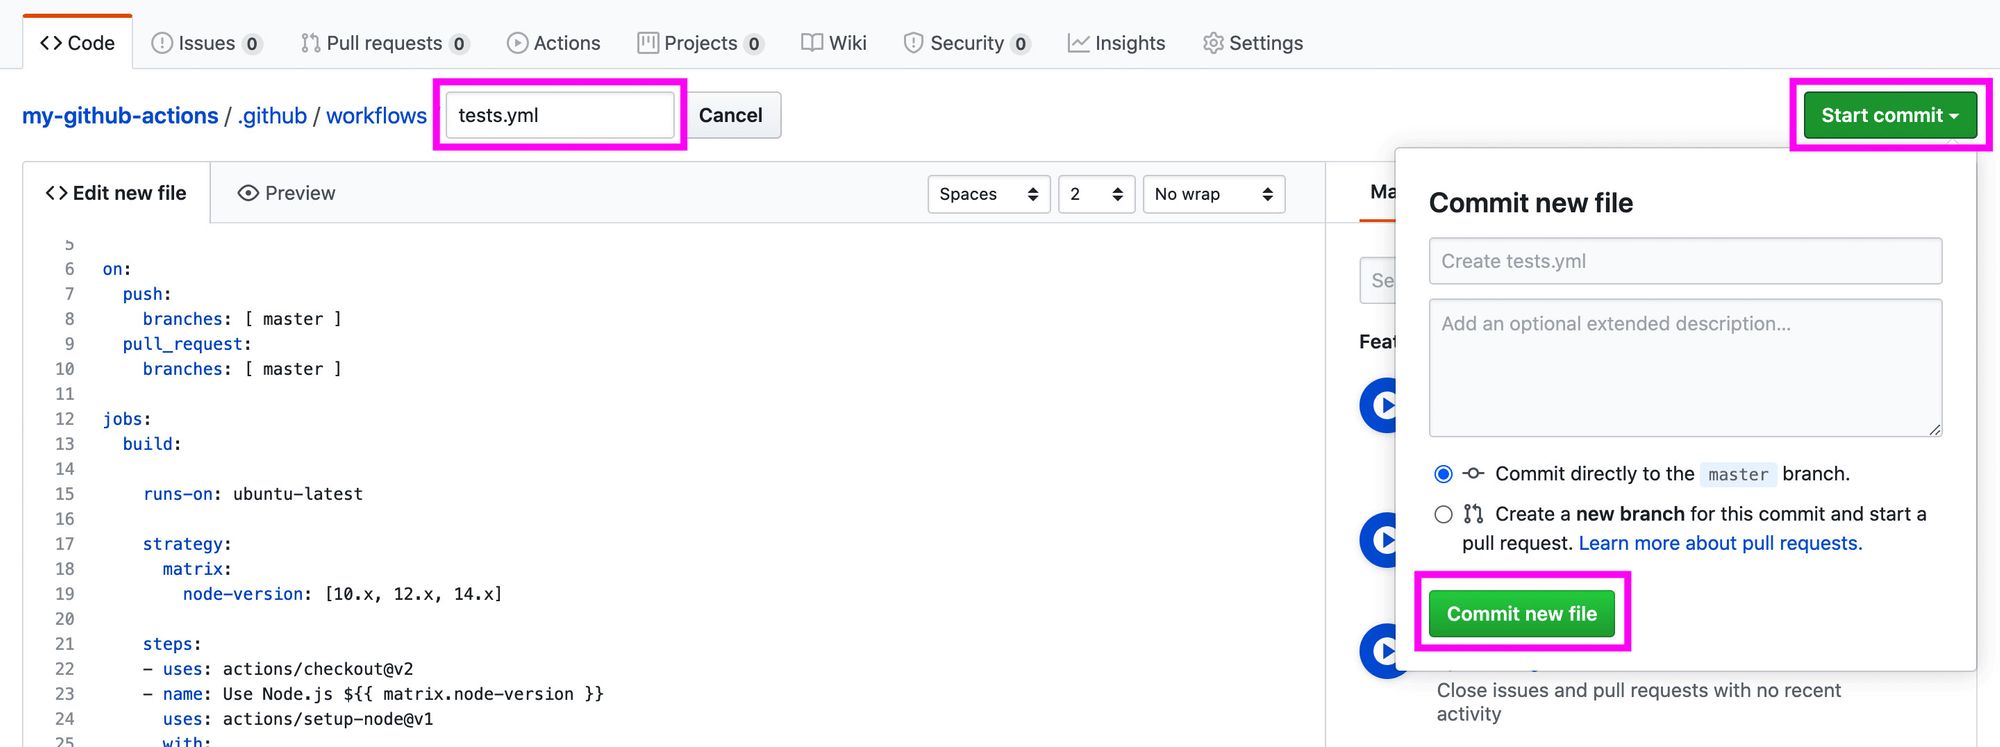
You can go ahead and click Start commit then either commit it directory to the master branch or add the change to a new branch. For this walkthrough, I’ll be committing straight to master.
To see our new action run, we can again click on the Actions tab which will navigate us back to our new Actions dashboard.
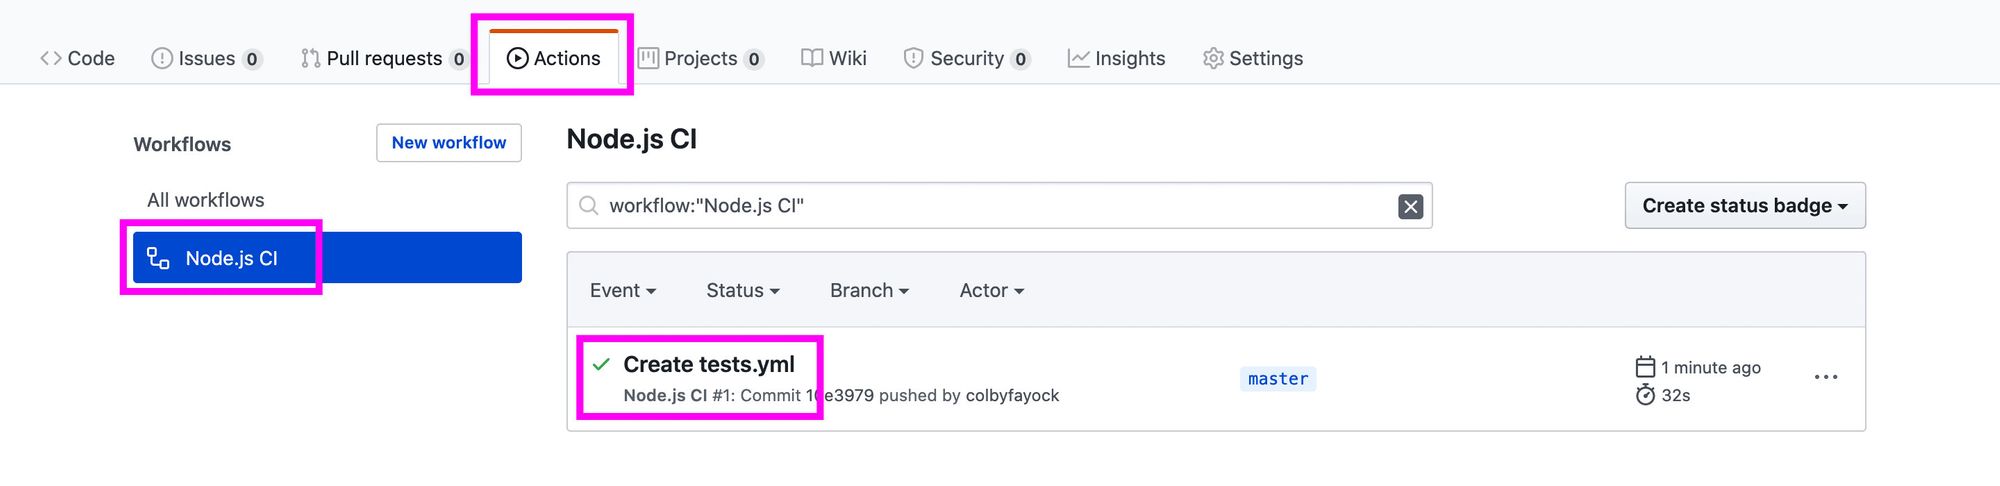
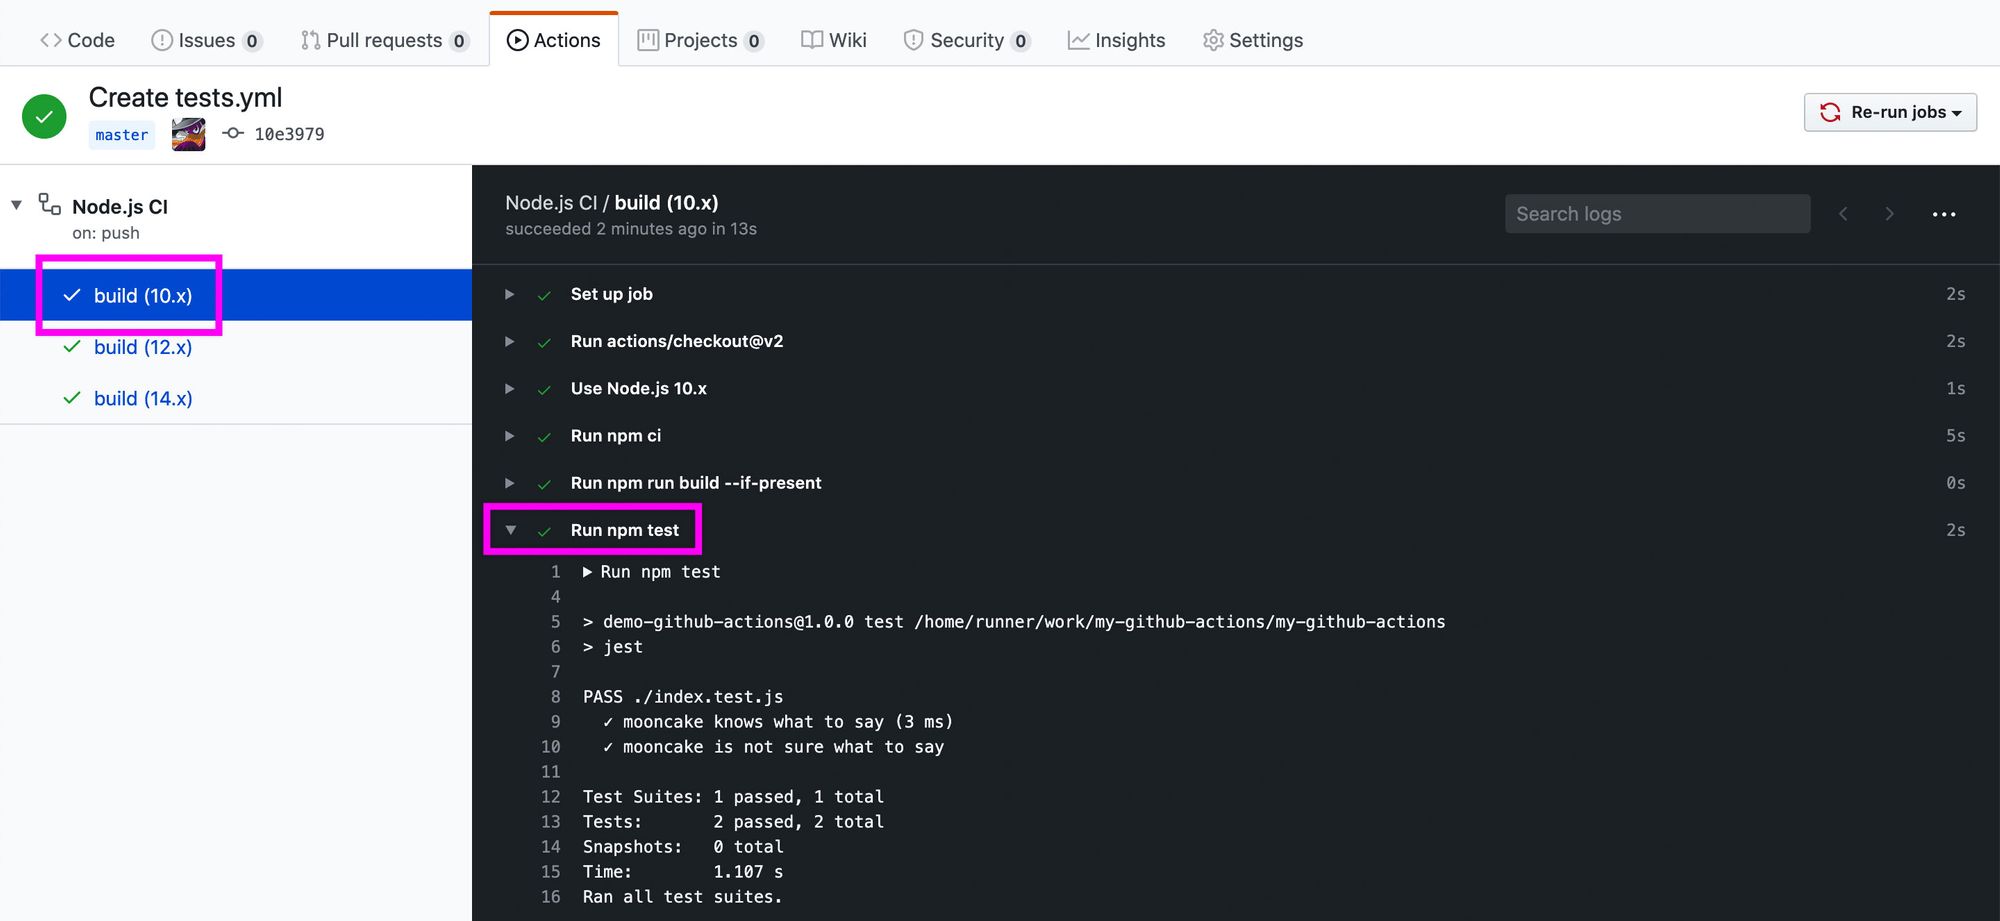
From there, you can click on Node.js CI and select the commit that you just made above and you’ll land on our new action dashboard. You can then click one of the node versions in the sidebar via build (#.x), click the Run npm test dropdown, and we’ll be able to see the output of our tests being run (which if you’re following along with me, should pass!).
Step 2: Configuring our new action
So what did we just do above? We’ll walk through the configuration file and what we can customize.
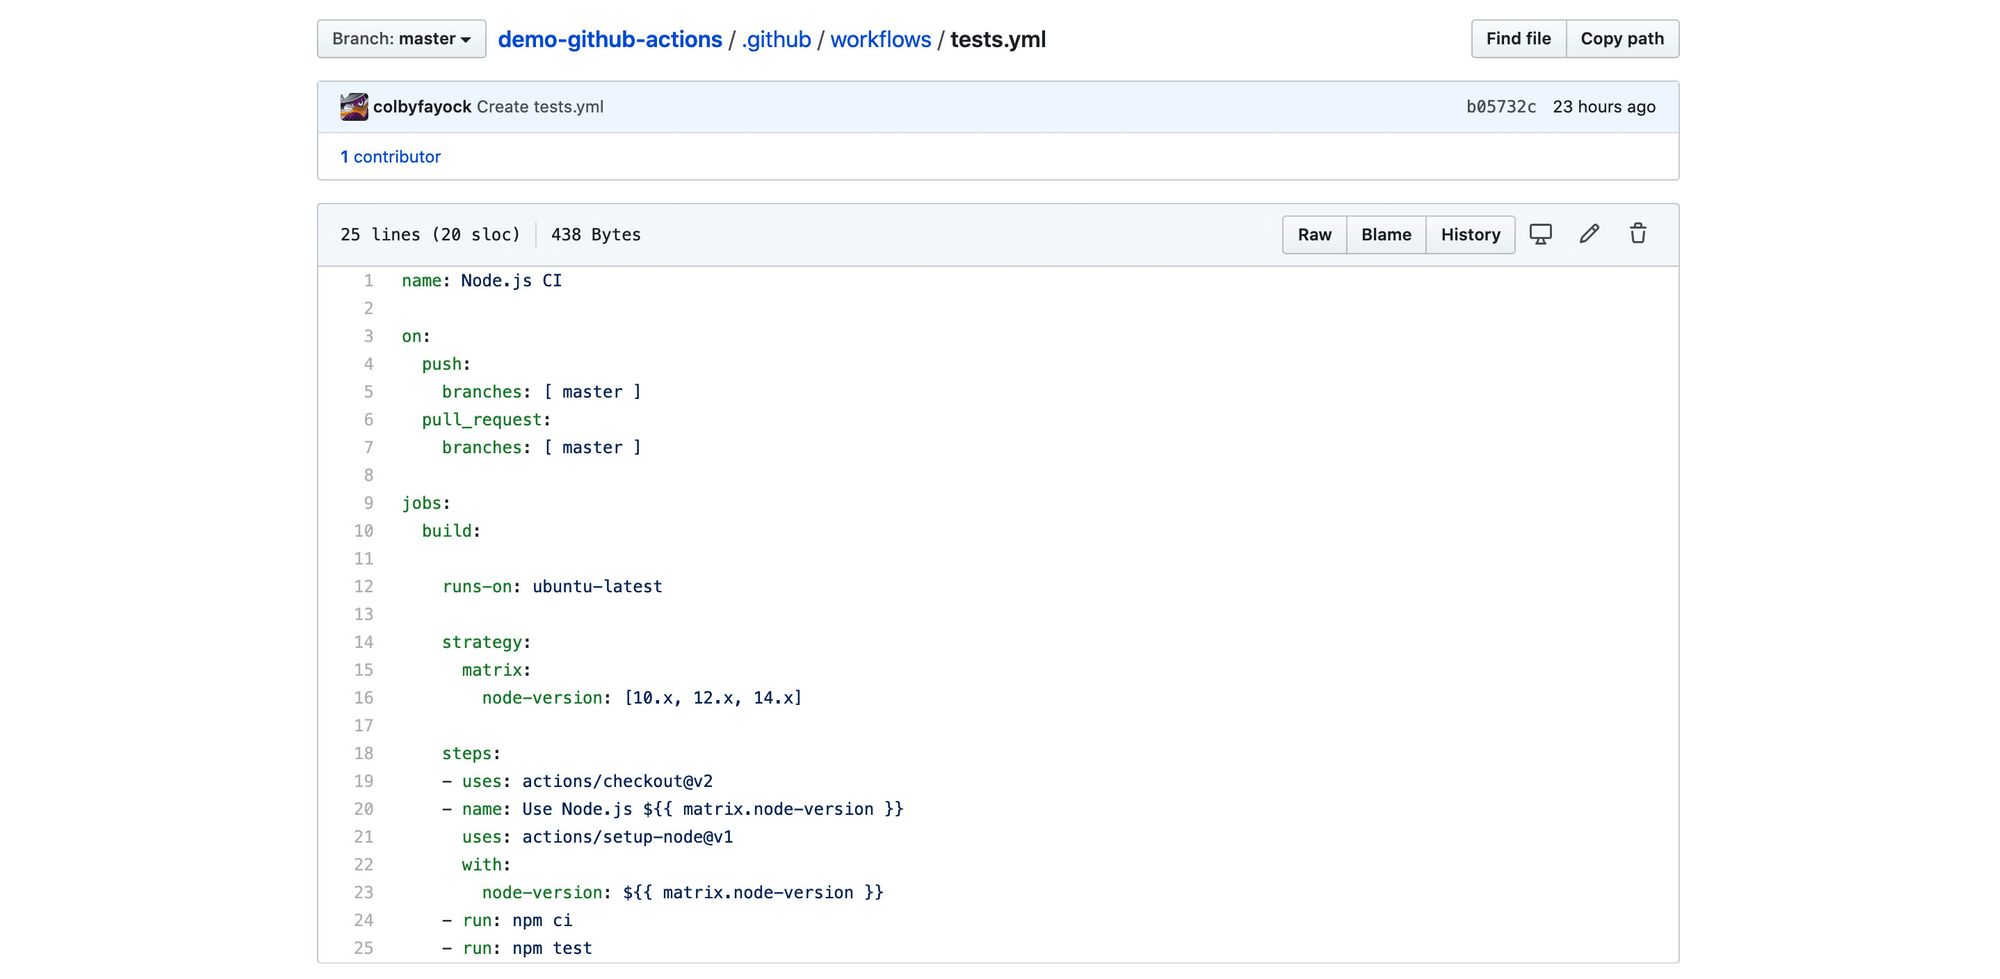
Starting from the top, we specify our name:
name: Node.js CI
This can really be whatever you want. Whatever you pick should help you remember what it is. I’m going to customize this to “Tests” so I know exactly what’s going on.
on:
  push:
    branches: [ master ]
  pull_request:
    branches: [ master ]
The on key is how we specify what events trigger our action. This can be a variety of things like based on time with cron. But here, we’re saying that we want this action to run any time someone pushes commits to master or someone creates a pull request targeting the master branch. We’re not going to make a change here.
jobs:
  build:
    runs-on: ubuntu-latest
This next bit creates a new job called build. Here we’re saying that we want to use the latest version of Ubuntu to run our tests on. Ubuntu is common, so you’ll only want to customize this if you want to run it on a specific environment.
    strategy:
      matrix:
        node-version: [10.x, 12.x, 14.x]
Inside of our job we specify a strategy matrix. This allows us to run the same tests on a few different variations.
In this instance, we’re running the tests on 3 different versions of node to make sure it works on all of them. This is definitely helpful to make sure your code is flexible and future proof, but if you’re building and running your code on a specific node version, you’re safe to change this to only that version.
    steps:
    - uses: actions/checkout@v2
    - name: Use Node.js ${{ matrix.node-version }}
      uses: actions/setup-node@v1
      with:
        node-version: ${{ matrix.node-version }}
    - run: npm ci
    - run: npm run build --if-present
    - run: npm test
Finally, we specify the steps we want our job to run. Breaking this down:
uses: actions/checkout@v2: In order for us to run our code, we need to have it available. This checks out our code on our job environment so we can use it to run tests.uses: actions/setup-node@v1: Since we’re using node with our project, we’ll need it set up on our environment. We’re using this action to do that setup for us for each version we’ve specified in the matrix we configured above.run: npm ci: If you’re not familiar withnpm ci, it’s similar to runningnpm installbut uses thepackage-lock.jsonfile without performing any patch upgrades. So essentially, this installs our dependencies.run: npm run build --if-present:npm run buildruns the build script in our project. The--if-presentflag performs what it sounds like and only runs this command if the build script is present. It doesn’t hurt anything to leave this in as it won’t run without the script, but feel free to remove this as we’re not building the project here.run: npm test: Finally, we runnpm testto run our tests. This uses thetestnpm script set up in ourpackage.jsonfile.
And with that, we’ve made a few tweaks, but our tests should run after we’ve committed those changes and pass like before!

Step 3: Testing that our tests fail and prevent merges
Now that our tests are set up to automatically run, let’s try to break it to see it work.
At this point, you can really do whatever you want to intentionally break the tests, but here’s what I did:
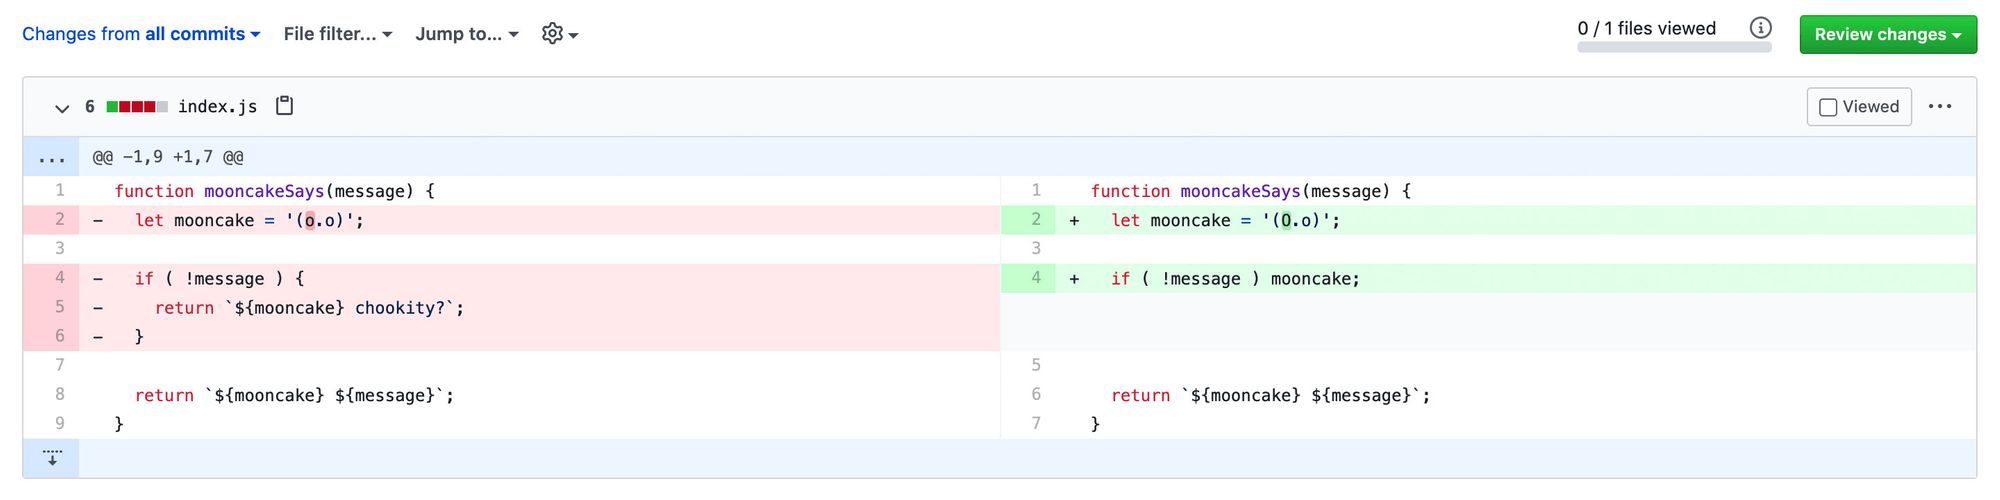
I’m intentionally returning different expected output so that my tests will fail. And they do!
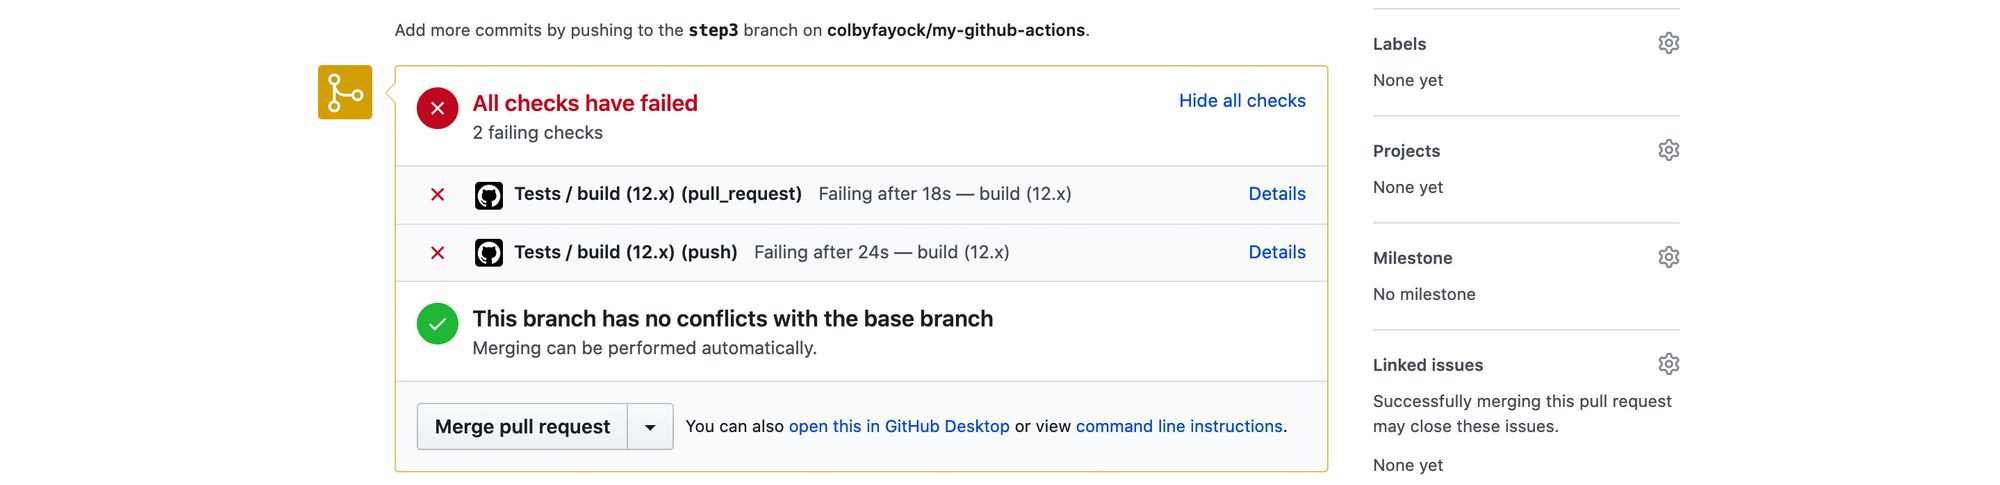
In my new pull request, my new branch breaks the tests, so it tells me my checks have failed. If you noticed though, it’s still green to merge, so how can we prevent merges?
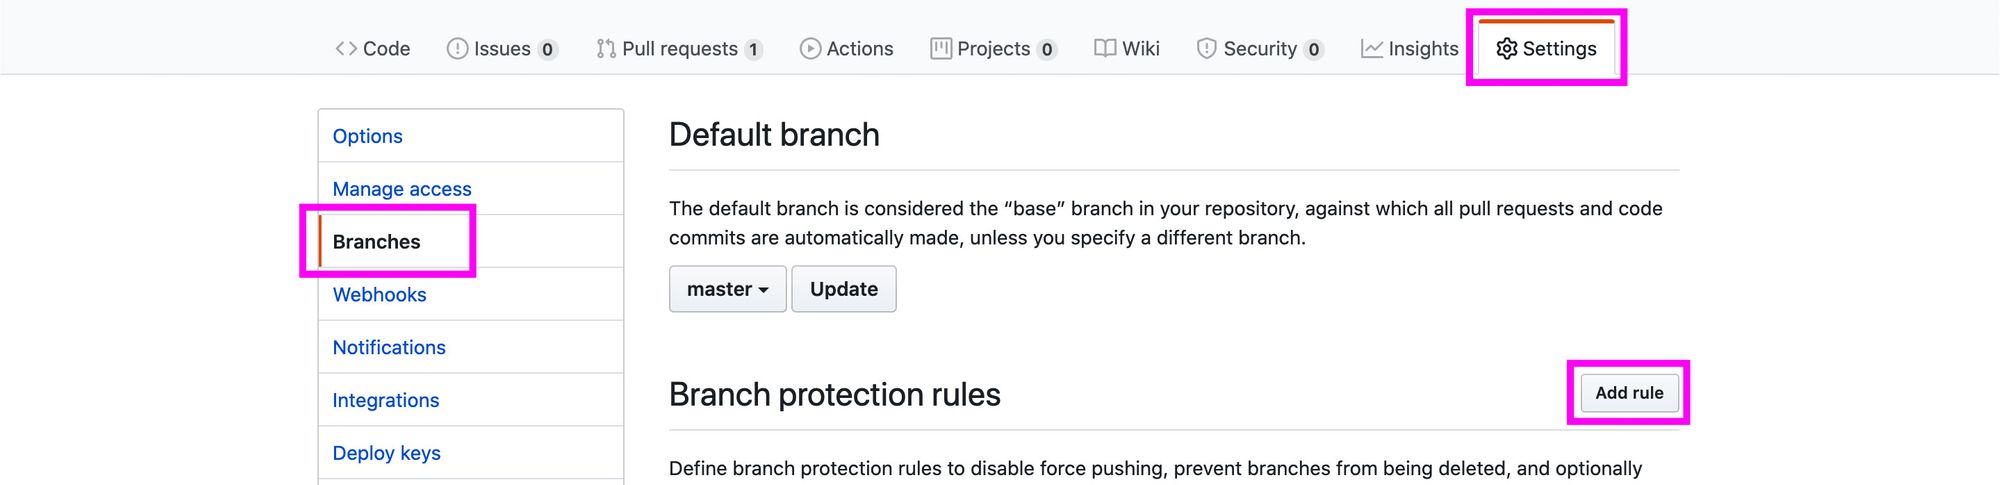
We can prevent pull requests from being merged by setting up a Protected Branch in our project settings.
First, navigate to Settings, then Branches, and click Add rule.
We’ll then want to set the branch name pattern to *, which means all branches, check the Require status checks to pass before merging option, then select all of our different status checks that we’d like to require to pass before merging.
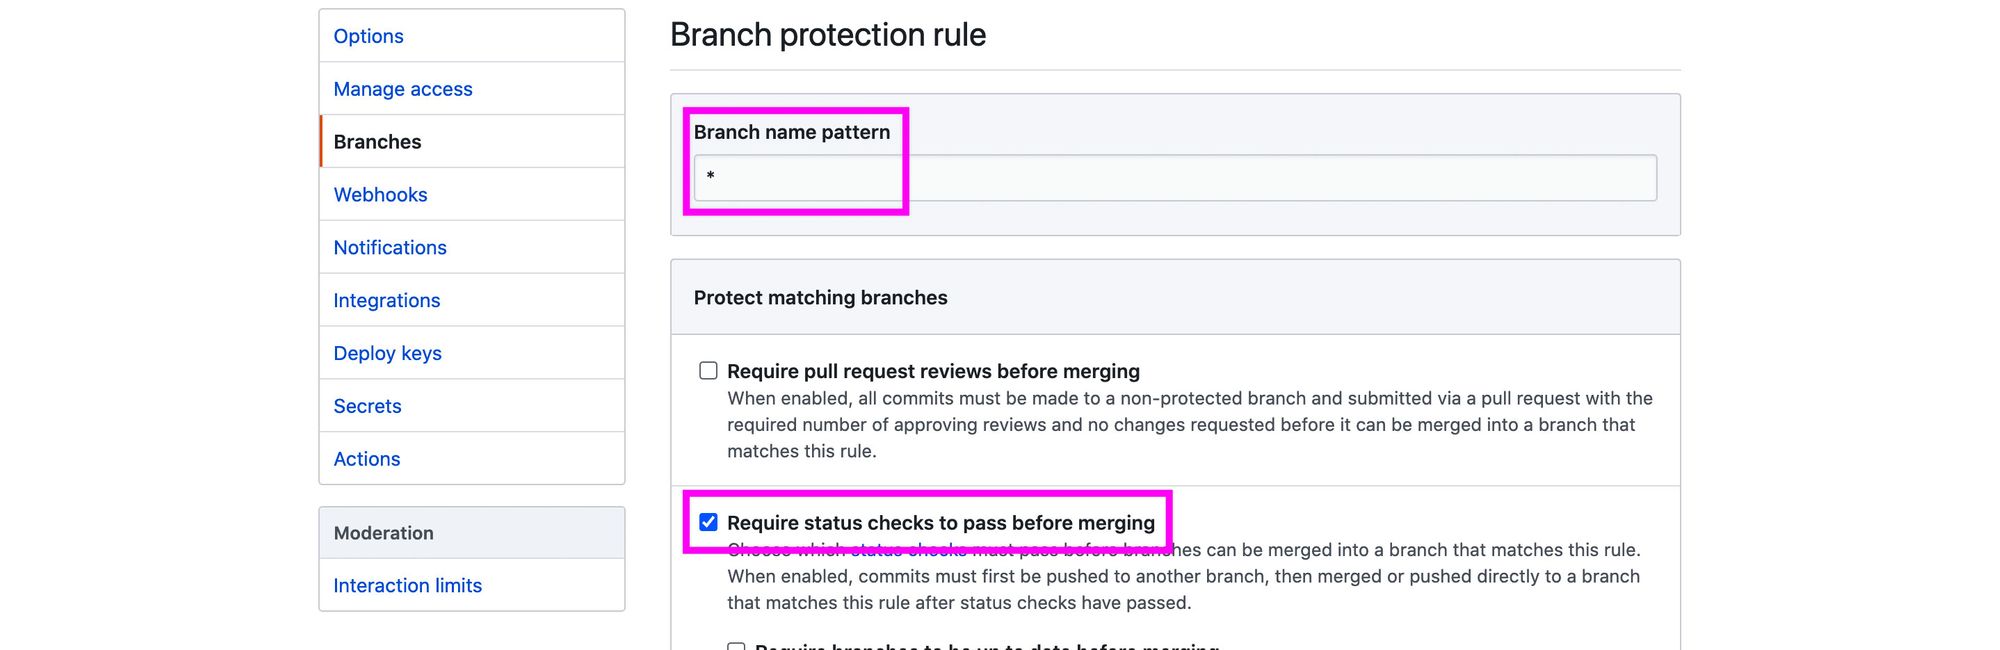
Finally, hit Create at the bottom of the page.
And once you navigate back to the pull request, you’ll notice that the messaging is a bit different and states that we need our statuses to pass before we can merge.
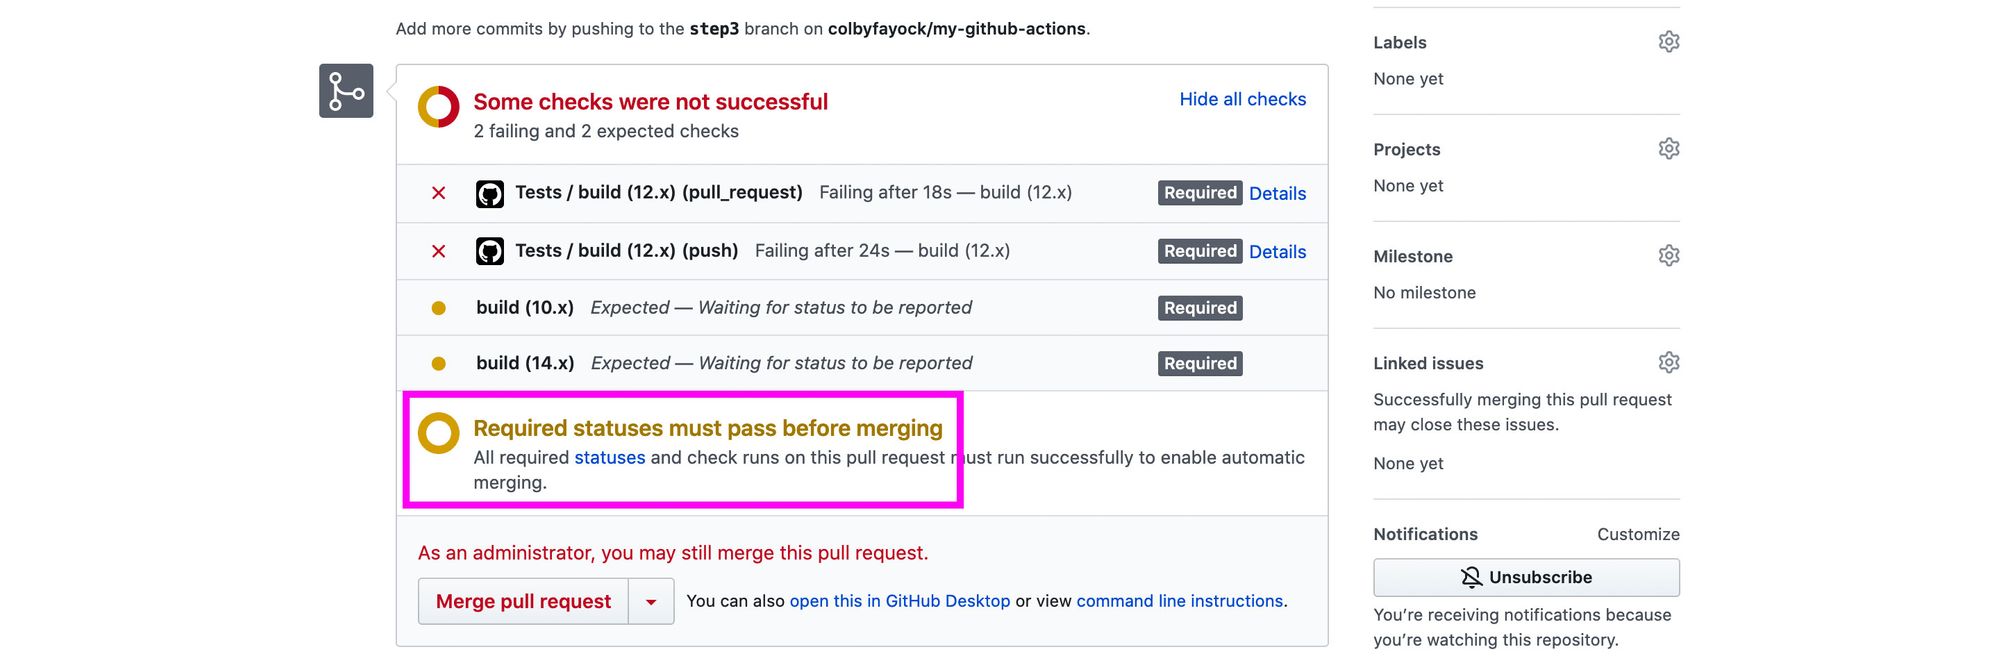
Note: as an administrator of a repository, you’ll still be able to merge, so this technically only prevents non-administrators from merging. But will give you increased messaging if the tests fail.
And with that, we have a new Github Action that runs our tests and prevents pull requests from merging if they fail.
Follow along with the pull request!
Note: we won’t be merging that pull request before continuing to Part 2.
Part 2: Post new pull requests to Slack
Now that we’re preventing merge requests if they’re failing, we want to post a message to our Slack workspace whenever a new pull request is opened up. This will help us keep tabs on our repos right in Slack.
For this part of the guide, you’ll need a Slack workspace that you have permissions to create a new developer app with and the ability to create a new channel for the bot user that will be associated with that app.
Step 1: Setting up Slack
There are a few things we’re going to walk through as we set up Slack for our workflow:
- Create a new app for our workspace
- Assign our bot permissions
- Install our bot to our workspace
- Invite our new bot to our channel
To get started, we’ll create a new app. Head over to the Slack API Apps dashboard. If you already haven’t, log in to your Slack account with the Workspace you’d like to set this up with.
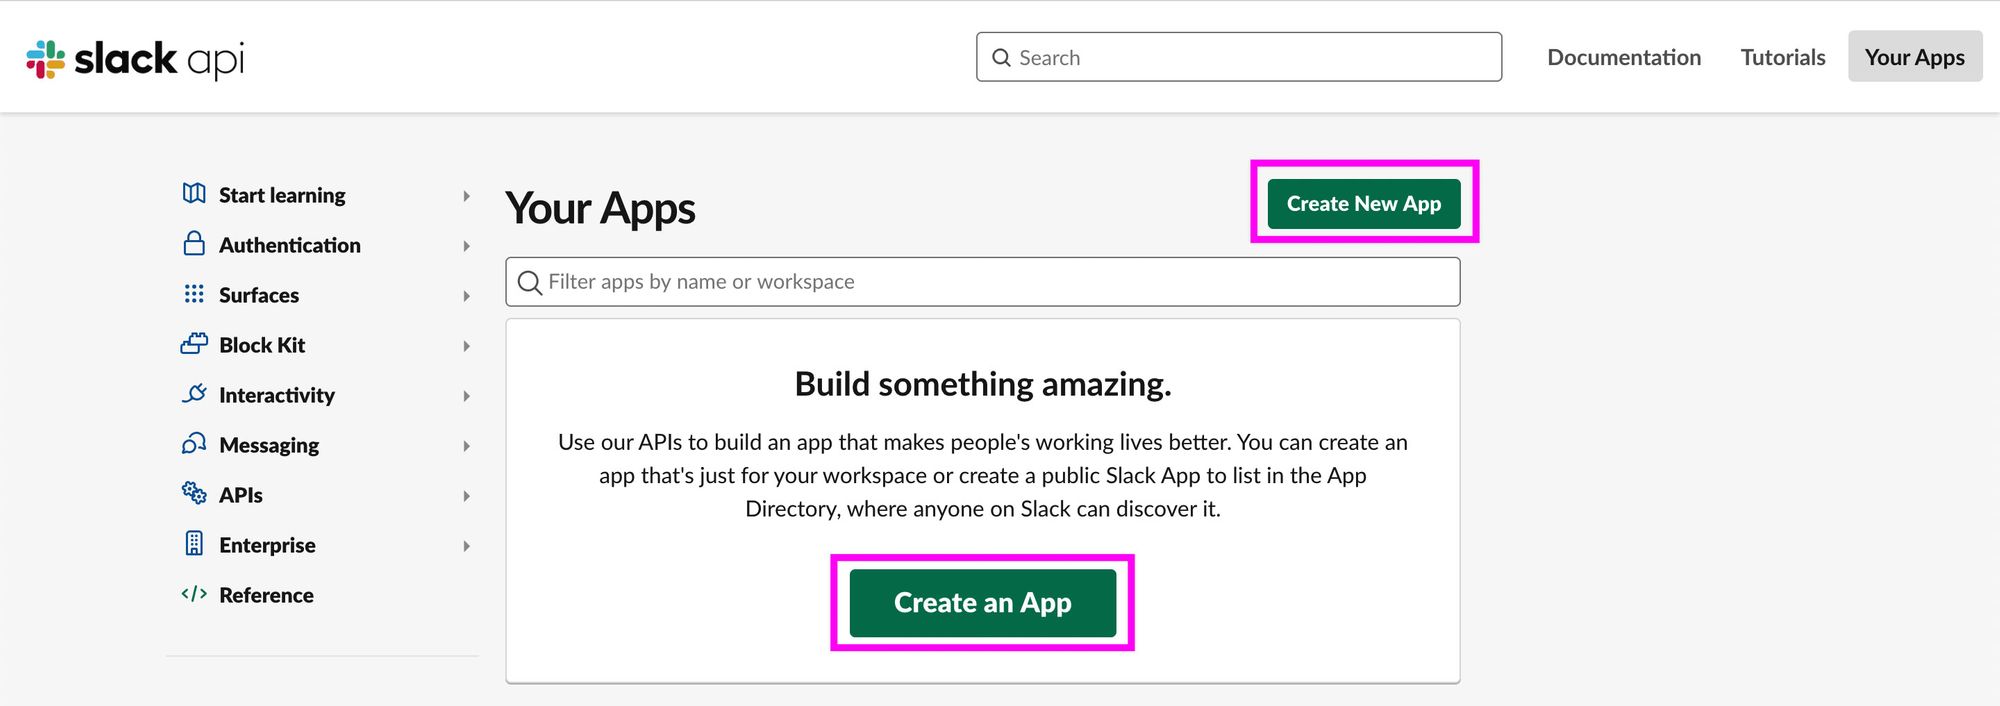
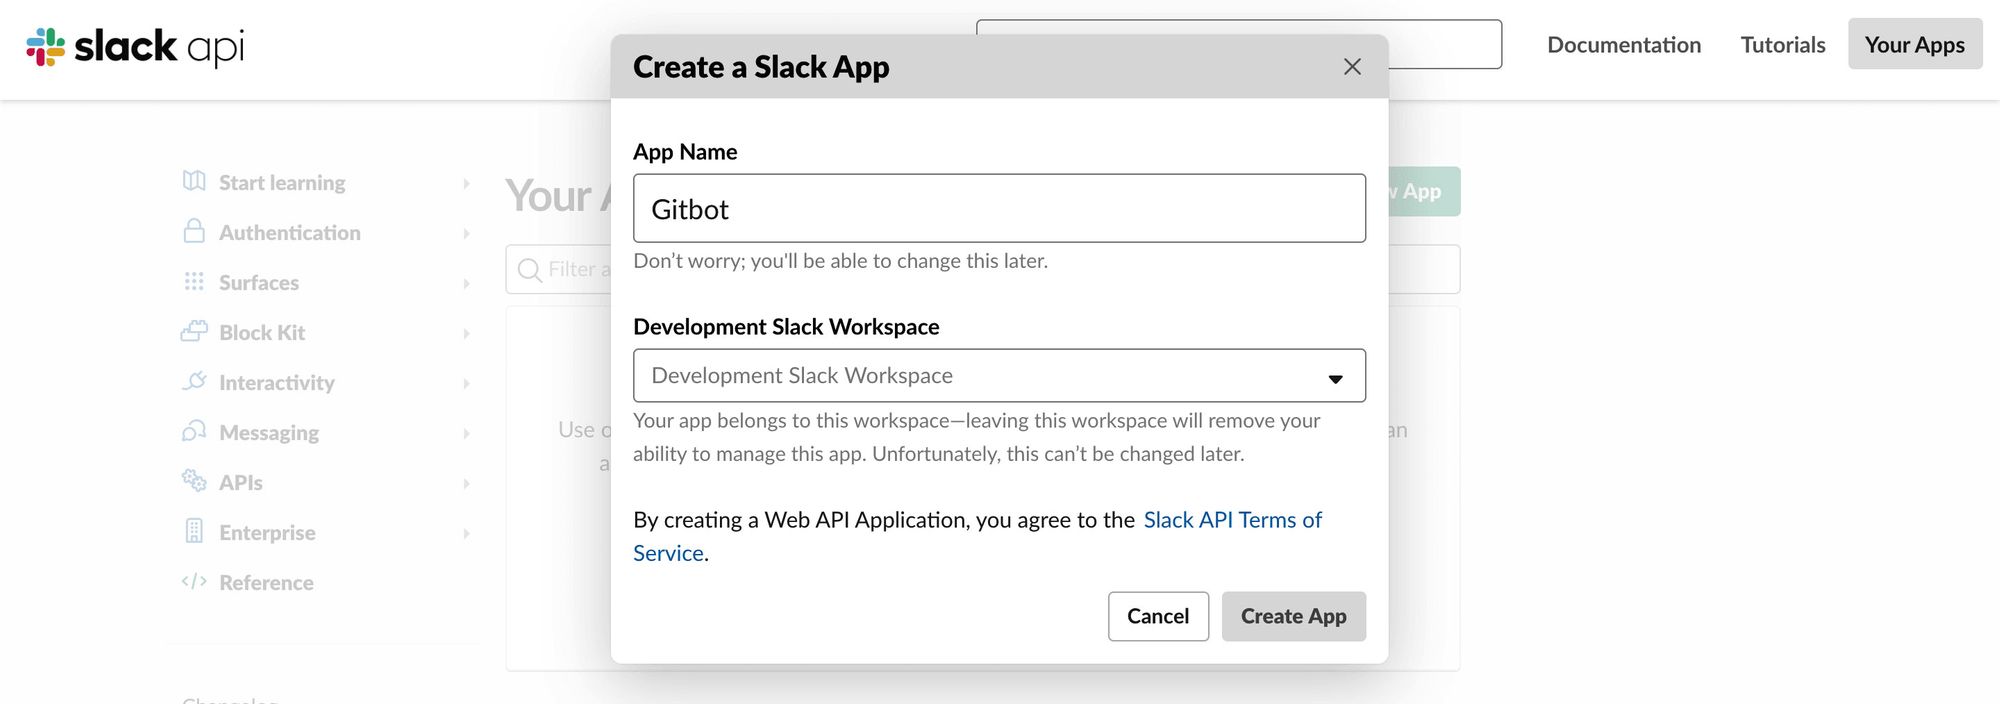
Now, click Create New App where you’ll be prompted to put in a name and select a workspace you want this app to be created for. I’m going to call my app “Gitbot” as the name, but you can choose whatever makes sense for you. Then click Create App.
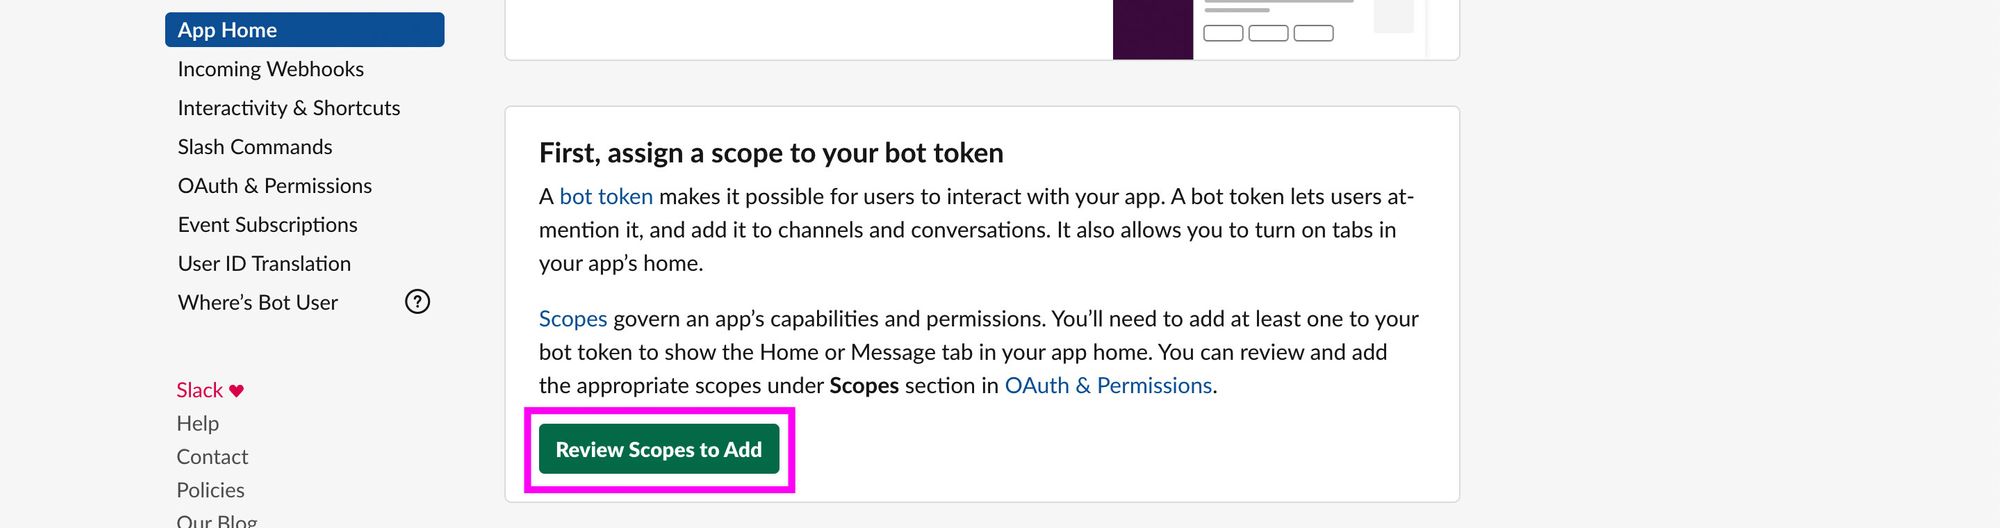
Once created, navigate to the App Home link in the left sidebar. In order to use our bot, we need to assign it OAuth scopes so it has permissions to work in our channel, so select Review Scopes to Add on that page.
Scroll own and you’ll see a Scopes section and under that a Bot Token section. Here, click Add an OAuth Scope. For our bot, we don’t need a ton of permissions, so add the channels:join and chat:write scopes and we should be good to go.

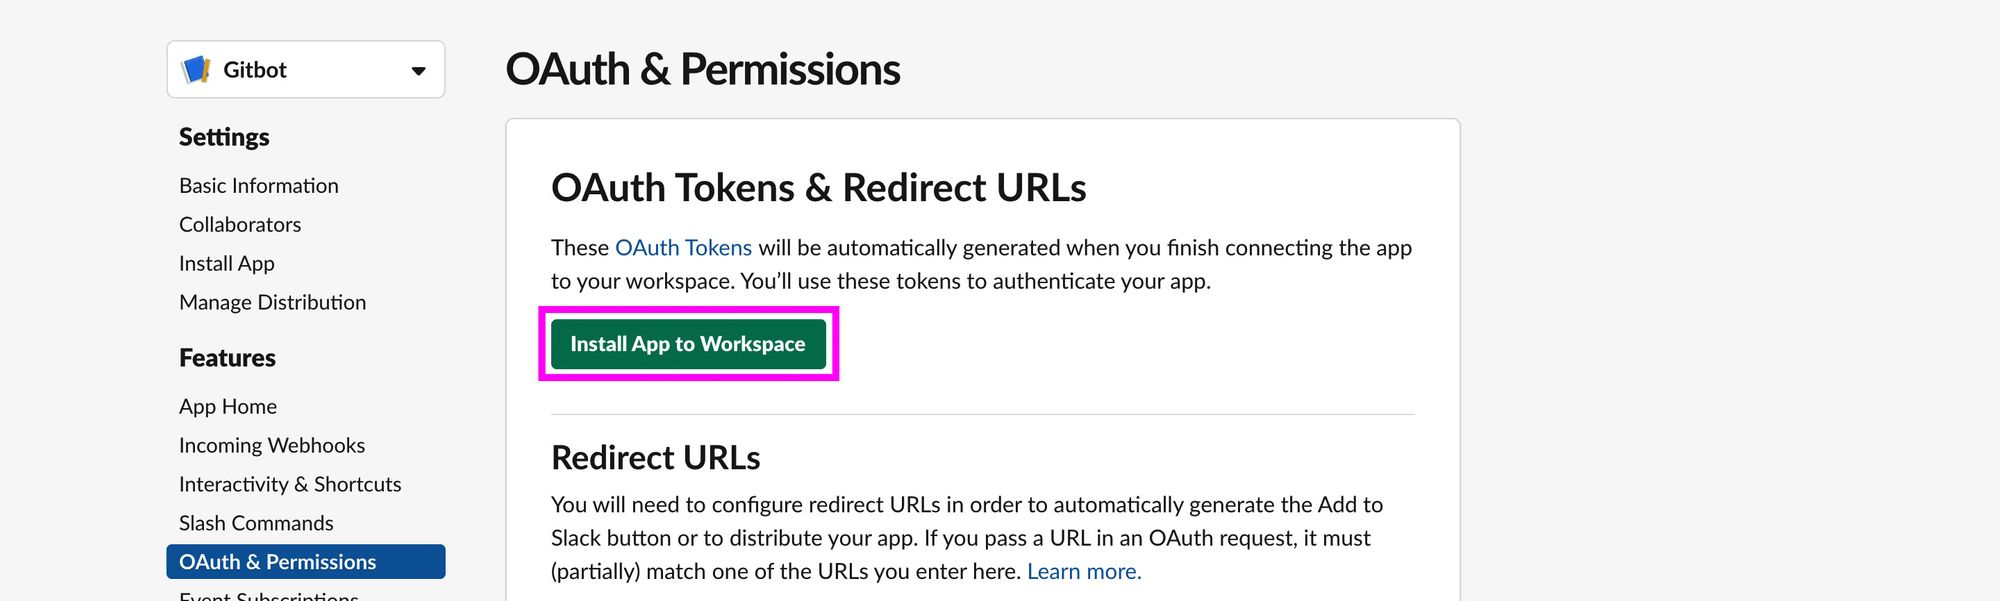
Now that we have our scopes, let’s add our bot to our workspace. Scroll up on that same page to the top and you’ll see a button that says Install App to Workspace.
Once you click this, you’ll be redirected to an authorization page. Here, you can see the scopes we selected for our bot. Next, click Allow.

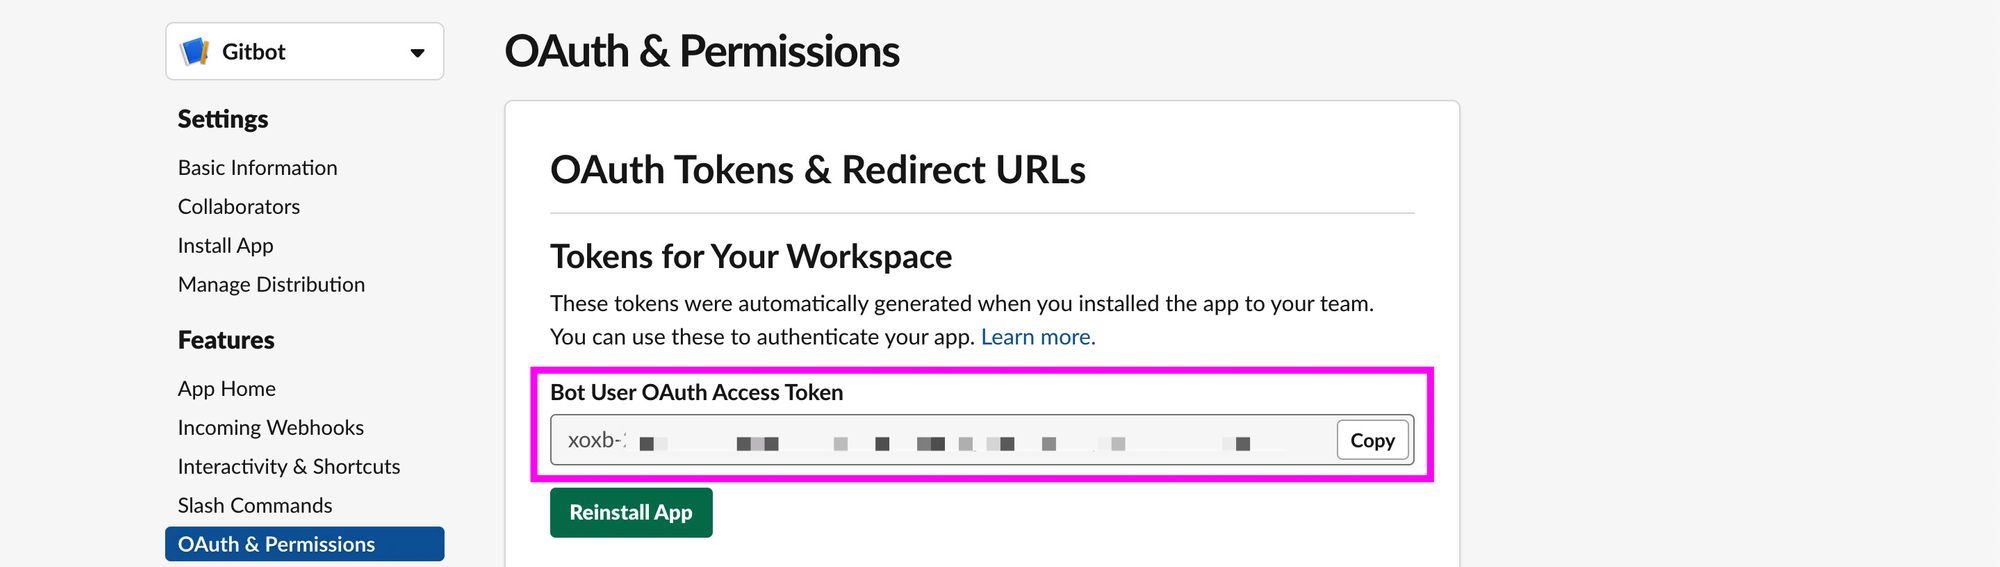
At this point, our Slack bot is ready to go. At the top of the OAuth & Permissions page, you’ll see a Bot User OAuth Access Token. This is what we’ll use when setting up our workflow, so either copy and save this token or remember this location so you know how to find it later.
Note: this token is private – don’t give this out, show it in a screencast, or let anyone see it!
Finally, we need to invite our Slack bot to our channel. If you open up your workspace, you can either use an existing channel or create a new channel for these notifications, but you’ll want to enter the command /invite @[botname] which will invite our bot to our channel.
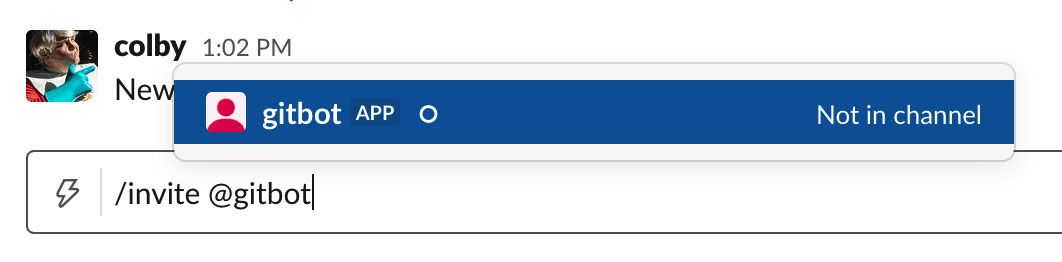
And once added, we’re done with setting up Slack!

Create a Github Action to notify Slack
Our next step will be somewhat similar to when we created our first Github Action. We’ll create a workflow file which we’ll configure to send our notifications.
While we can use our code editors to do this by creating a file in the .github directory, I’m going to use the Github UI.
First, let’s navigate back to our Actions tab in our repository. Once there, select New workflow.

This time, we’re going to start the workflow manually instead of using a pre-made Action. Select set up a workflow yourself at the top.

Once the new page loads, you’ll be dropped in to a new template where we can start working. Here’s what our new workflow will look like:
name: Slack Notifications

on:
  pull_request:
    branches: [ master ]

jobs:
  notifySlack:

    runs-on: ubuntu-latest

    steps:
    - name: Notify slack
      env:
        SLACK_BOT_TOKEN: ${{ secrets.SLACK_BOT_TOKEN }}
      uses: abinoda/slack-action@master
      with:
        args: '{\"channel\":\"[Channel ID]\",\"blocks\":[{\"type\":\"section\",\"text\":{\"type\":\"mrkdwn\",\"text\":\"*Pull Request:* ${{ github.event.pull_request.title }}\"}},{\"type\":\"section\",\"text\":{\"type\":\"mrkdwn\",\"text\":\"*Who?:* ${{ github.event.pull_request.user.login }}\n*Request State:* ${{ github.event.pull_request.state }}\"}},{\"type\":\"section\",\"text\":{\"type\":\"mrkdwn\",\"text\":\"<${{ github.event.pull_request.html_url }}|View Pull Request>\"}}]}'
So what’s happening in the above?
name: we’re setting a friendly name for our workflowon: we want our workflow to trigger when there’s a pull request is created that targets ourmasterbranchjobs: we’re creating a new job callednotifySlackjobs.notifySlack.runs-on: we want our job to run on a basic setup of the latest Unbuntujobs.notifySlack.steps: we really only have one step here – we’re using a pre-existing Github Action called Slack Action and we’re configuring it to publish a notification to our Slack
There are two points here we’ll need to pay attention to, the env.SLACK_BOT_TOKEN and the with.args.
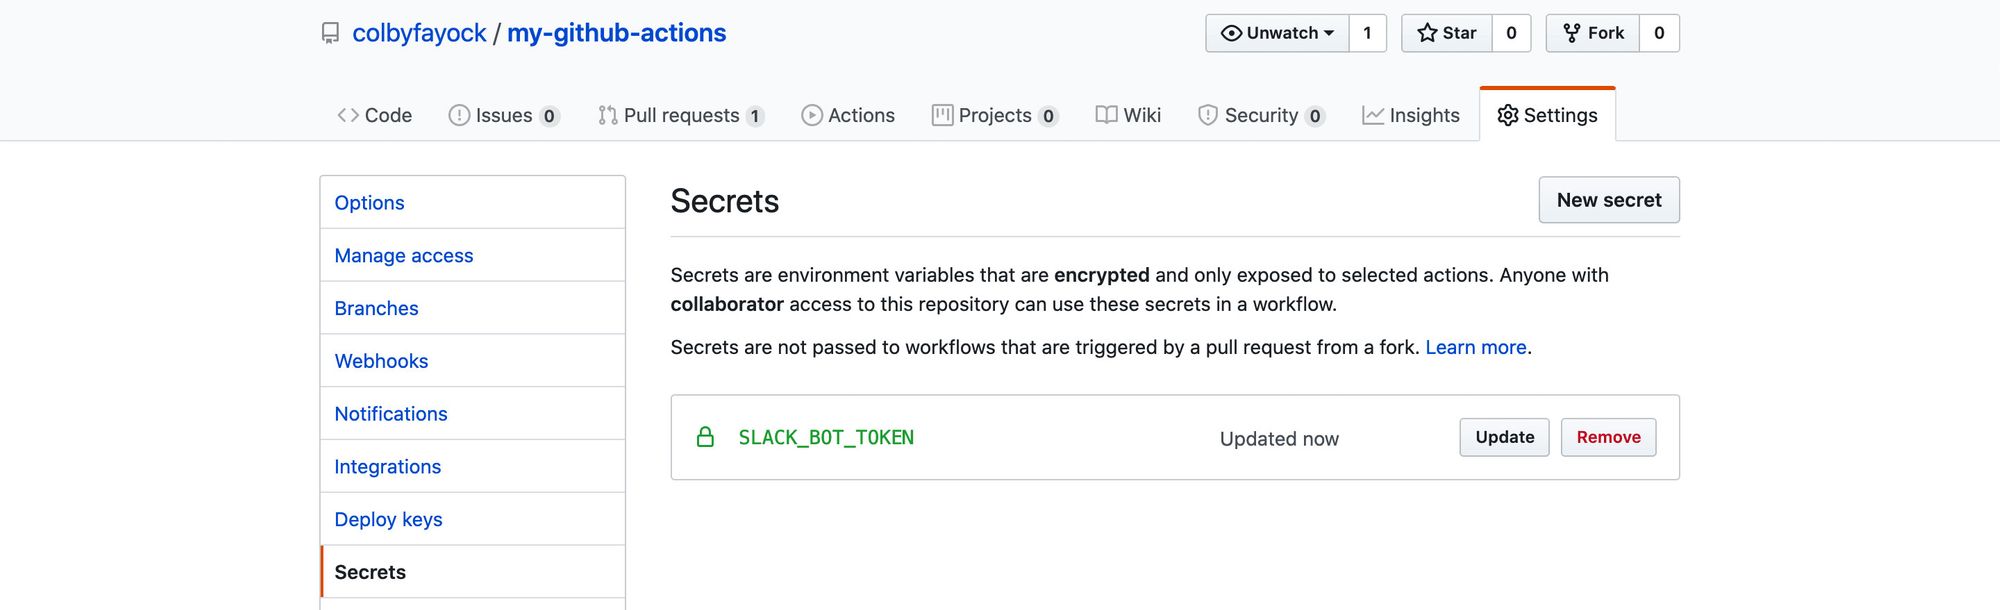
In order for Github to communicate with Slack, we’ll need a token. This is what we’re setting in env.SLACK_BOT_TOKEN. We generated this token in the first step. Now that we’ll be using this in our workflow configuration, we’ll need to add it as a Git Secret in our project.
The with.args property is what we use to configure the payload to the Slack API that includes the channel ID (channel) and our actual message (blocks).
The payload in the arguments is stringified and escaped. For example, when expanded it looks like this:
{
  "channel": "[Channel ID]",
  "blocks": [{
    "type": "section",
    "text": {
      "type": "mrkdwn",
      "text": "*Pull Request:* ${{ github.event.pull_request.title }}"
    }
  }, {
    "type": "section",
    "text": {
      "type": "mrkdwn",
      "text": "*Who?:*n${{ github.event.pull_request.user.login }}n*State:*n${{ github.event.pull_request.state }}"
    }
  }, {
    "type": "section",
    "text": {
      "type": "mrkdwn",
      "text": "<${{ github.event.pull_request._links.html.href }}|View Pull Request>"
    }
  }]
}
Note: this is just to show what the content looks like, we need to use the original file with the stringified and escaped argument.
Back to our configuration file, the first thing we set is our channel ID. To find our channel ID, you’ll need to use the Slack web interface. Once you open Slack in your browser, you want to find your channel ID in the URL:
https://app.slack.com/client/[workspace ID]/[channel ID]
With that channel ID, you can modify our workflow configuration and replace [Channel ID] with that ID:
with:
  args: '{\"channel\":\"C014RMKG6H2\",...
The rest of the arguments property is how we set up our message. It includes variables from the Github event that we use to customize our message.
We won’t go into tweaking that here, as what we already have will send a basic pull request message, but you can test out and build your own payload with Slack’s Block Kit Builder.
Test out our Slack workflow
So now we have our workflow configured with our Slack app, finally we’re ready to use our bot!
For this part, all we need to do is create a new pull request with any change we want. To test this out, I simply created a new branch where I added a sentence to the README.md file.
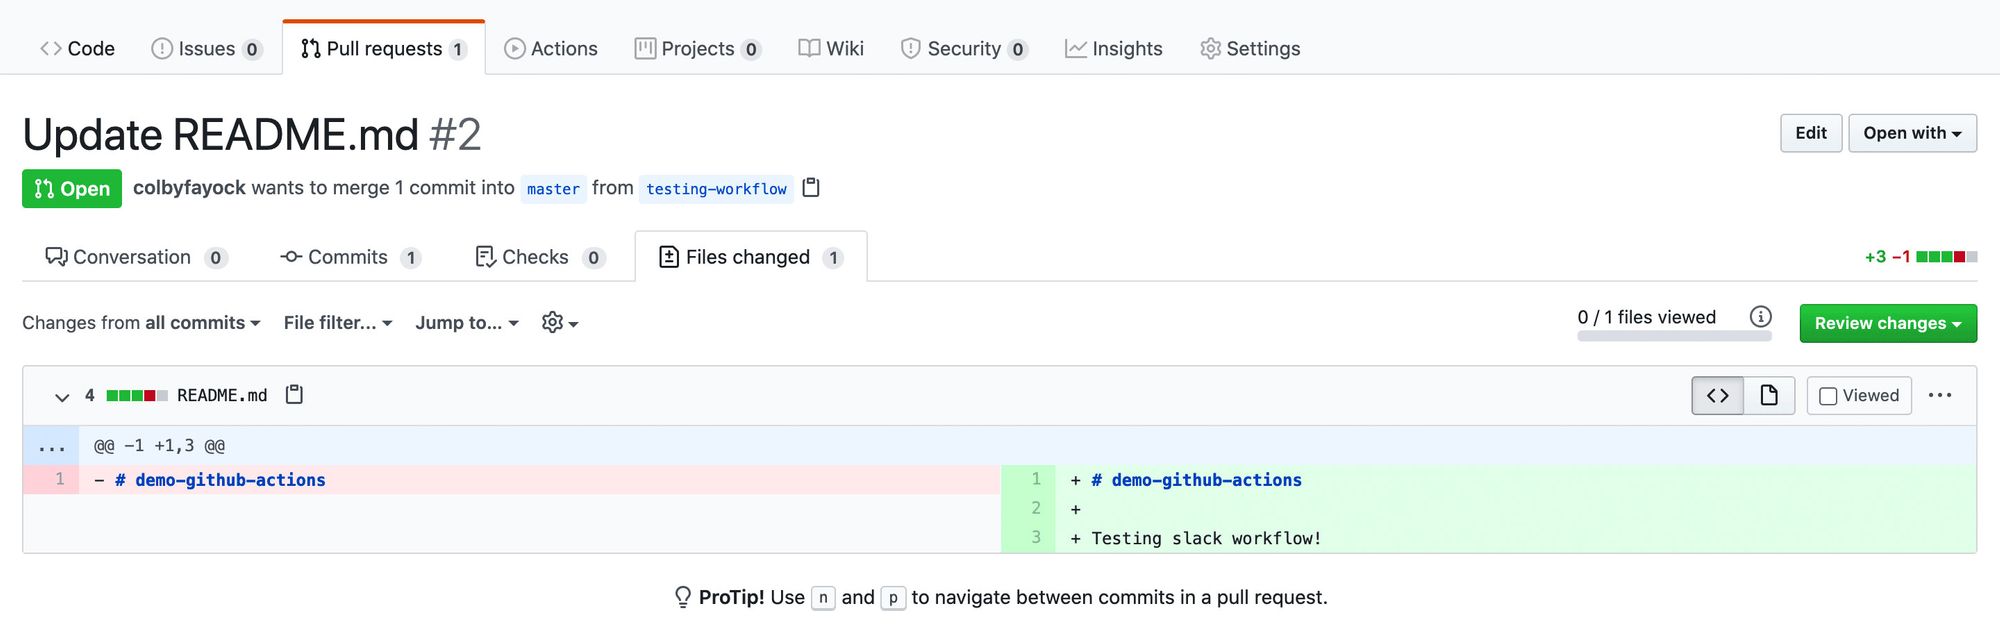
Once you create that pull request, similar to our tests workflow, Github will run our Slack workflow! You can see this running in the Actions tab just like before.
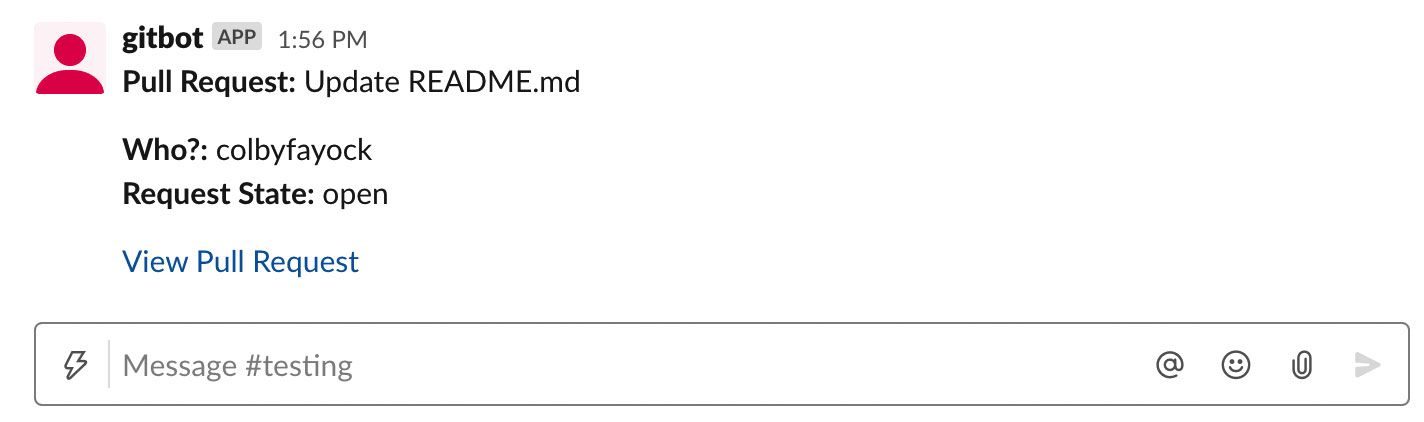
As long as you set everything up correctly, once the workflow runs, you should now have a new message in Slack from your new bot.
Note: we won’t be merging that pull request in.
What else can we do?
Customize your Slack notifications
The message I put together is simple. It tells us who created the pull request and gives us a link to it.
To customize the formatting and messaging, you can use the Github Block Kit Builder to create your own.
If you’d like to include additional details like the variables I used for the pull request, you can make use of Github’s available contexts. This lets you pull information about the environment and the job to customize your message.
I couldn’t seem to find any sample payloads, so here’s an example of a sample github context payload you would expect in the event.
More Github actions
With our ability to create new custom workflows, that’s not a lot we can’t automate. Github even has a marketplace where you can browse around for one.
If you’re feeling like taking it a step further, you can even create your own! This lets you set up scripts to configure a workflow to perform whatever tasks you need for your project.