

What is OpenAI?
OpenAI is a currently non-profit organization focused on AI research.
They’ve made huge splashes in the tech community with it’s popular releases like DALL-E which gives the ability to create an image from some basic text and GPT which let’s people have real conversations with human-like responses based on language models.
They’re rapidly making progress, constantly releasing new versions of the models, which make huge strides each time.
AI? Is the future really here?
Pretty much! While it’s likely we’re in a little bit of a “hype wave”, some of the technology we’re seeing is gamechanging.
In my previous article, I explored using GitHub Copilot CLI which let’s you generate commands using AI in the terminal. For a terminal noob like me, that’s incredibly helpful.
But this extends to things like accessibility where it gives us more tools like voice to text to help those i neeed or other industries that can use features like the new ChatGPT Plugins to bring realworld problem-solving into a simple chat interface.
Again, while there’s certainly some hype, I’m excited about the future!
What are we going to build?
We’re going to build a Pokémon generator that creates a new, custom Pokémon using AI.
We’ll do this by using the OpenAI SDK in a Next.js serverless function to make our requests.
Once created, we’ll add the Pokémon data to a Card template that we’ll get as part of a Next.js Starter template.
Step 0: Creating a new Next.js app
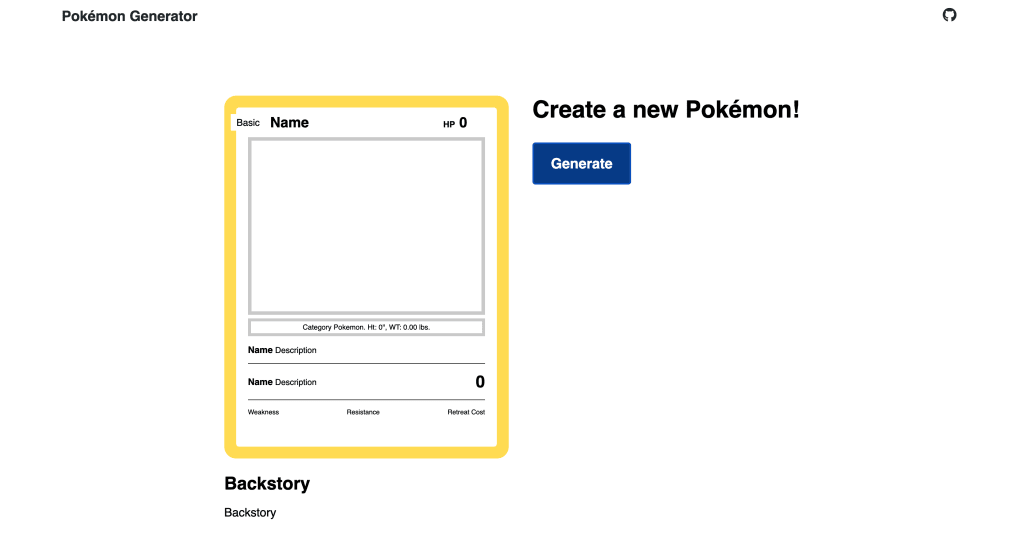
If you want to follow along with my example, let’s start off by creating a new Next.js app from a Starter template I created that will give us a basic Pokémon card UI.
In your terminal run:
npx create-next-app -e https://github.com/colbyfayock/demo-pokemon-generator-starter my-pokemon-generatorOnce complete, navigate to your new directory
cd my-pokemon-generatorThen start your development server with:
npm run devYour server will spin up at http://localhost:3000 and you should be ready to go with your new Next.js app!
Step 1: Installing and configuring the OpenAI SDK
Digging in, we’ll start off by installing the OpenAI SDK.
In your terminal, install openai with:
npm install openaiTo use the OpenAI SDK, we’ll need an API key that is connected to our account.
If you don’t already have an account, head over to openai.com/product and click Get Started to sign up, or go directly to the signup page, where you can create your free account.
Note: If this is the first time using OpenAI (or you haven’t used much), you should have access to a limited trial. If that’s expired, you’ll need to enter your billing information. For pricing perspective, playing around and setting up the demo for this cost me less than $0.50 USD.
Once in your account, navigate to API Keys by either selecting it from the left sidebar or by clicking your profile avatar on the top right of the navigation.
Let’s create a new key so that we can store it to use in our project.
Note: this is a secret key, be sure not to commit this key openly or share it with anyone or it will get abused.
Inside of your project, create a new file .env.local and inside add:
OPENAI_API_KEY="<Your API Key>"In the next step, we’ll use this key for initializing the SDK!
Step 2: Generating a new Pokémon with the ChatGPT API in a Next.js serverless function
Starting off, we want to build a profile for our Pokémon.
To do that, we’re going to use ChatGPT API, particularly the gpt-3.5-turbo model, inside of a Next.js serverless function.
Note: Before we dive in, the ChatGPT API takes a little long to process a request. This combined with the standard Free Tier timeout of 10s from tools like Vercel and Netlify means the API may fail when deployed. You can use Edge Functions which have no limit or upgrade to the Pro plan to get higher limits.
Create a new file inside the directory src/pages/api/pokemon called create.js.
Inside src/pages/api/pokemon/create.js add:
const { Configuration, OpenAIApi } = require('openai');

const configuration = new Configuration({
  apiKey: process.env.OPENAI_API_KEY,
});

const openai = new OpenAIApi(configuration);

export default async function handler(req, res) {
  res.status(200).json({
    attributes: {}
  })
}
Here we’re:
- Scaffolding a new async API endpoint
- Importing Configuration and OpenAIApi from the OpenAI SDK
- Creating a new configuration with our API Key
- Creating a new OpenAIApi instance with that configuration
- Returning an empty object for attributes
We can test out our new endpoint by visiting it in our browser at http://localhost:3000/api/pokemon/create.
Tip: We can visit it in the browser because we’re only using it as a GET request for now. If you start to accept a request body, you would no longer be able to do so.
With that OpenAI configuration, we really have access to any model we specify, so we can dive right in.
Add the following above the response inside of the function to use the createChatCompletion method:
const results = await openai.createChatCompletion({
  model: 'gpt-3.5-turbo',
  messages: [],
});
This whole thing really revolves around this simple method.
Here we’re:
- Invoking createChatCompletion
- Stating we want to use the model gpt-3.5-turbo
- Currently sending an empty message
If we try testing this, which don’t bother, we’ll get an error. The whole point is we want to pass in a message to tell or ask ChatGPT what to do.
This is the prompt of the request, where in our case, we want to generate a new Pokémon.
Let’s first try something like this:
Create a new Pokemon characterWhere in the code we would want to add:
messages: [{
  role: 'user',
  content: 'Create a new Pokemon character'
}]
Here we’re defining our message as a user message with the content of the message.
If we add a console log to view the results at:
console.log(results.data.choices);We’ll be able to see in the terminal when hitting out endpoint that we start to see some real results!
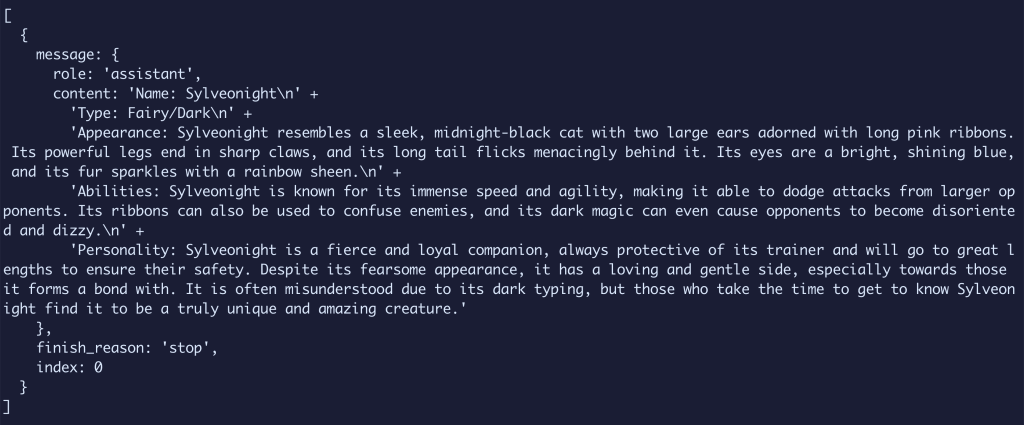
Now before we move on, let’s just take a moment to think about how little code we required and how little of a prompt we needed to gather that bit of information. It blows my mind!
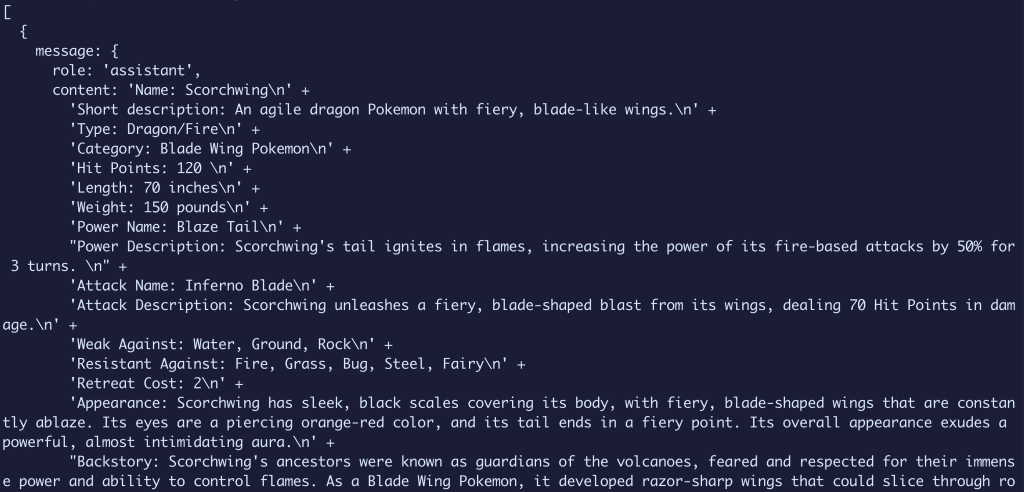
But moving on, we have a particular set of information we need for each Pokémon.
So let’s update our prompt to include bullet points for each one:
messages: [{
  role: 'user',
  content: `
    Create a new Pokemon character with the following unique attributes:
    - Name
    - Short description less than 80 characters
    - The type of Pokemon
    - The category of Pokemon it is
    - Number of Hit Points or health
    - The Pokemon's length in inches
    - The Pokemon's weight in pounds
    - The Pokemon's power name and description
    - The Pokemon's attack name with description and Hit Points it would cause in damage
    - The type of Pokemon it is weak against
    - The type of Pokemon it is resistant against
    - The retreat cost of the Pokemon
    - The Pokemon's appearance in less than 600 characters
    - The Pokemon's backstory in less than 600 characters
  `
}]
And as you’d expect, we get our results.
But there’s one issue with this, I don’t want to have to write a RegEx to parse all of this (or ask ChatGPT to write one for me).
Instead, we can simply tell ChatGPT we want the response formatted as JSON!
Format the response in the following JSON objectmessages: [{
  role: 'user',
  content: `
    Create a new Pokemon character with the following unique attributes:
    - Name
    - Short description less than 80 characters
    - The type of Pokemon
    - The category of Pokemon it is
    - Number of Hit Points or health
    - The Pokemon's length in inches
    - The Pokemon's weight in pounds
    - The Pokemon's power name and description
    - The Pokemon's attack name with description and Hit Points it would cause in damage
    - The type of Pokemon it is weak against
    - The type of Pokemon it is resistant against
    - The retreat cost of the Pokemon
    - The Pokemon's appearance in less than 600 characters
    - The Pokemon's backstory in less than 600 characters
    Format the response as a JSON object
  `
}]
And our results.
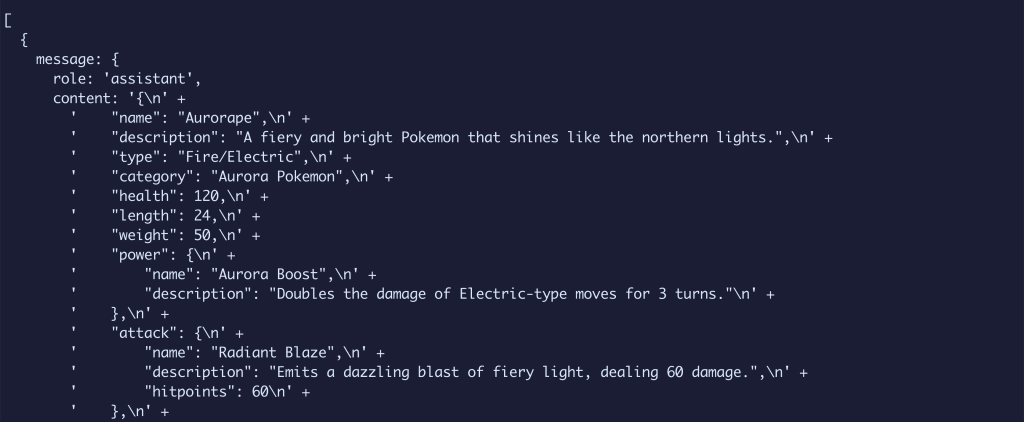
We’ll notice that it’s being return as a string, as the content field is a stirng, but we can easily parse that in our endpoint.
Now as one last thing, if you make this request several times, you might notice you get inconsistent keys, which is bad for predicting the data.
What we can do is even tell ChatGPT exactly how we want our data formatted, such as passing in an example object.
I went ahead and prepared this bit for you, so first import the sample data:
const { POKEMON_ATTRIBUTES } = require('@/data/pokemon');Then update the prompt one last time:
messages: [{
  role: 'user',
  content: `
    Create a new Pokemon character with the following unique attributes:
    - Name
    - Short description less than 80 characters
    - The type of Pokemon
    - The category of Pokemon it is
    - Number of Hit Points or health
    - The Pokemon's length in inches
    - The Pokemon's weight in pounds
    - The Pokemon's power name and description
    - The Pokemon's attack name with description and Hit Points it would cause in damage
    - The type of Pokemon it is weak against
    - The type of Pokemon it is resistant against
    - The retreat cost of the Pokemon
    - The Pokemon's appearance in less than 600 characters
    - The Pokemon's backstory in less than 600 characters
    Format the response in the following JSON object ${JSON.stringify(POKEMON_ATTRIBUTES)}.
  `
}]
And now every time we request our Pokémon, we’ll get our data consistently!
Finally we want to return this data to the endpoint so we can use it in the app.
We’re only going to get one “choice” from our results, so we can hard code the first item in the array, and return our attributes parsed:
const attributes = JSON.parse(completion.data.choices[0].message.content);
res.status(200).json({
attributes
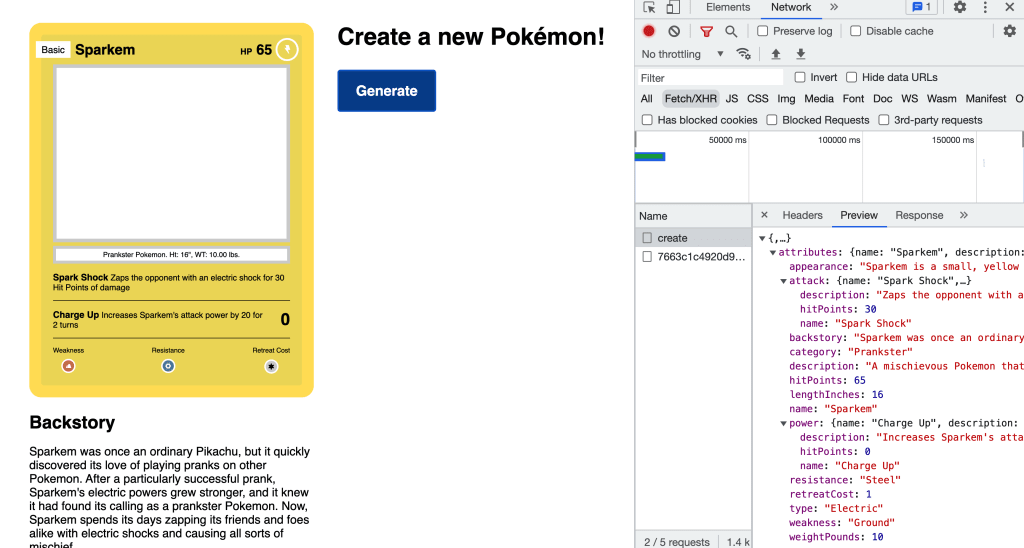
});And now when we hit our endpoint in the browser, we’ll see our attributes returned and ready to use!
Step 3: Generating a new Pokémon card on button click
Heading to the UI, let’s get this thing working so we can see the results on our Pokémon card.
Inside src/pages/index.js, we want to add a click event handler so that any time the Generate button is clicked, we make a request to our endpoint, and fill out the card.
On the Button component (which is just a standard button wrapped), add an onClick handler with:
<Button onClick={handleOnGenerate}>Generate</Button>Next let’s define that handleOnGenerate function at the top of our page component:
function handleOnGenerate(e) {
  e.preventDefault();
}
Here we’re simply defining the function and preventing the default actions from taking place in the browser on click.
Now, we want to kick off the process of creating our new Pokémon.
First we need a mechanism to store that information.
Let’s import the useState hook with:
import { useState } from 'react';Then set up a new instance of state:
const [attributes, setAttributes] = useState();And then, let’s actually set up our generation request:
setAttributes(undefined);
const data = await fetch('/api/pokemon/create/attributes').then(res => res.json());
setAttributes(data.attributes);
Here we’re:
- First resetting the attributes state in the event we generate multiple
- Use Fetch to make a request to our create endpoint
- Set our results into state
At this point you can try to log out the results, but I’m moving right along to wiring this up to the existing UI.
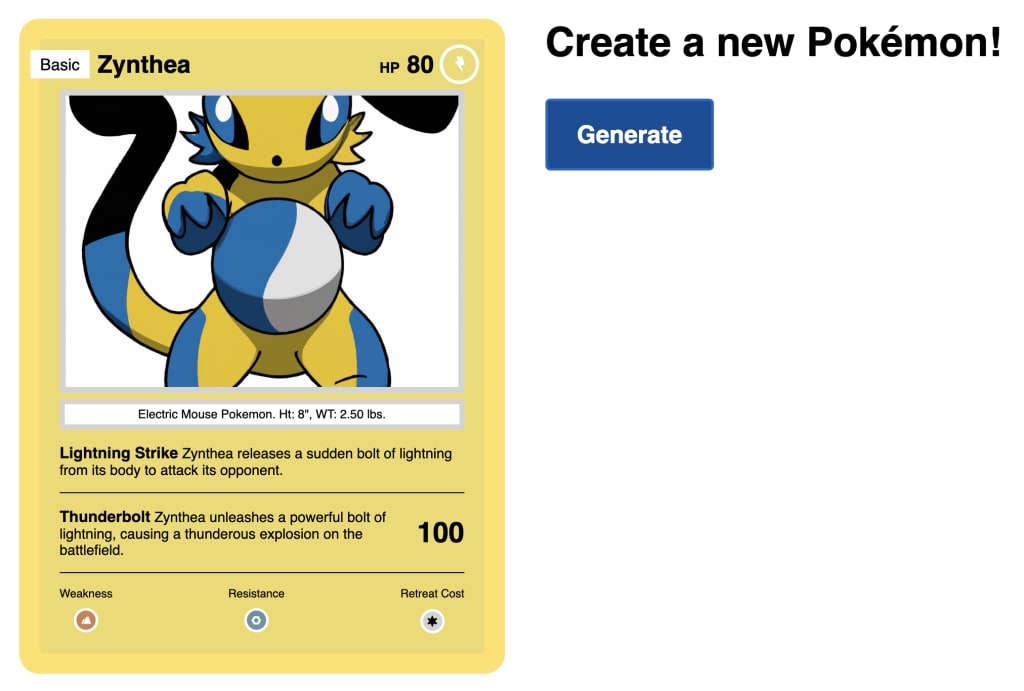
The existing Card component takes in a prop of attributes which knows exactly what this data looks like, so update Card to:
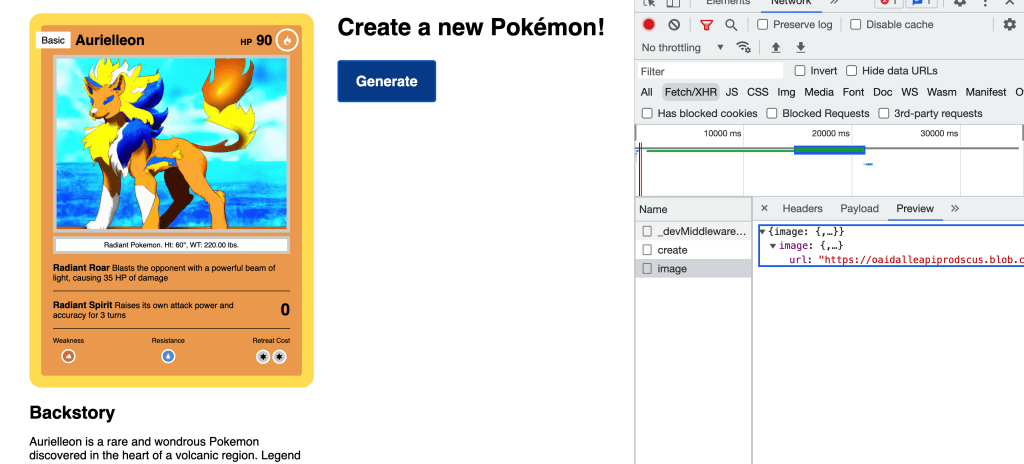
<Card attributes={attributes} />And now, if you click the Generate button and wait a few seconds (be patient, check the Network tab in your developer tools!), we’ll see our card UI populate with information and even change color based on the type!
Note: If the card didn’t populate right, you may have not added the
POKEMON_ATTRIBUTESobject into the prompt in Step 2.
We can even update the backstory at the bottom with:
<h2>Backstory</h2>
{attributes?.backstory && <p>{ attributes.backstory }</p>}
Which gives us a new look at our new Pokémon!
Next, we’ll add a new endpoint to generate an image!
Step 4: Generating a Pokémon’s image with OpenAI DALL-E
Creating our image endpoint will look pretty similar to the create endpoint only one difference, we’re going to update the prompt based on the previous step.
But we’re not going to jump right to that, first, let’s scaffold our new endpoint.
Create a new file image.js inside of src/pages/api/pokemon.
Inside src/pages/api/pokemon/image.js add:
const { Configuration, OpenAIApi } = require('openai');

const configuration = new Configuration({
  apiKey: process.env.OPENAI_API_KEY,
});

const openai = new OpenAIApi(configuration);

export default async function handler(req, res) {
  res.status(200).json({
    image: {}
  });
}
Like before, we’re setting up our new endpoint and initializing the OpenAI SDK.
This time though, we’re going to use the createImage method, which uses DALL-E models.
Add the following to the function:
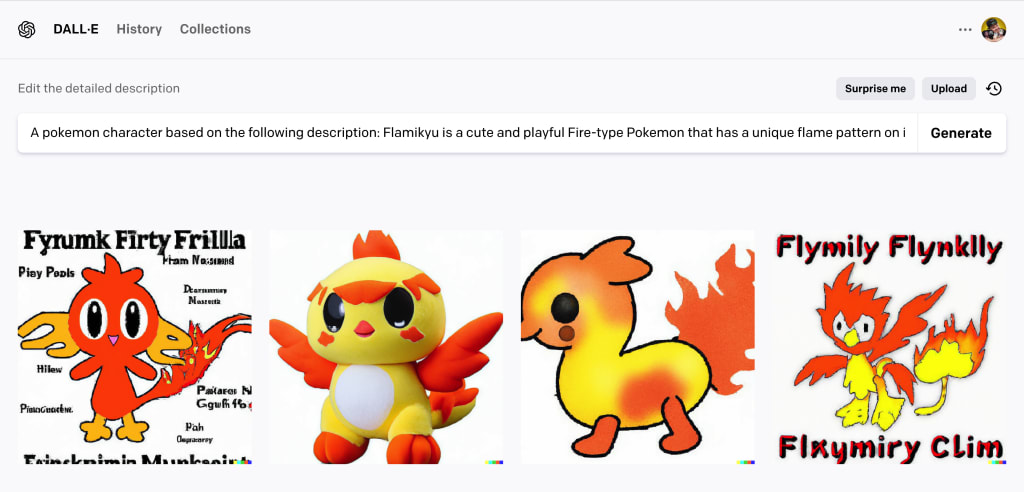
const results = await openai.createImage({
  prompt: `Create an image of a new Pokemon with a plain colored background that has no text or objects`,
  n: 2,
  size: '1024x1024',
});
If we add a console log statment and open up our new endpoint in the browser, we’ll be able to see some new results.
Open one of those (or both) up in your browser and you’ll see a new Pokémon!

The only issue, is that’s not OUR Pokémon, so we want to be able to define a paramter in the body of our endpoint so that we can pass it to the prompt.
First let’s parse the body and grab a description value:
const body = req.body && JSON.parse(req.body);
const { description } = body || {};
And then pass it to our prompt:
const results = await openai.createImage({
  prompt: `Create an image of a new Pokemon with a plain colored background that has no text or objects from the description: ${description}`,
  n: 2,
  size: '1024x1024',
});
Now at this point, we won’t be able to simply test our endpoint in the browser because we require a body for the request, but we’ll be able to see it when we wire up the UI.
So finally, let’s return those results, where because we’re currently only using one image, I’m going to return only the first image:
res.status(200).json({
  image: results.data.data[0]
});
To test this out, let’s head back to our UI.
Inside of src/pages/index.js, first set up a new state instance:
const [image, setImage] = useState();And once our create endpoint is complete, let’s fire off a second request to get our image:
setImage(undefined);
const { image } = await fetch('/api/pokemon/image', {
  method: 'POST',
  body: JSON.stringify({
    description: data.attributes.appearance
  })
}).then(res => res.json());
setImage(image);
And finally update the Card UI to magically update:
<Card attributes={attributes} image={image} />And once you now open it up in your browser and click Generate (again be patient), you’ll first see the attributes load in, then you’ll see the image!
What else can we do?
Add more security to your endpoint
People will be wanting to abuse your API! While here we’re just generating a Pokémon, you wouldn’t want someone to be able to use the web console on your site and use the endpoint as much as you’d like.
Add some sort of security such as authentication with Clerk or other auth tools.
Add the ability to pass in options to the generator endpoint
We’re currently passing in a static prompt to OpenAI, but we can fine tune this to give more personalized results to the person genrating a Pokémon.
For instance, we can pass in the type as a parameter in the body of the Attributes request and specify that we want a Pokémon of that type.
Use a fixed list such as Type
There’s only a finite about of Pokémon types, is it possible ChatGPT will make one up?
We can be sure that we only get a Type of the ones we support, so we can tell ChatGPT to create a type out of a given list, similar to how we passed in the JSON object as a string.