

What are Video Thumbnails?
Thumbnails, and in particular video thumbnails, are a still-image representation of a video. Commonly that would be a screen grab from somewhere in the video, but you could alternatively create a graphic which you might see on YouTube a lot.
But for our use case, we’re going to consider a screen grab as our thumbnail, which just shows a single point in time of our video.
How can we use Cloudinary to generate video thumbnails on-the-fly?
One of the cool features of Cloudinary is it’s ability to transform media on-the-fly, meaning, we don’t need to pre-process our images and videos, we can simply append attributes to our URL and Cloudinary will go off to generate that asset and return it.
Anytime after that first load, it will return cached, so we get full performance benefits.
And Hover Preview Effects?
Building immersive UIs on the web is all about interaction and delight.
One of my favorite recent examples of this is the disneyplus.com UI where when you hover over one of their category blocks, it shows a little animation in the background.
It seems like such a simple thing, but for fans of the different properties (like me!), I get excited seeing those little animations right inside of the UI.
What are we going to build?
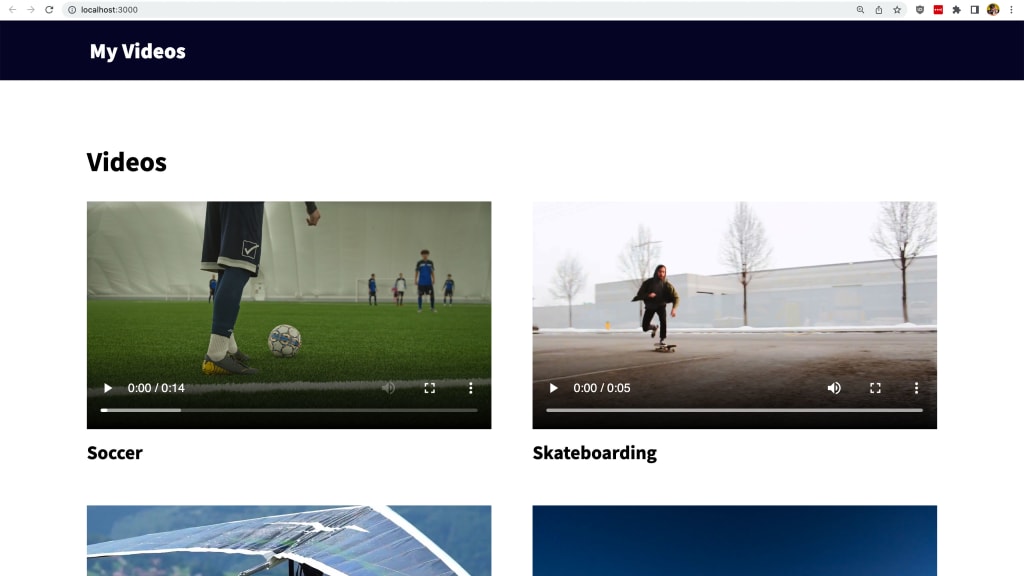
We’re going to start off with a Demo Starter that will give us a Next.js application as a portal into React with a basic grid of videos.
From there, we’re going to move our videos to Cloudinary so we can start to take advantage of Cloudinary tech, particularly, we’ll learn how to serve the videos from Cloudinary, generate thumbnails from the videos automatically, and even create shorter previews.
This will all get bundled into creating a nice hover effect for showing a playing video when hovering over the thumbnail image.
Disclaimer: I work for Cloudinary as a Developer Experience Engineer.
Step 0: Creating a new Next.js app from a demo starter
We’re going to start off with a new Next.js app using a starter that includes some simple UI that we’ll use.
In particular, we’re going to use this starter that will set you up with a simple application that lists out some local videos in a grid.
Inside of your terminal, run:
yarn create next-app -e https://github.com/colbyfayock/demo-video-list-starter my-videos
# or
npx create-next-app -e https://github.com/colbyfayock/demo-video-list-starter my-videos
Note: feel free to use a different value than
my-videosas your project name!
Once installation has finished, you can navigate to that directory.
cd my-videosThen you can start your local development server with:
yarn dev
# or
npm run dev
And once you visit it in your browser at http://localhost:3000, we should see our new application!
Step 1: Installing and configuring the Cloudinary JS URL Gen SDK
To get started, we want to get our project set up to be able to use Cloudinary.
You’ll want to have a free Cloudinary account in order to follow along.
In your terminal, we’ll first want to install the SDK with:
yarn add @cloudinary/url-gen
# or
npm install @cloudinary/url-gen
Once installed, we want to import the dependency into our project.
At the top of src/pages/index.js add:
import { Cloudinary } from '@cloudinary/url-gen';We can then use our import to configure a new instance of Cloudinary which we’ll use in our code.
Add the following below your imports and above your page function:
const cld = new Cloudinary({
  cloud: {
    cloudName: '<Your Cloud Name>'
  }
});
Make sure to replace <Your Cloud Name> with your Cloudinary Cloud Name. You can find it easily right at the top of your dashboard!
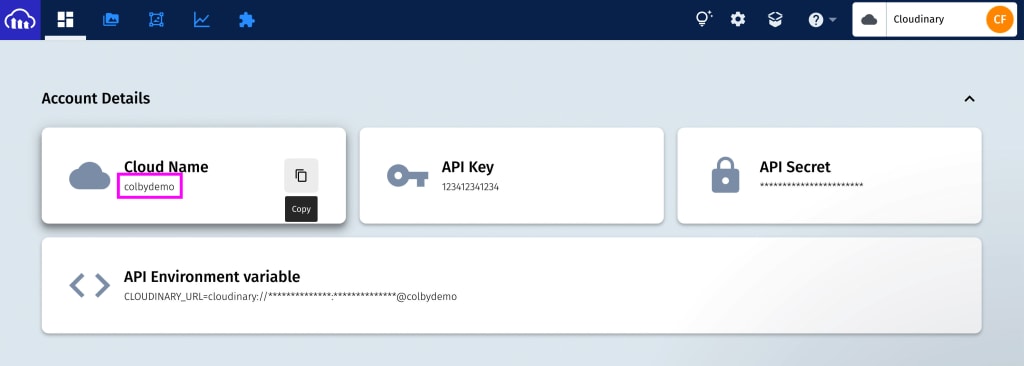
Note: Make sure to use your Cloud Name or you’ll have trouble following along. You also will be subject to the same free tier of my demo account as you are with your own account!
But now we’re ready to get started serving our videos from Cloudinary!
Step 2: Serving optimized videos in a Next.js app with Cloudinary
In order to get started, we want to first move our videos over to Cloudinary, which will allow us to take advantage of the features needed for our tutorial.
If you want to follow along with me, you can find all of the videos inside of the public/videos directory and upload them to your Cloudinary account.
Note: all videos are from pexels.com and the link to the original video and creator can be found in the
videos.jsonfile.
Then you want to have all of the videos that are located inside videos.json to correspond with your videos, particularly, we need to either update the id field to include our folder location (if using a folder) or update it in the UI. I’m going to update the ID to include my Cloudinary folder location like:
[
  {
    "id": "my-videos/soccer",
    ...
Now after you do this, the videos won’t load in the app because the location is no longer correct, but now we can use these IDs to build our Cloudinary URLs.
To do this, we’re going to update our <video> tag to build a dynamic source:
<video
  controls
  width="100%"
  src={cld.video(video.id).delivery('q_auto').format('auto').toURL()}
/>
Here we’re doing a few things:
- We’re passing our
video.idto thecld.videomethod where ouridis now our Public ID, which is how we reference our video - We’re additionally setting a
deliverywith quality of auto andformatof auto in order to take advantage of automated optimization and formatting - Finally we use
toURLto build a URL to pass to the video player
At this point, our application should look just like when we started but now we should be serving our videos from Cloudinary.
Note: You may notice in your web console we have a mismatched source. The Cloudinary URL gen SDK doesn’t run on the server, so when it loads in the client, it will show a warning. It won’t show this warning in production, but later in the tutorial we can see how we can resolve this with the Cloudinary React SDK
While you shouldn’t notice anything different from when we were serving them locally, one benefit we’re automatically getting by setting our automated optimization parameters is we’re now serving our videos in a smaller file size.
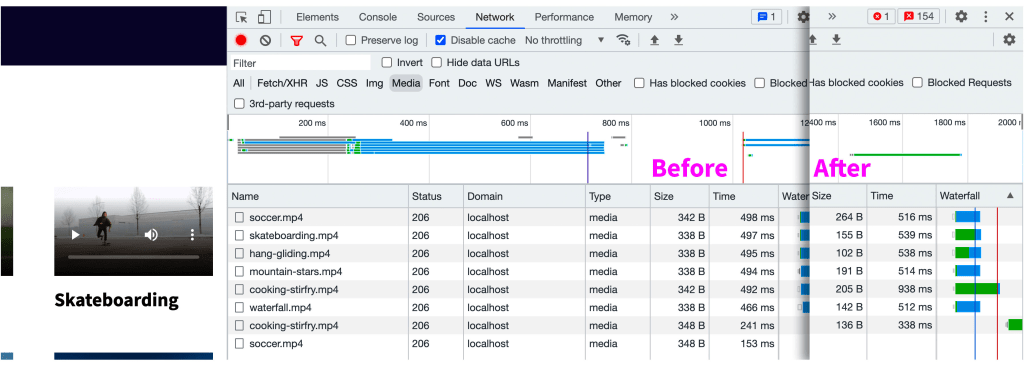
This will help with performance so we’re delivering a faster experience for our visitors.
Note: You’ll notice the timing is a little more when serving from Cloudinary as we’re now creating an external network request rather than serving the media locally which will load fast.
Next we’ll see how we can autogenerate a poster (or thumbnail) that we can use for our video.
Step 3: Automatically generating a video thumbnail to use as a poster with Cloudinary
The HTML video tag comes with a feature called a poster which gives us the ability to load a thumbnail while our video is loading.
It helps provide a better experience rather than showing an empty space while it’s loading.
Since we have our videos uploaded to Cloudinary, we can generate these thumbnails on the fly with a simple transformation!
To do this, let’s update the poster attribute on our video:
<video
  controls
  width="100%"
  src={cld.video(video.id).delivery('q_auto').format('auto').toURL()}
  poster={cld.image(video.id).setAssetType('video').delivery('q_auto').format('auto:image').toURL() }
/>
Here we’re:
- Using the
cld.imagemethod to say we want to create an image - But we set the asset type to
videosince we’re dealing with a video - We similarly set the delivery to a quality of auto but we set a format to
auto:imageto make sure it’s of type image and not video when generated - Finally as usual we turn it into a URL
If you now load the page, you’ll notice that each video has a still image while it’s loading. This is the poster thumbnail we just generated!
Cloudinary will take the video file, grab a frame, and generate an image for us. That’s literally all we had to do to generate our images on the fly.
Next we’re going to migrate to the Cloudinary React SDK so we can start taking advantage of other features to help performance as well as eliminate our issue with issue with clientside loading.
Step 4: Using the Cloudinary React SDK to server videos with Lazy Loading
This is an optional step. We don’t necessarily need to use the React SDK for serving our videos, but by doing so, we get some cool features we can take advantage of on top of the default HTML video element, in particular Lazy Loading.
Note: want to try to lazy load without the React SDK? Try using the intersection observer to only load the images when in view!
First let’s install the Cloudinary React SDK:
yarn add @cloudinary/react
# or
npm install @cloudinary/react
Next we can import our new dependency:
import { AdvancedVideo } from '@cloudinary/react';Then, we just need to make some simple tweaks to our <video> tag:
<AdvancedVideo
  controls
  width="100%"
  cldVid={cld.video(video.id).delivery('q_auto').format('auto')}
  poster={cld.image(video.id).setAssetType('video').delivery('q_auto').format('auto:image').toURL() }
/>
Here we:
- Replaced
<video>with<AdvancedVideo> - Replaced
srcwithcldVid - Inside the
cldVidprop, we removedtoURLas we specifically want to provide the component thecld.videoinstance we’re creating
At this point if you reload the page, nothing should look different. But now we can take advantage of plugins with our SDK!
First update our import at the top of the page:
import { AdvancedVideo, lazyload } from '@cloudinary/react';Where then we just need to add it as a new prop to our AdvancedVideo component:
<AdvancedVideo
  controls
  width="100%"
  cldVid={cld.video(video.id).delivery('q_auto').format('auto')}
  poster={cld.image(video.id).setAssetType('video').delivery('q_auto').format('auto:image').toURL() }
  plugins={[lazyload()]}
/>
While we really won’t see anything noticeably different in the UI, what we will see is that if our videos aren’t in view yet, they’re not going to load!
This saves precious resources for someone who might not scroll through the page.
Next we’ll see how we can automatically play a video any time someone hovers over a video!
Step 5: Automatically playing a video on hover
In this step we’re going to take a bit of a different approach to our existing UI.
Currently, we’re loading the whole video which is great if that’s our goal, but often we would want to load a grid of videos which would link to the video’s page, not play it inline.
So in this step and the next we’re going to do two things:
- Automatically play the video whenever someone hovers over a thumbnail
- Load an automatically generated preview of the video instead of the whole thing
Let’s start off by automatically playing the video.
The way we’re going to handle this is by loading our image as an actual image and hiding our video.
Whenever someone hovers over that image, we’ll show our video and move it on top of our image.
First off let’s move our poster to a regular image.
Because we’re already importing the React SDK, we can also take advantage of Cloudinary’s AdvancedImage component.
Update the import statement:
import { AdvancedImage, AdvancedVideo, lazyload } from '@cloudinary/react';Then above our AdvancedVideo add:
<AdvancedImage
  cldImg={cld.image(video.id).setAssetType('video').delivery('q_auto').format('auto:image')}
/>
We’re basically creating an <img> tag but we’re passing in our cld.image instance to our image.
We can then optionally remove the poster attribute from our AdvancedVideo as at that point it’s redundant.
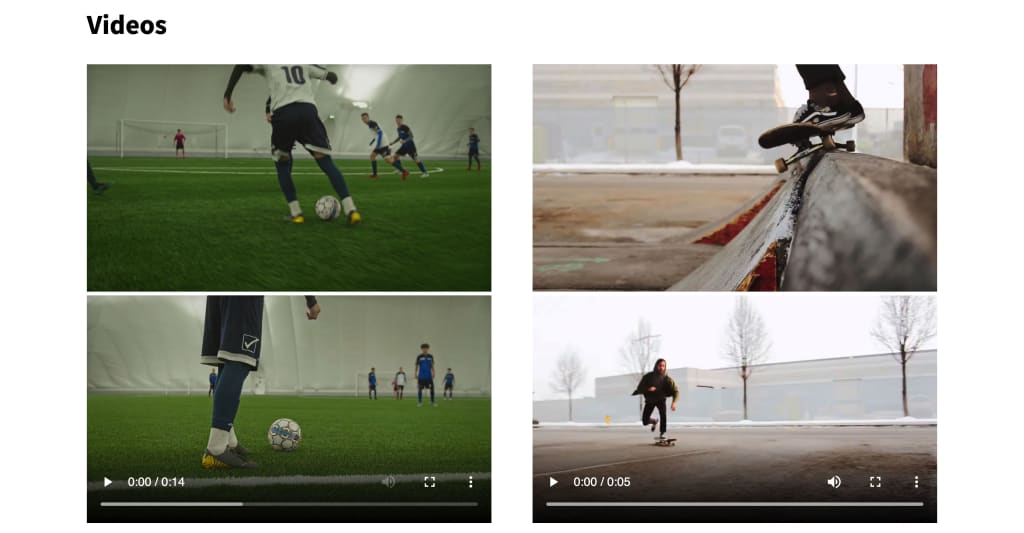
If we now look in the browser, we should see our still image above our videos.
Now we can use some CSS to both hide and show on interaction.
Let’s add a className to our parent container so we can control the styles.
<li className={styles.video} key={video.id}>Now let’s open src/styles/Home.module.scss where we’ll add our styles.
Tip: we’re actually using Sass in this tutorial which is already installed in the project Starter. You can just as easily use regular CSS if you prefer. If you want to learn more about Sass in Next.js check out my tutorial.
.video {

  position: relative;

  img {
    position: relative;
    z-index: 1;
  }

  video {
    position: absolute;
    top: 0;
    left: 0;
    opacity: 0;
    z-index: 0;
    width: 100%;
    height: auto;
  }

  &:hover {

    video {
      z-index: 2;
      opacity: 1;
    }

  }

}
This is a big snippet, but here’s what we’re doing:
- We’re first setting a relative position on our container so that we can absolutely position inside
- Our image is also relative, but we want to set a z-index of 1 so we define where in our layer stack it is
- Our video gets a position of absolute so that we can stack it in the same position as our image, by default behind
- When someone then hovers on our element, we tell our image to pop up to a z-index 2, above our image, with a full opacity, so it shows in the UI
If we look in the UI, we get close to the effect we want. When we hover over, we can see our video player.
The first issue though is we want this to autoplay on hover.
This is an easy fix, where we can update our AdvancedVideo component with the autoPlay prop to autoplay.
<AdvancedVideo
  autoPlay
We also though want to add two others:
<AdvancedVideo
  autoPlay
  loop
  muted
Where we want loop so it plays over and over and muted as autoplay may not work before interaction in some browsers if sound is on.
If we look in the browser, this gives us the effect we want of playing the video automatically.
Though, do we really want it to be constantly playing over and over in the background? Additionally, if someone hovers on and off, would you expect it to stop and start back in the position it left?
Instead of using autoPlay we can control the playing of the video using browser APIs so that we’re giving a better experience.
To do this we’re going to use the React refs which the Cloudinary components support so we can access this API.
First, let’s update our import statement to include useRef:
import { useState, useEffect, useRef } from 'react';Next in our videos.map loop we’re going to create a new ref for each video:
{videos.map(video => {
  const playerRef = useRef();
We then need to add that ref to our AdvancedVideo with:
<AdvancedVideo
  ref={playerRef}
At this point, we set up the ref association so we can access the video, so now let’s hook into some interactions to control it.
First let’s add two functions to control our player when hovering on and off of our element:
function onMouseOver(e) {
  playerRef.current.videoRef.current.play();
}

function onMouseOut(e) {
  playerRef.current.videoRef.current.pause();
}
Here we’re using the current ref to play and pause the player using browser APIs. You’ll notice we’re referencing 2 refs here, where we first access the ref of our AdvancedVideo then the ref of our video element.
To invoke those we can add onMouseOver and onMouseOut to our parent element:
<li className={styles.video} key={video.id} onMouseOver={onMouseOver} onMouseOut={onMouseOut}>Finally we want to make sure we remove the autoPlay prop from our AdvancedVideo element and while we’re at it, remove controls as we don’t want someone controlling the player in this UI.
<AdvancedVideo
  ref={playerRef}
  loop
  muted
  width="100%"
  cldVid={cld.video(video.id).delivery('q_auto').format('auto')}
  plugins={[lazyload()]}
/>
But now if we load the app we’ll see that when we hover over, it’ll play and pause, keeping our position, and our controls our hidden for a great preview look!
Next we’ll generate a preview of our video instead of the whole thing for better performance.
Step 6: Generating a preview clip on-the-fly to avoid loading full videos
Currently we’re playing the entirety of the videos, which is fine, but some of the videos are long. This could especially be true if you’re using things like TV shows or movies for your app, where you don’t want the entire thing playing just for a hover effect.
Instead we can use Cloudinary tech to automatically generate a shorter preview clip, avoiding loading big video files, and giving a nice preview effect of our video.
To do this we need one simple change. We’re going to update the cldVid prop on our AdvancedVideo:
cldVid={cld.video(video.id).effect('e_preview:duration_4').delivery('q_auto').format('auto')}In the above, we chained .effect('e_preview:duration_4') to the beginning of our video instance, which tells Cloudinary exactly what we want, which is a preview, and here we’re saying we want it to be 4 seconds.
Now when you reload the page, you might get some errors or loading spinners for a bit. In the background after the first request, Cloudinary will generate those files, meaning you might have to wait a bit for it to first load, but once loaded, they get cached and served from the CDN with no processing delays!
But once they’re loaded, we can see we get nice shorter clips for a better experience.
Bonus: those clips were generated “intelligently” meaning it’s not just the first 4 seconds, it’s pulling a clip that will be more interesting to viewers based on the video content.
What else can we do?
Dynamically crop and resize
Now that we’re hooked into Cloudinary we can take advantage of other features. One thing you might have notice is not all videos have the same exact size or ratio (not to mention if you’re pulling in vertical videos into yours).
We can use Cloudinary’s ability to crop and resize videos and on top of that, we can use gravity to automatically position the video within that crop intelligently.
This works for both video and images, but here’s a tutorial for images with How to Create Thumbnail Images Using Face Detection with Cloudinary.
Add effects to your media
Another thing we can do with Cloudinary is add filters and effects, ranging from simple things like changing the color to overlays with images or text.
Maybe you want to add text to your thumbnails or maybe you want to play around with filters for an interesting look.
How to Add Webcam Photo Filters & Effects in React with Cloudinary