Disclaimer: This post is sponsored by Xata. Learn more about sponsored content.
What is Xata?
Xata is a serverless database solution that layers on a powerful search component on top of the fully-functional database. It comes equipped with both SDKs and a CLI that make it easy to interface with data for both JavaScript and TypeScript developers alike.
Think about things like a simple search, being able to filter that search, or generate dynamic insights into the data being searched.
These are things that can be tricky and require a lot of development effort to work in traditional database solutions, but with Xata, these features are built right in like a search API and aggregations.
What are aggregations?
Aggregations are a way of clustering data to provide insights such as describing those clusters with a number.
A straightforward example is an online store (which we’ll be working on today) which has a bunch of products that each have a category.
We may want to known how many products are in each category.
So we can create an aggregation where we cluster our products by their category, leaving us with a number that tells us how many products are in each.
While search in itself is powerful, these are features that can help us build a better experience for the customers visiting our site or learn more about the data we’re storing.
What are we going to build?
We’re going to connect a Next.js application to a Xata database to dynamically pull in products for an online store.
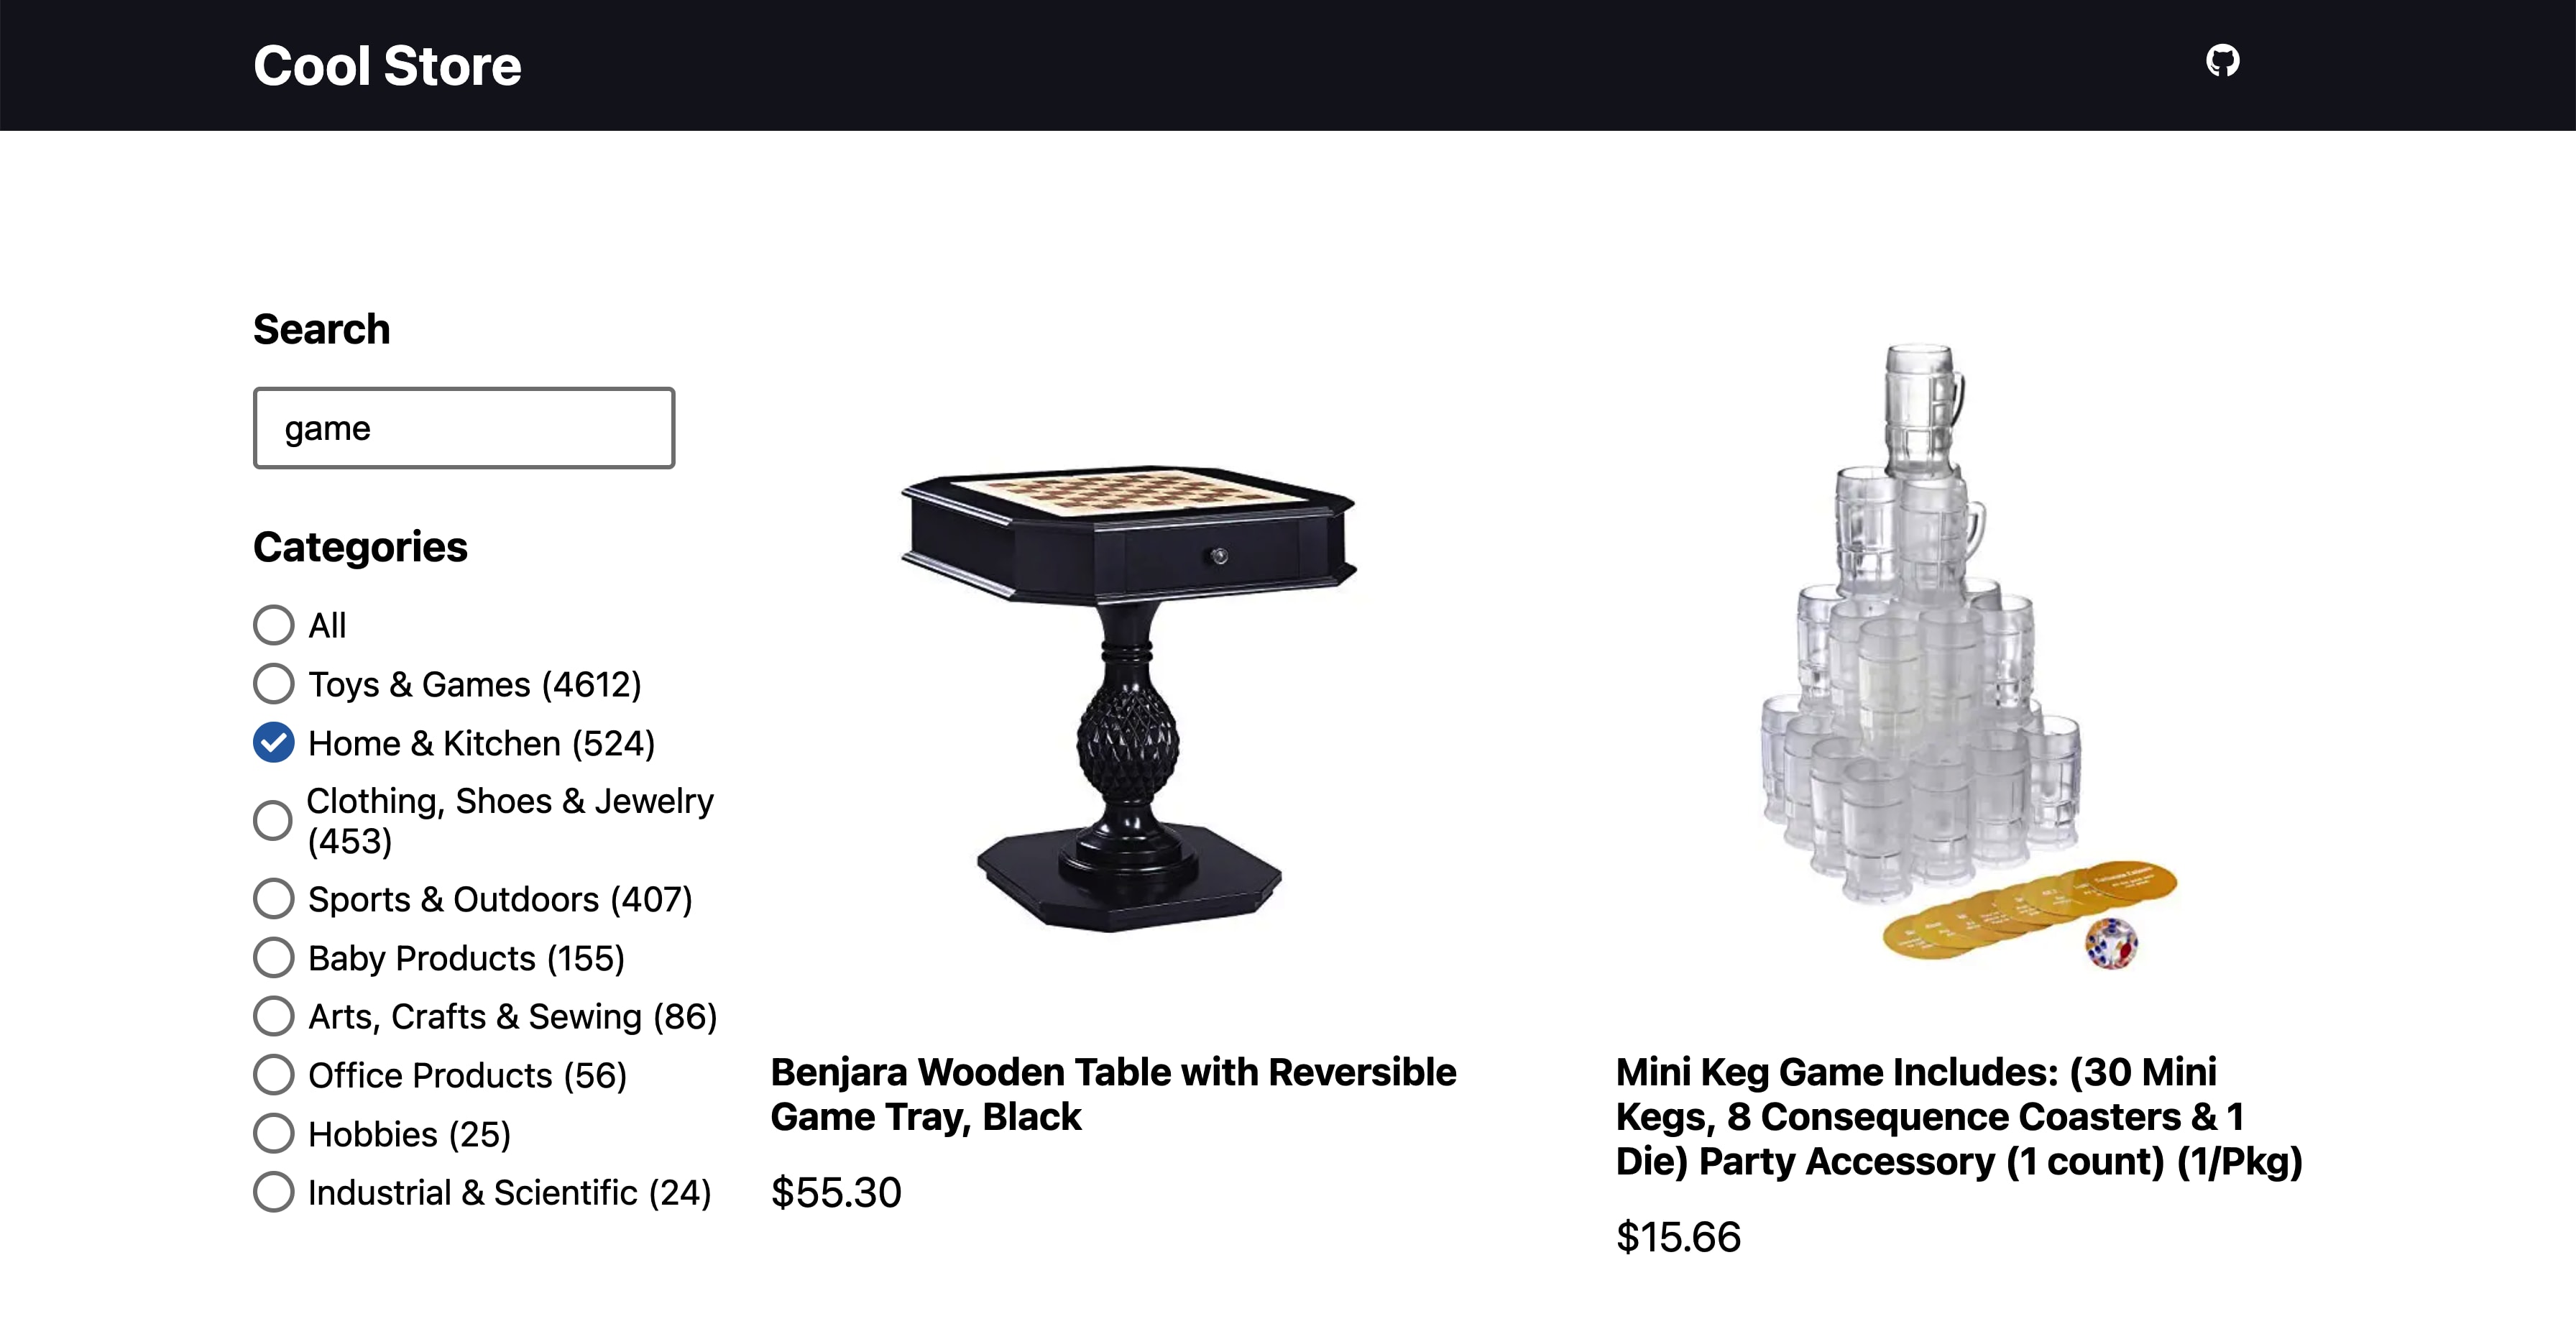
We’ll seed this database using sample product data pulled from Kaggle, ready to be imported to Xata from a CSV in the Starter we’ll use to spin up an application.
Once we have our new database, we’ll pull a standard list of products, then layer on search as well as aggregation to give a dynamic shopping experience for our online store.
Step 0: Creating a new Next.js app from a demo starter
We’re going to start off with a new Next.js app using a starter that includes a grid of products and a list of categories, that don’t really do anything yet (we’ll hook it up later).
In particular, we’re going to use this starter that will set you up with a simple gallery of images.
Inside of your terminal, run:
yarn create next-app -e https://github.com/colbyfayock/demo-product-listing-starter my-product-search
# or
npx create-next-app -e https://github.com/colbyfayock/demo-product-listing-starter my-product-search
Note: feel free to use a different value than
my-product-searchas your project name!
Once installation has finished, you can navigate to that directory.
cd my-product-searchThen you can start your local development server with:
yarn dev
# or
npm run dev
And once you visit it in your browser at http://localhost:3000, we should see our new application!

Taking a look inside of the code, the only thing that’s necessarily “special” about how our application is currently set up is how we’re getting our products.
We’ll be importing a CSV into Xata to seed our products, so rather than having a completely different dataset for this Starter, the application is currently using a small sample of the products (50) currently being loaded from a separate CSV, imported into the project, and parsed in getStaticProps, to ultimately load the page with product data.
In the first few steps, our first task will be to get that product data dynamically from Xata!
Step 1: Creating a new Xata serverless database
Starting off, we need a Xata database, and before that, we need a Xata account.
Head over to xata.io where you can create your free account by logging in with Google, Github, or your email address via magic link.
Tip: There’s no separate “register”, you just sign in with whatever method you want.
Once logged in, you’ll be met with a fresh new workspace (or your existing workspaces).
Here you’ll be able to check out important configuration and billing details related to your workspace, but we’re interested in creating a database at this point.
Click Add a database then add a name of your choice and select a region. Usually you select the region closest to where you expect the requests to the database to be made from or generally if you have a datacenter preference. I’m going to select us-east-1.

When ready, hit Create.
Once you do, the database will be created and it will now be shown as available to select, so click on your new database and navigate to it.
Inside, we’ll see we have a bunch of options for what we can do, which we’ll get started with next as we load in our new product data!
Step 2: Importing Products to a Database from a CSV with the Xata CLI
Xata gives us two options for how we import our product data, one being a Preview option they’re working with in the UI, but also a CLI option for being able to easily create a new table with imported data, with the added option of being able to customize the import if needed.
So to start, we’ll need to install the CLI locally in order to get this started.
Let’s use npm to install it with:
npm i -g @xata.io/cliNext, in order to do anything, we need to authenticate our local environment with our Xata account.
In your terminal, run:
xata auth loginAnd once you do, you’ll be prompted with whether you want to create a new key using the browser or use an existing one.

If you don’t yet have a key, the easiest way to do this is to create a new one using the browser.
But if you go ahead and select to use the browser, Xata will pop open a new tab in your browser where you’ll be asked what to name your new API key.
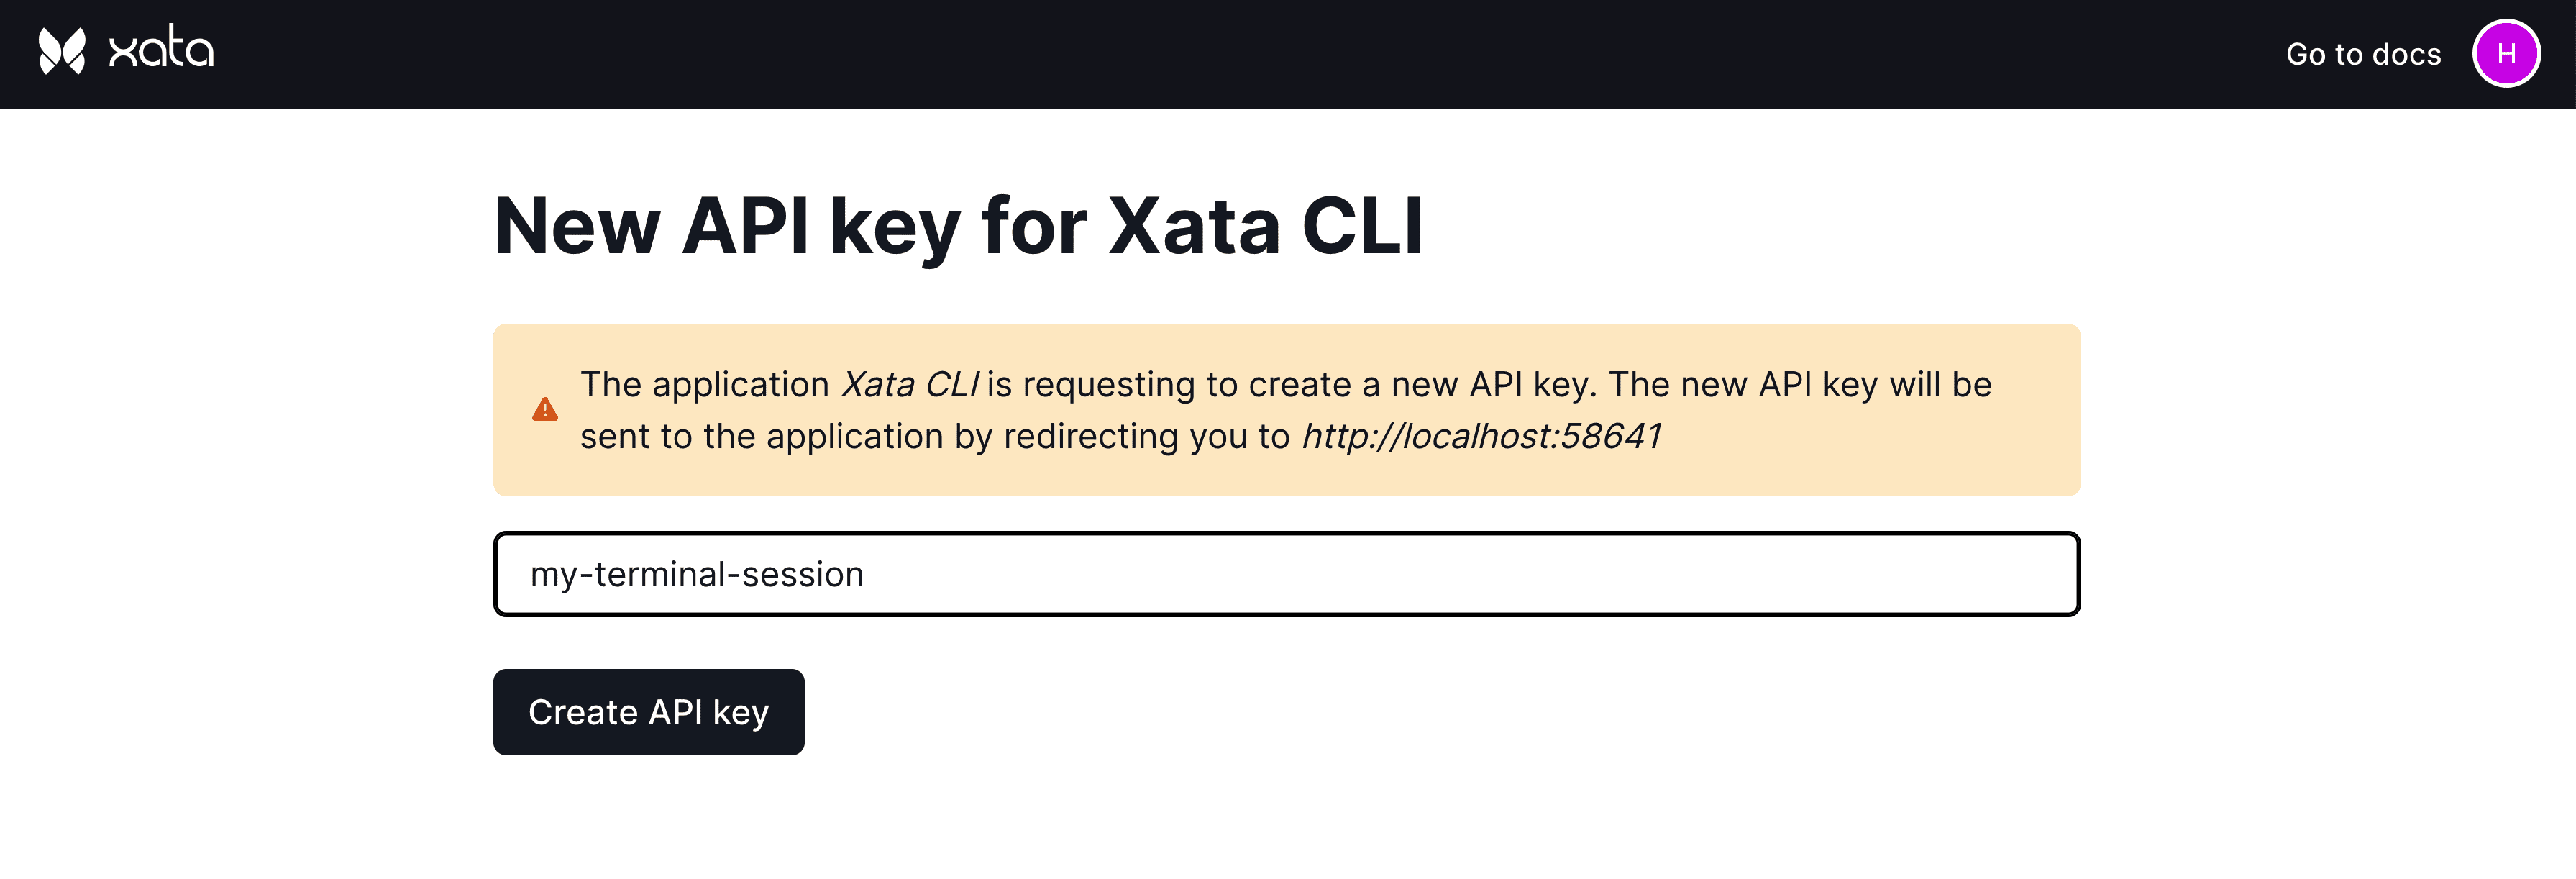
Use whatever name you’ll remember for your terminal session.
Once ready, click Create and Xata will let you know you can close the tab!
And once back to your terminal, you should now see a success message that you’re now logged in, so moving on.
Next let’s run our import.
As I mentioned earlier, our project is seeded using a CSV that includes 50 products, but next to it in our src/data directory is a CSV that includes 7,000 products which we’ll import into Xata.
Tip: Why 7,000 products? Showing 50 is great for a basic “how it works” but 7,000 helps to show how powerful Xata is at scale!
In your terminal run:
xata import csv src/data/amazoncom-sample-7000.csv --create --table=productsOnce you do, Xata will ask you a few questions including:
- Select a database: this should be the one you created in the previous step
- Select a branch: this is helpful if you want work on different branches of your data, but for now, let’s select
main
As soon as you hit enter on the second one, Xata will now process that CSV and try to import all of the products.
After it works through everything, we should have 7,000 records successfully added! Now let’s head over to Xata to confirm.

Pretty easy right?
But now we have all of our data loaded into a database and we can start running queries to learn how to access our data to display for our customers.
Step 3: Listing products in a Next.js application from Xata
We have a database full of products, let’s get them loaded dynamically into our application.
Starting off, in order to access and use the Xata API, we’ll need to be able to create authenticated requests.
Given we set up the CLI already, Xata makes this easy.
In your terminal, run:
xata initLike before, this command will ask you a few questions:
- Select a database…: select the database we created in the previous step
- Do you want to use code generation…: we have a few options for how we interface with Xata, including Typescript if you prefer, but I’m going to select “Generate JavaScript code with ES modules”
- Choose the output file…: you can select where Xata will generate their file that includes the client and initialization information, but I’m going to go with
src/lib/xata.js - Do you want to generate the TypeScript declarations?: your preference, but I’m going with No, as I’m not using a Typescript project
At this point, Xata will install the SDK, create a .env file with API keys, and initialize the xata.js file with some helpers to get started.
Before we’re done though, we have another question:
- Choose a default development branch…: and again, choose what you’d like, but I’m selecting
mainsince I’m just going to work off prod reading my data - Do you want to add .env to your .gitignore?: yes!
And finally we’re ready to start digging into our query.
Another nice thing about Xata is inside of the database dashboard, they have a lot of easy ways to grab code to drop into projects.
To start, navigate back to the products table if you left, and click Get code snippet on the top right of the page.
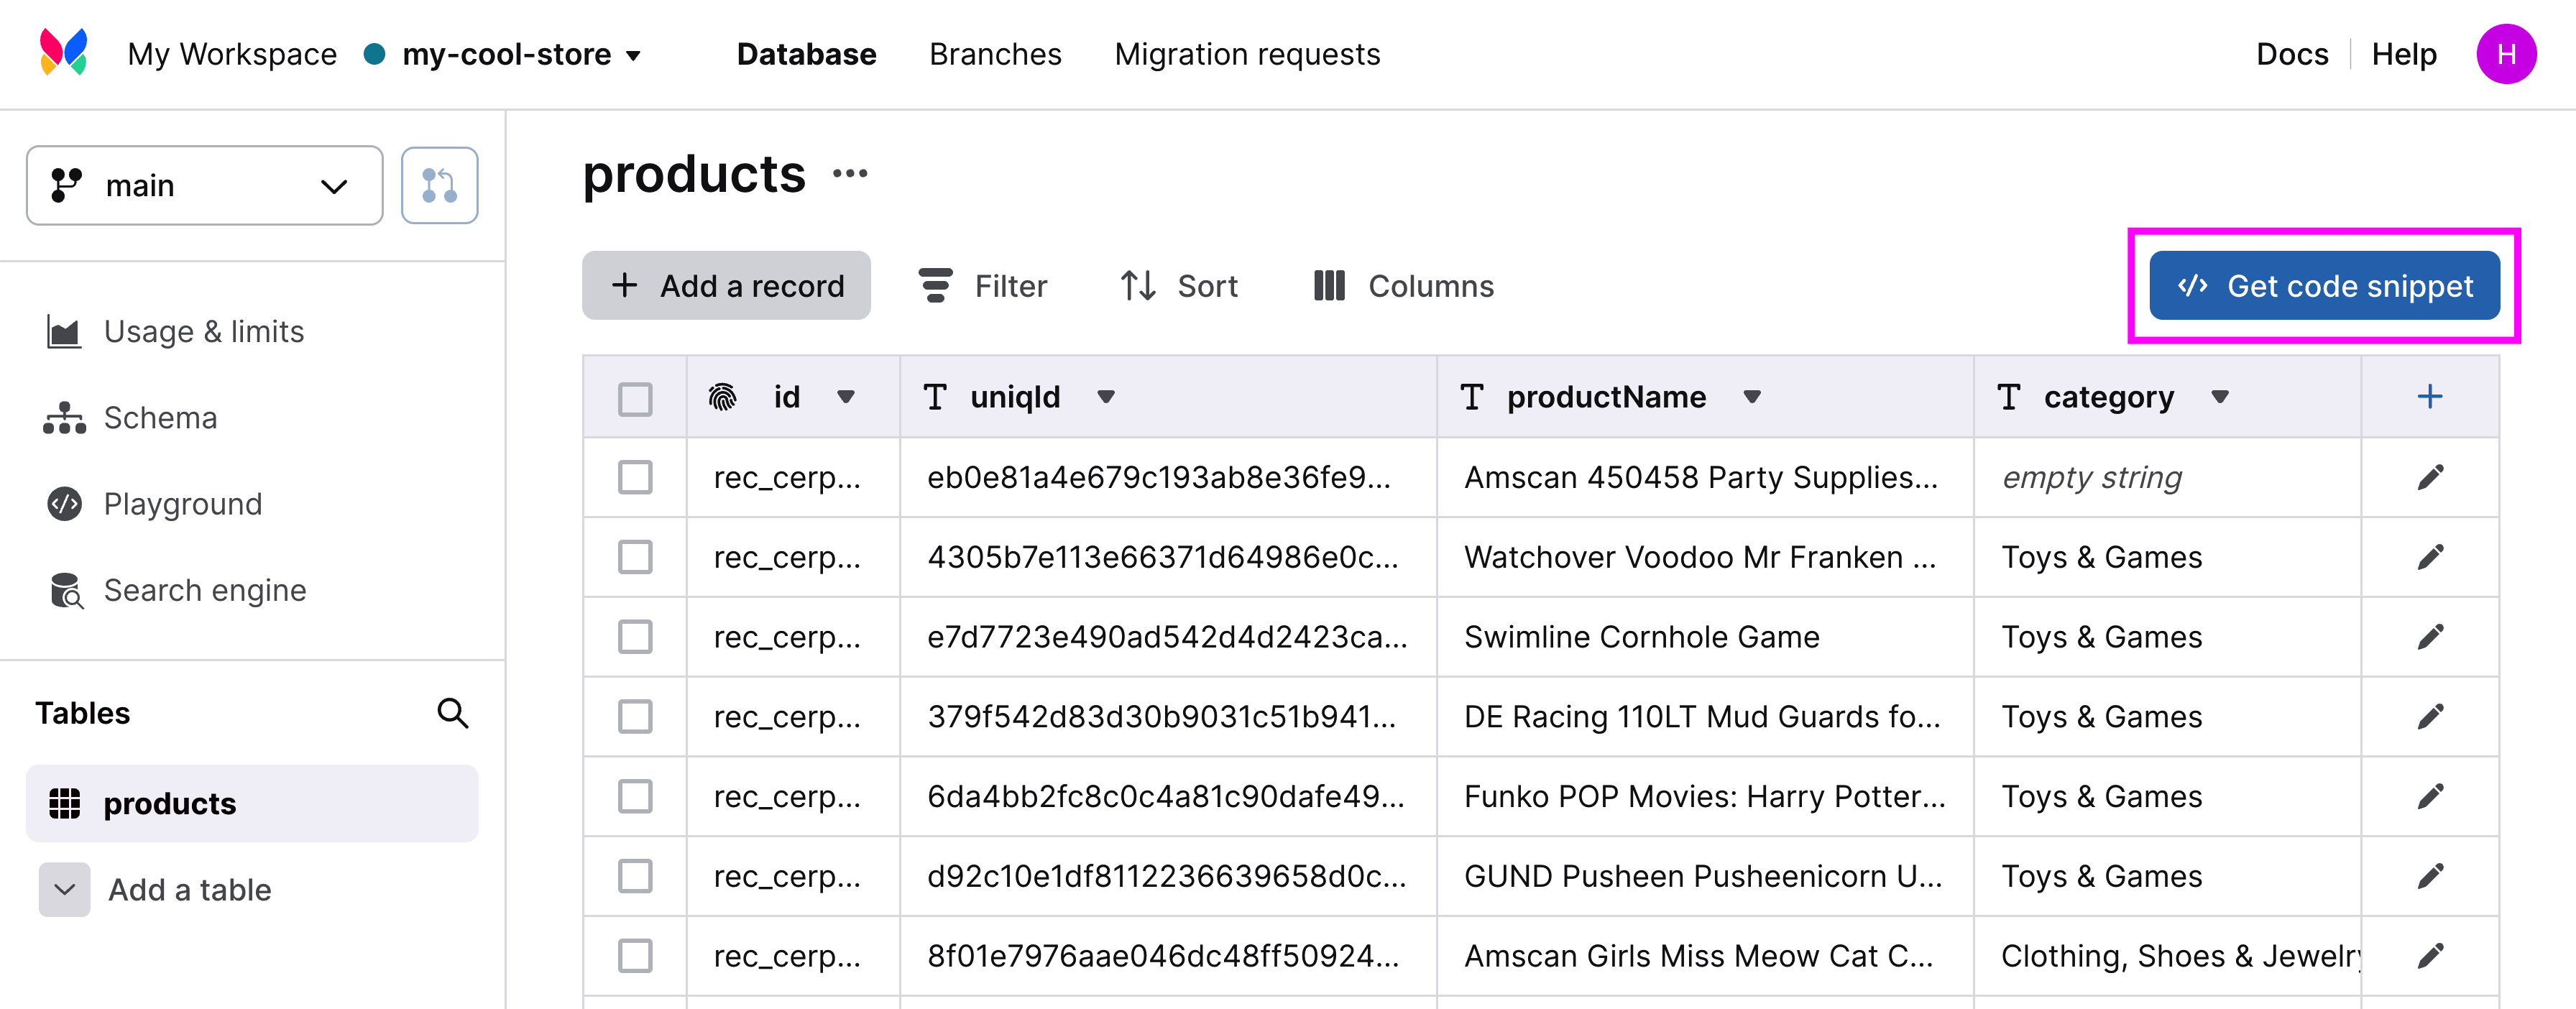
Once we select that, Xata gives us some commands we could run to initialize our project, but we don’t need to do that part.
Instead, we’re interested in the code snippets below, like Paginated query, which is exactly what we want.
Tip: we want a paginated query and not all records as 7,000+ records is a whole lot of data to request!
Let’s copy the code snippet.
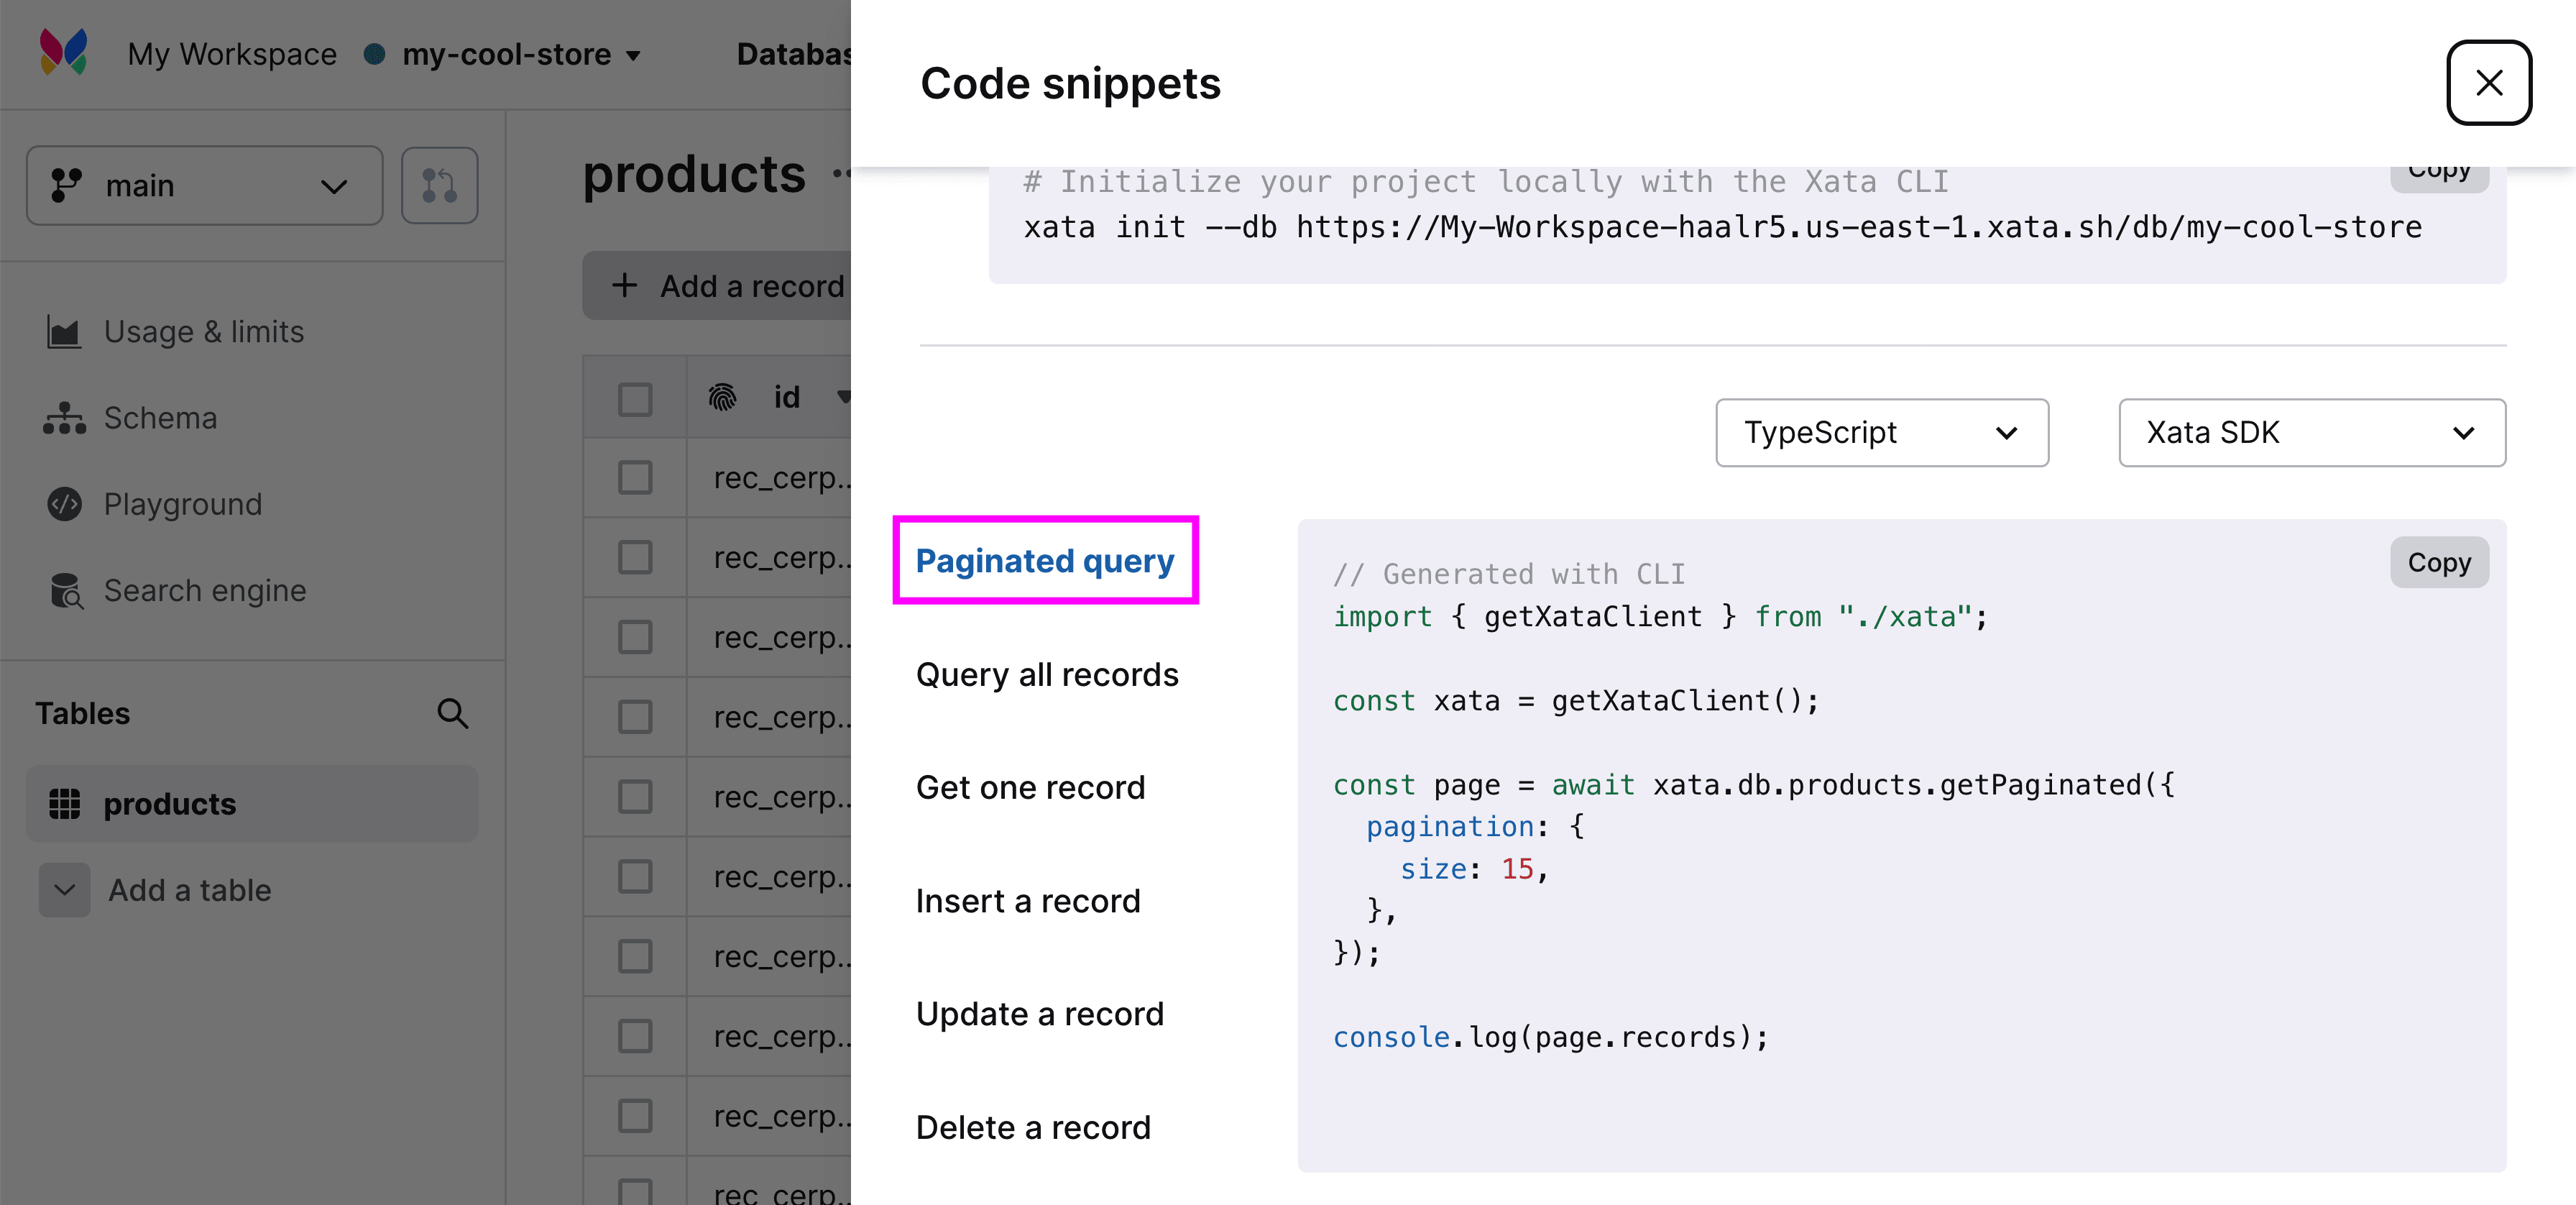
And paste this into our src/pages/index.js file starting with importing our client at the top:
import { getXataClient } from 'src/lib/xata';Note: I modified mine to reflect where I created my
xata.jsfile from earlier, be sure to import it from the right place!
Then we can add the other snippet into getStaticProps at the bottom of the page:
const xata = getXataClient();

const page = await xata.db.products.getPaginated({
  pagination: {
    size: 15,
  },
});
Before we replace our products prop, let’s test this out.
Add a console log right after:
console.log('page', page)And if we reload the page and look inside of our terminal (not the browser’s console), we should see all of our data listed out, including the structure it was returned in.
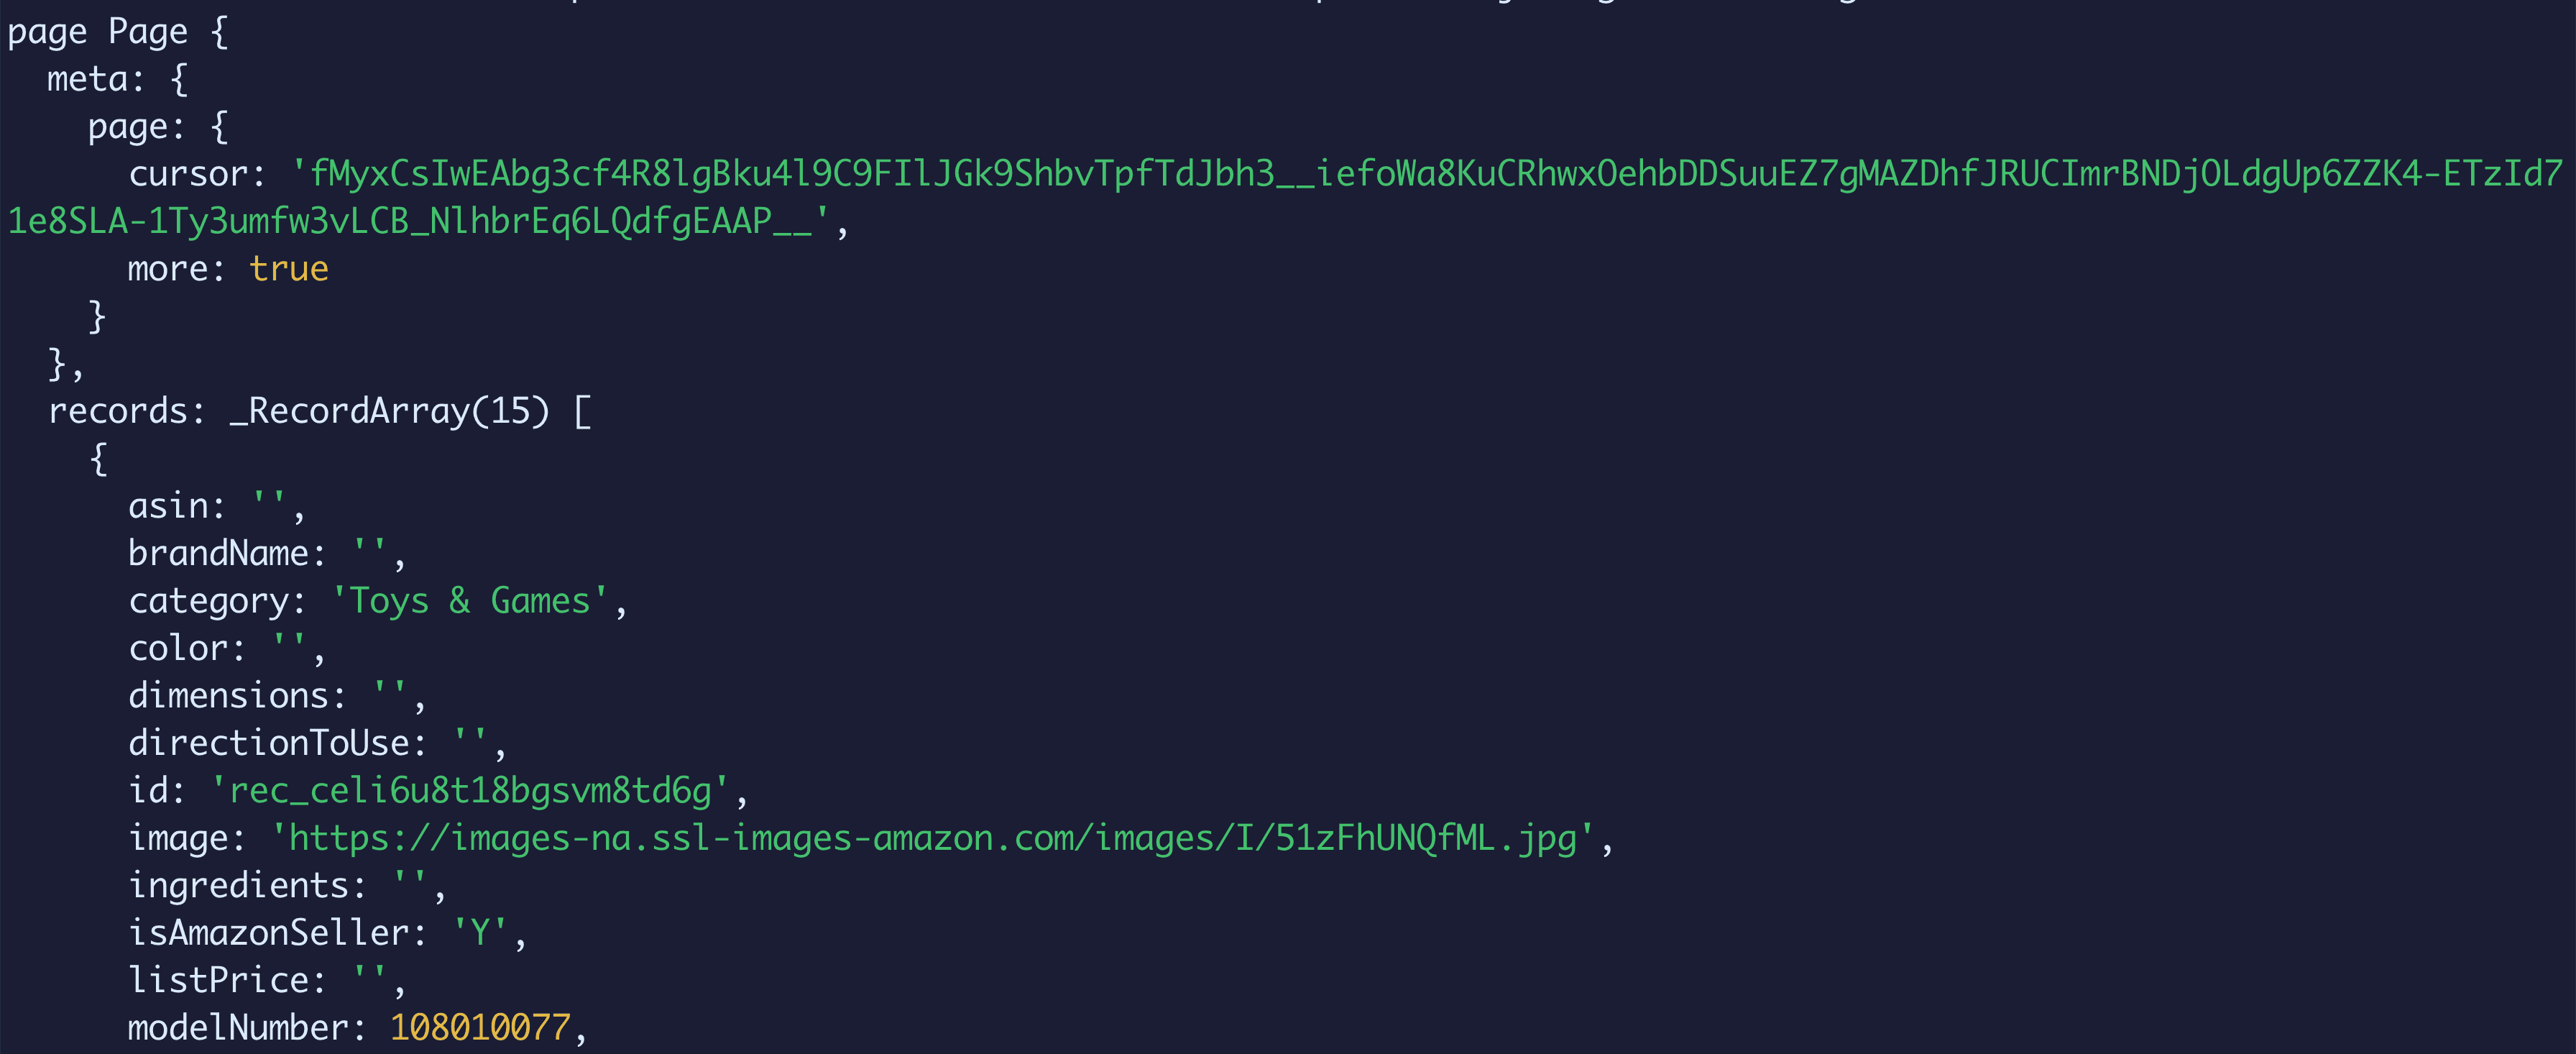
So let’s use this to replace our locally sourced products.
We can do this a few ways, such as setting our const of products to page.records instead of the map statement:
const products = page.records;Or my preferred, we can destructure products directly from our request response by renaming the records property:
const { records: products } = await xata.db.products.getPaginated({
  pagination: {
    size: 15,
  },
});
And if we reload our application, we should see the layout look the same, but the list of products are likely a bit different, as we’re now sourcing our products from our database, so they’ll probably load a bit differently from how they were imported compared to my manually trimmed CSV.
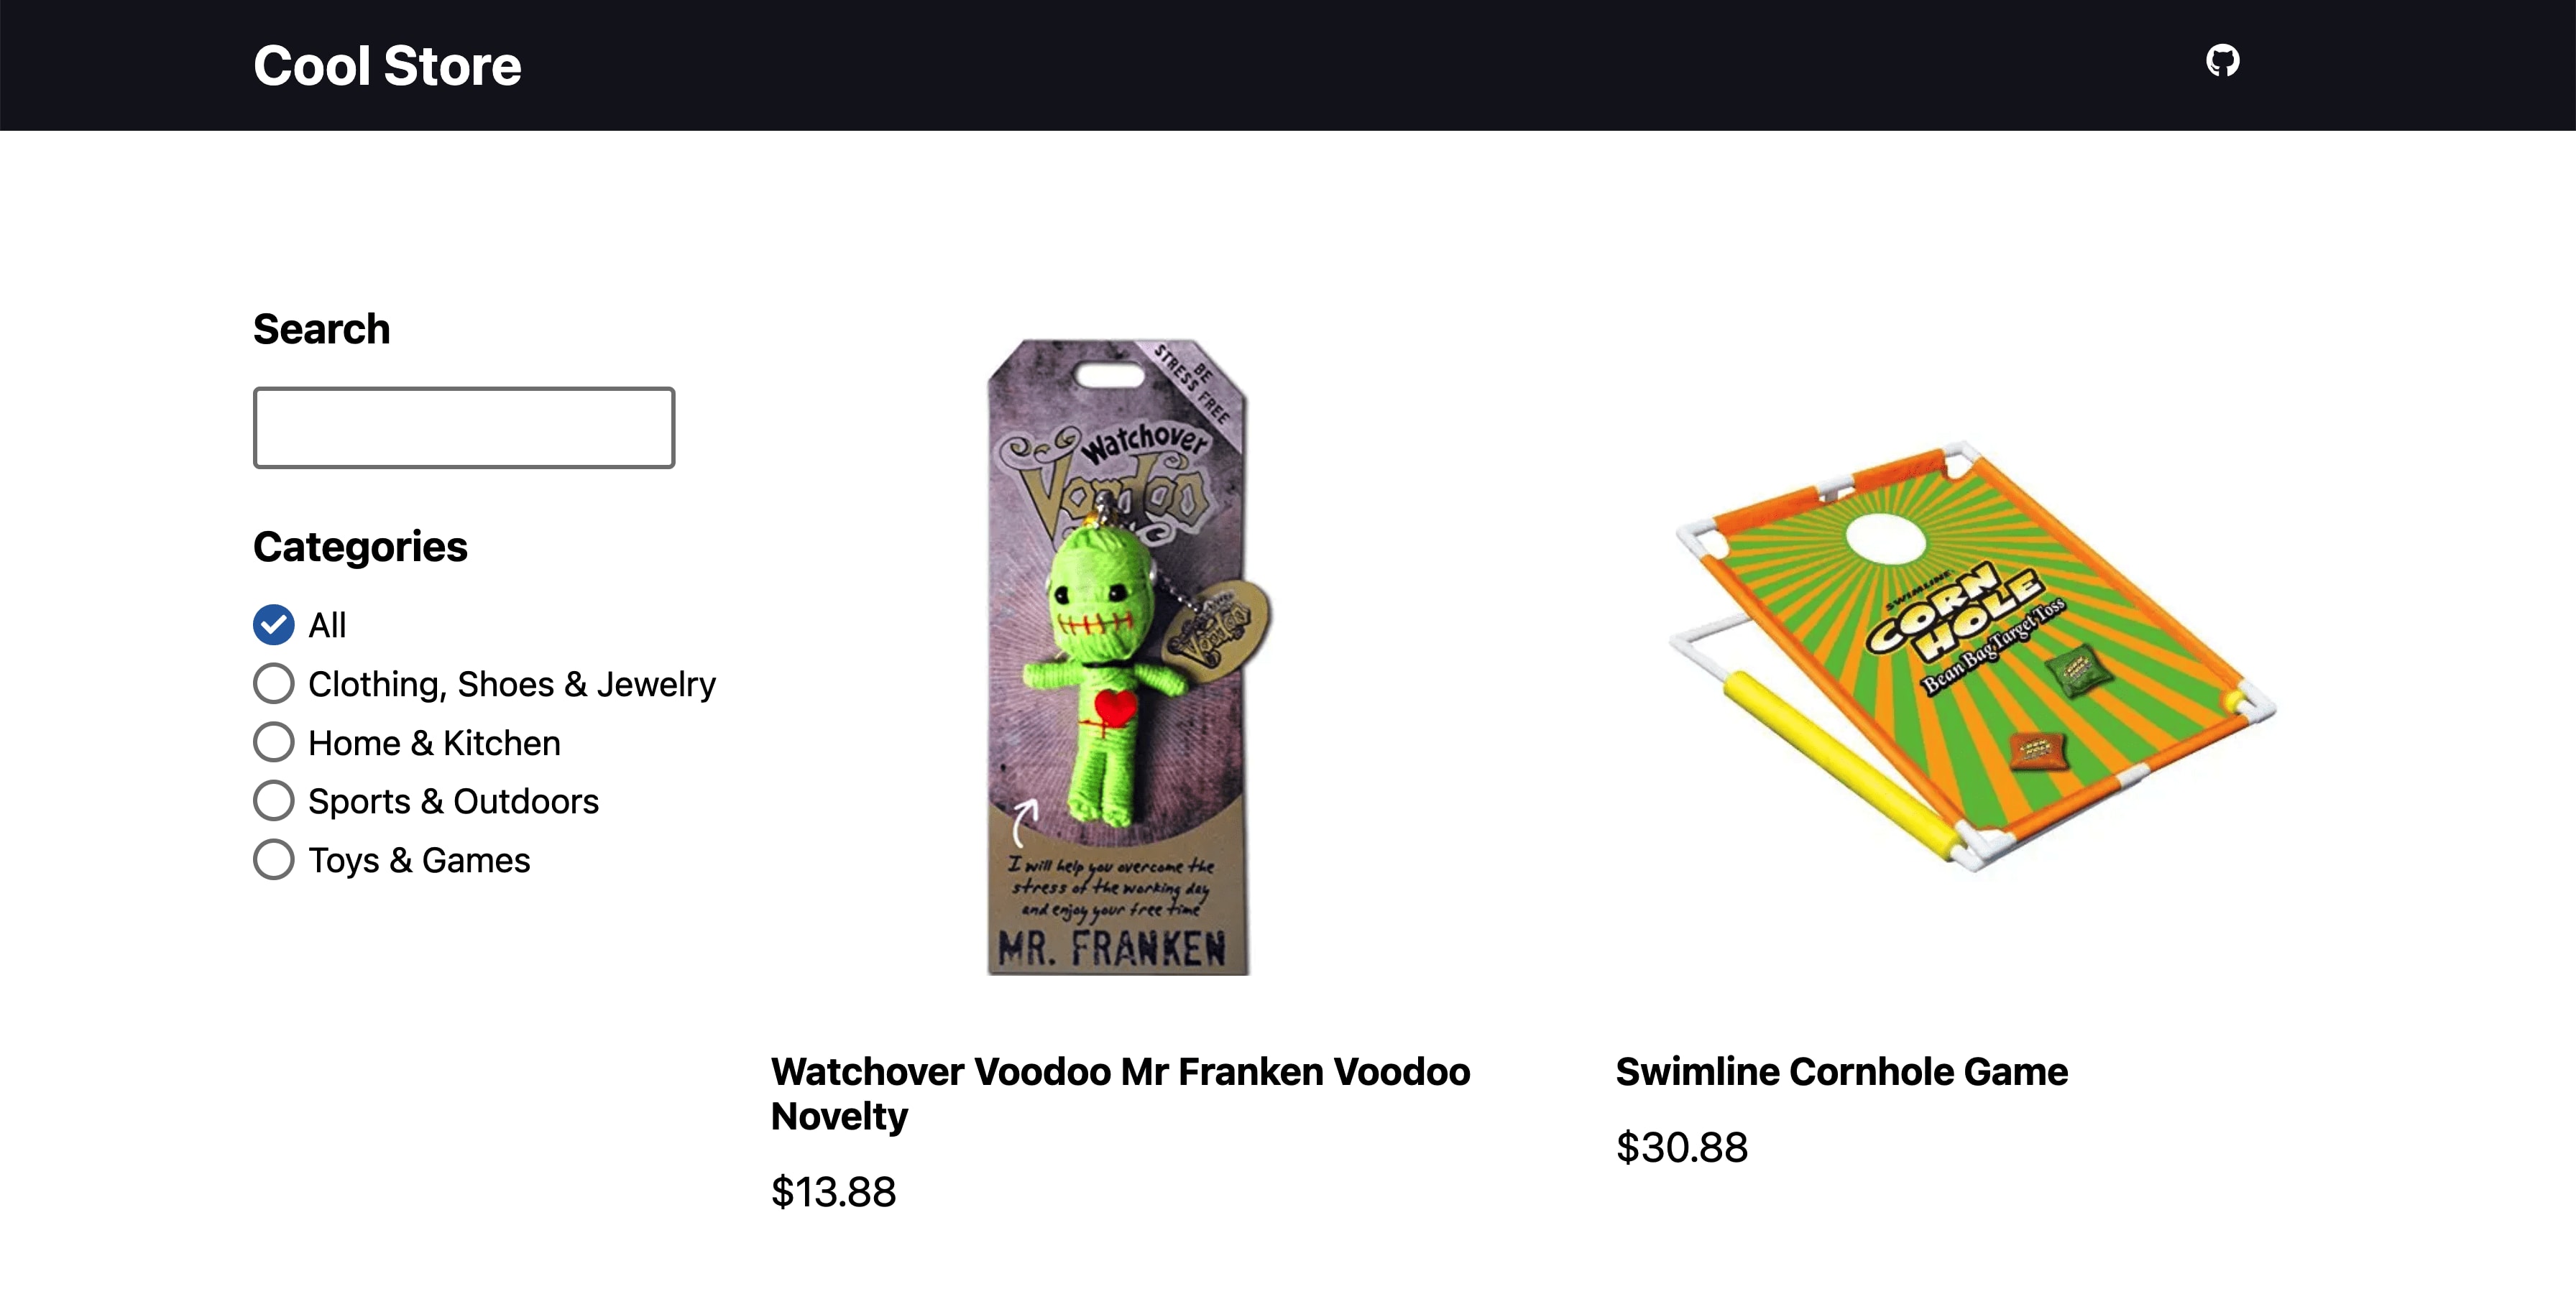
At this point, you can also remove the import statement for the sample CSV at the top of the page, as we’ll no longer need that.
But now, we’re pulling a list of products directly from our database!
Tip: While we’re not going to cover pagination here, you can use techniques like infinite scrolling, a “load more” button, or numbered pages to load the rest of the results.
Step 4: Searching for products in a Xata database with Next.js serverless functions
Now that we have our basic list of products, it’s time to move on to some interaction-based product listings.
First up, is giving the ability to run a search based off of someone’s input.
To start, we can head back to the Xata UI where we can see what searching our products will look like by heading to the Search tab where once we enter a query like “skateboard”, we can not only see we eventually get a list of results, but we see that Xata is querying our products in realtime.
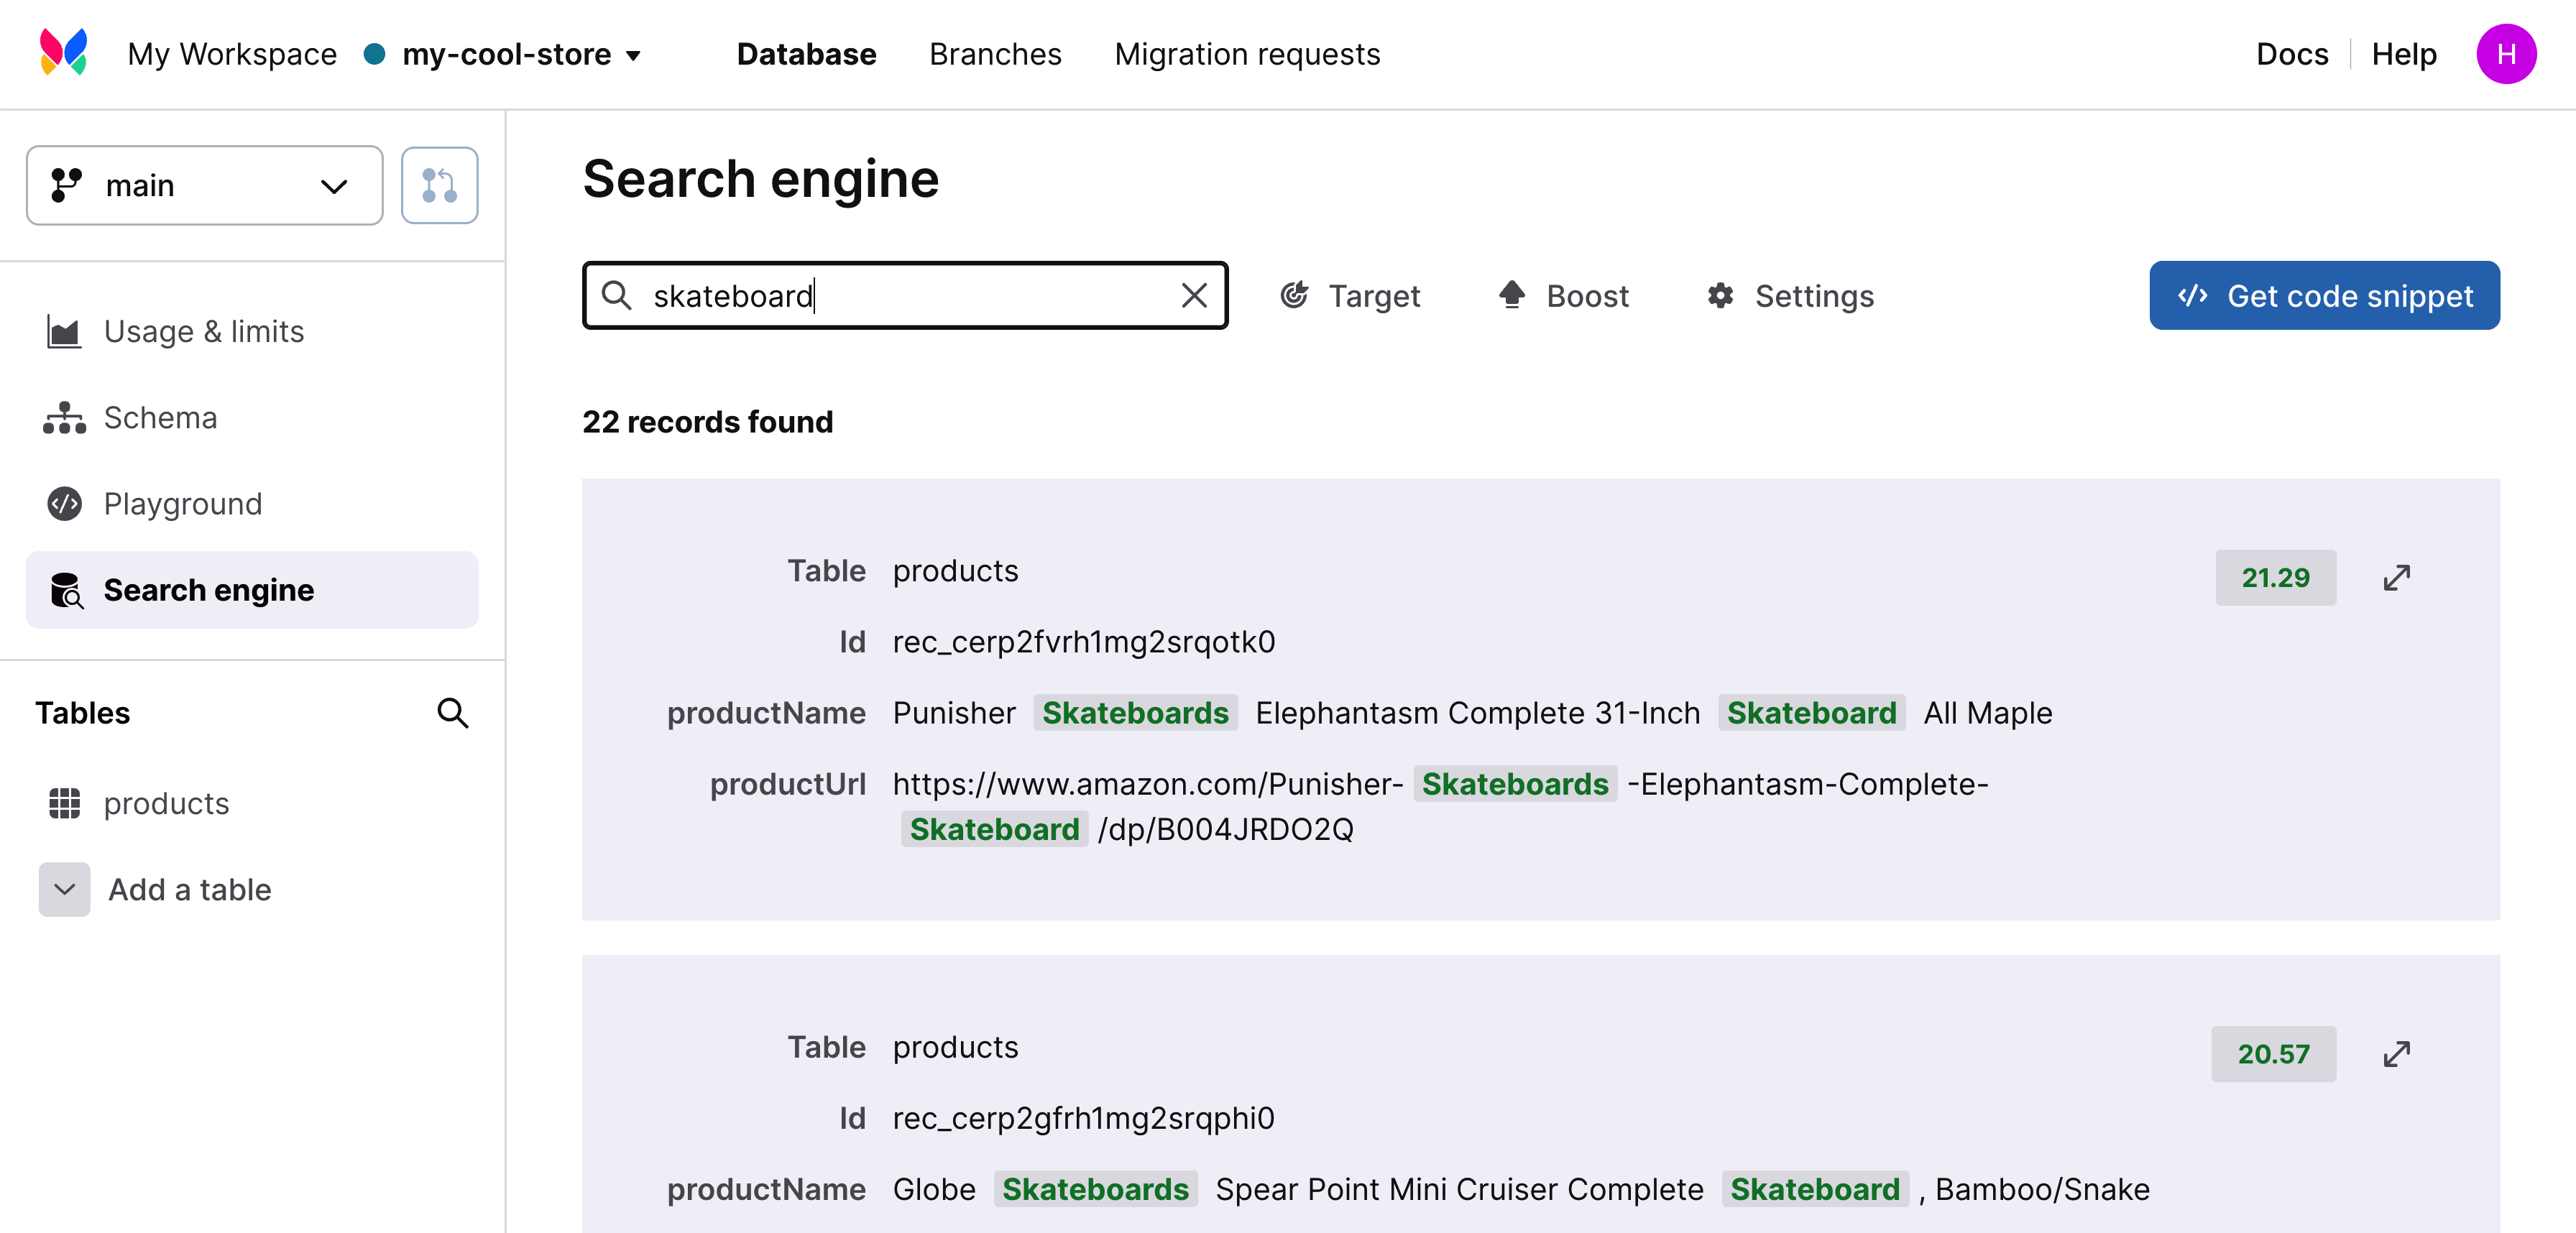
Now let’s get this working in our application.
On the right side of the page, we’ll again see our Get code snippet button, where we’ll see similar bits of code and commands like we did earlier, but now we see a snippet that includes how to programmatically search a table.
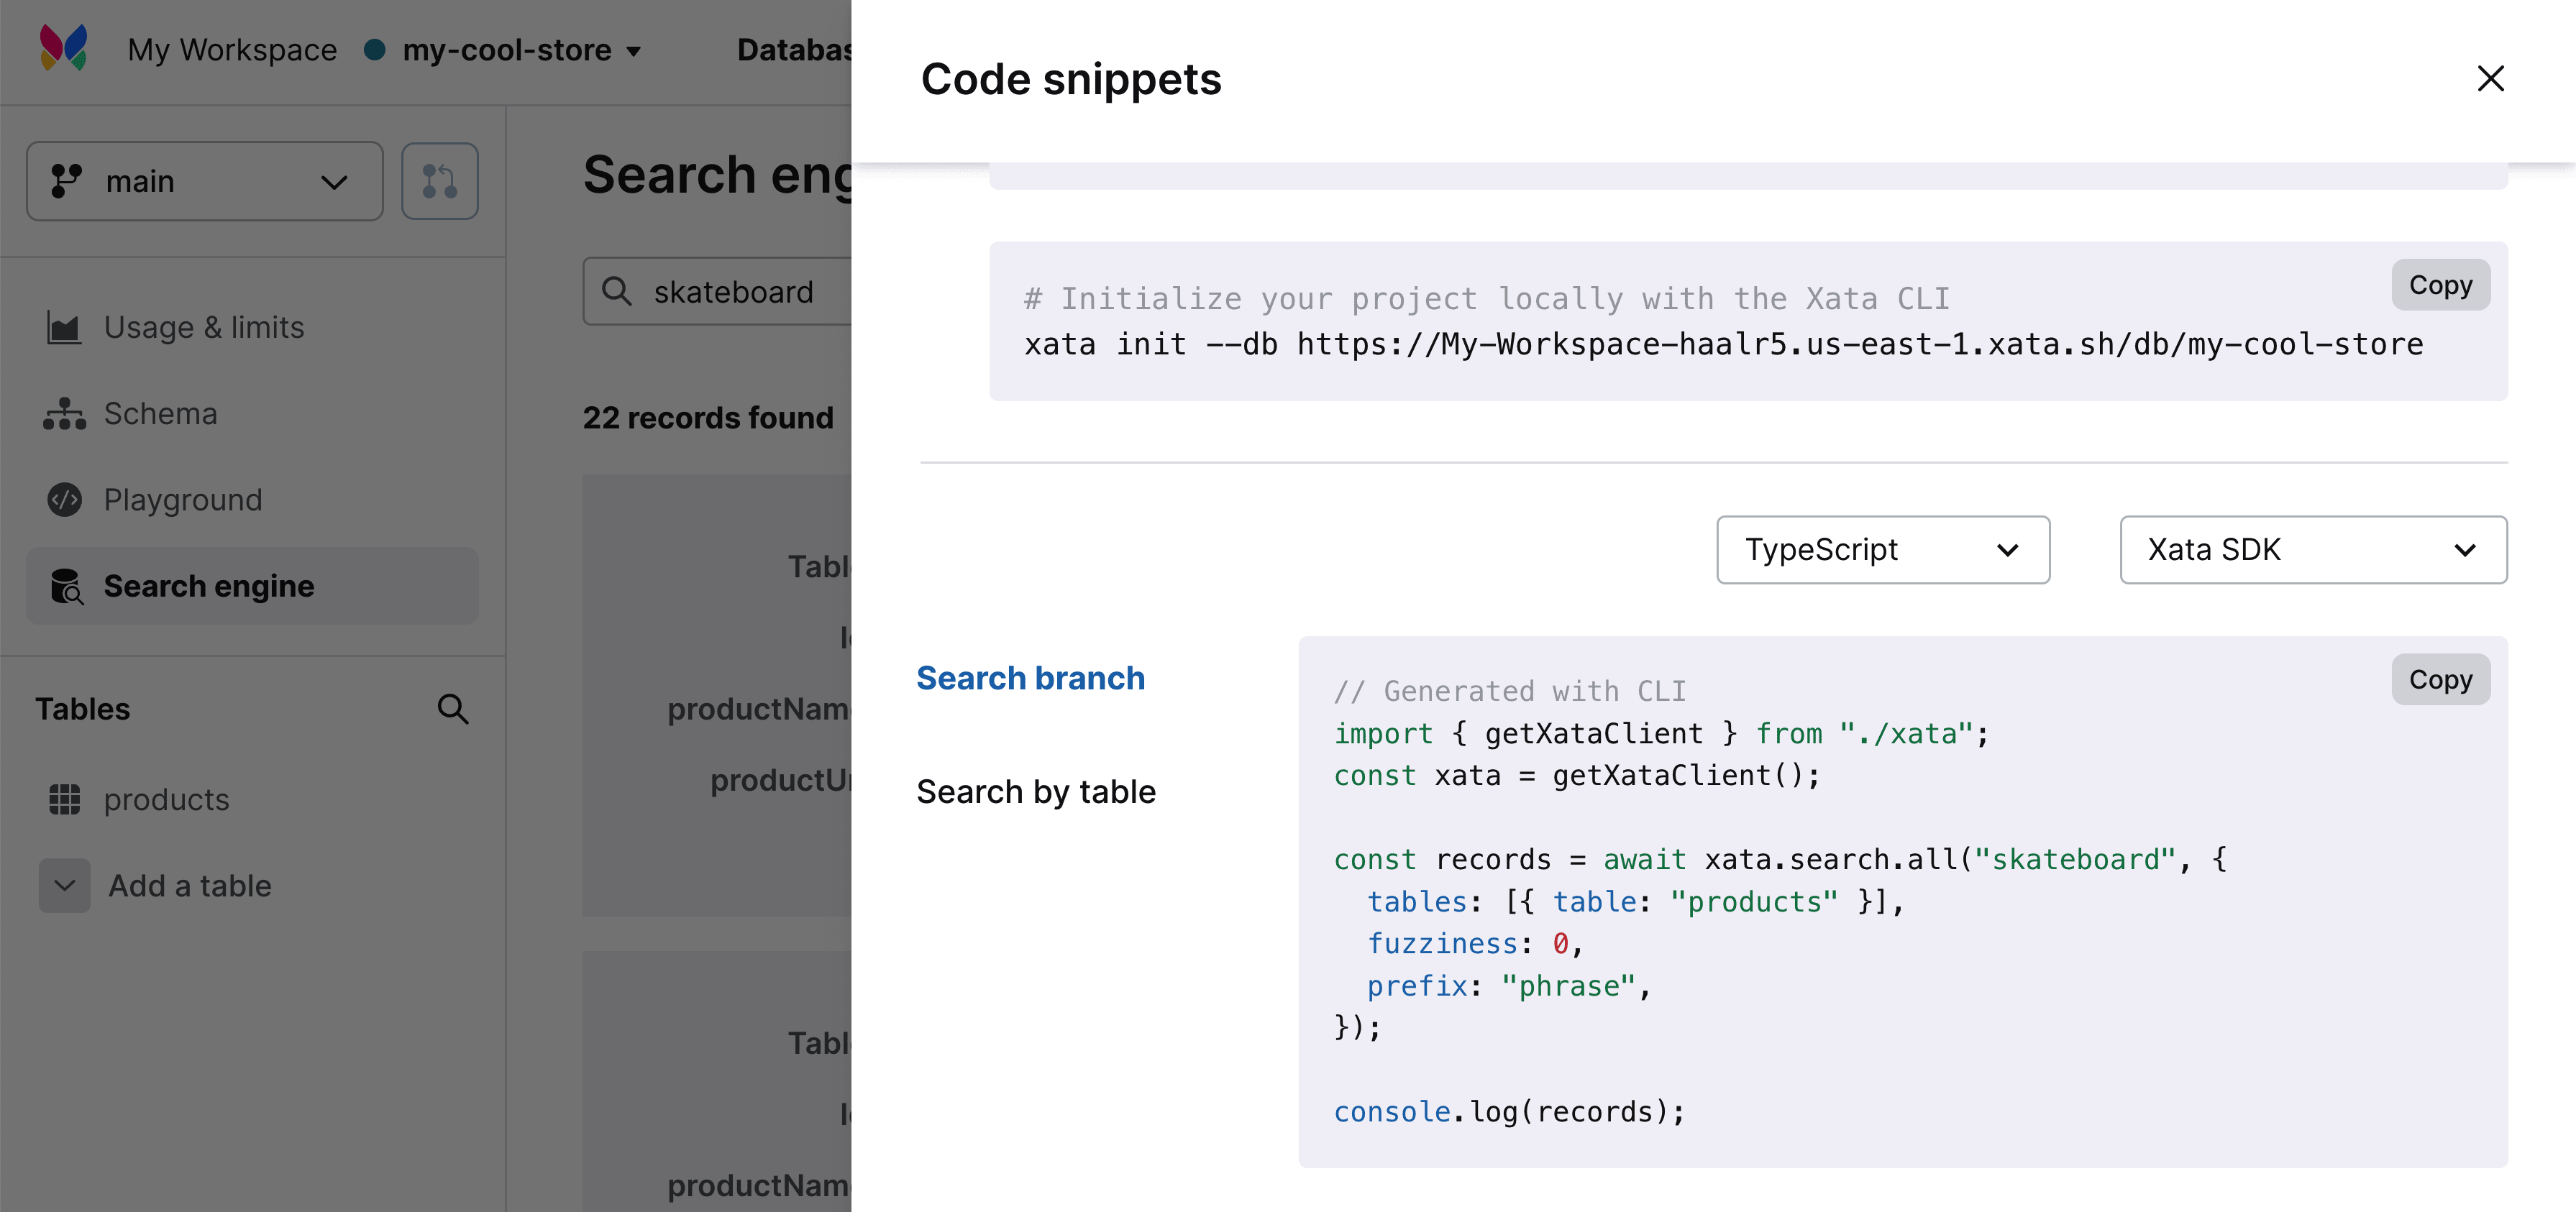
We’ll come back to copy this in a second, but for now, let’s head into our application where we’ll now want to create our serverless function.
Create a new file search.js inside of src/pages/api.
Inside src/pages/api/search.js add:
export default async function handler(req, res) {
  const { query } = JSON.parse(req.body);

  res.status(200).json({ products: [] })
}
Here we’re setting up a handler function which will be invoked when our endpoint is hit, where we’re parsing the body for a search query and ultimately passing back our products.
Now let’s add our search snippet.
At the top of search.js let’s first import our client with:
import { getXataClient } from 'src/lib/xata';Tip: this should be the same import statement that you are using in
src/pages/index.js
Next, we want to get our client, which we can do outside of our handler function:
const xata = getXataClient();Then, we can run our search using a slightly tweaked version from the Xata dashboard that dynamically passes in our search query:
const records = await xata.search.all(query, {
  tables: [{ table: 'products' }],
  fuzziness: 0,
  prefix: 'phrase',
});
Finally, before we try to use this endpoint, we need to pass back the products in the response, so update the res.status line to:
res.status(200).json({
  products: records.map(({ record }) => record)
});
At this point, we should have our endpoint ready to use to create search requests, but we need a mechanism to trigger it.
Tip: if you want to test the Next.js API route before actually using it in the application you could use tools like Postman to make requests!
Back inside our application, let’s head to src/pages/index.js and set up our search handlers.
If you’re following along, the application should already have a function that will fire any time someone starts typing in the search input. It uses debouncing on that function to avoid making a ton of requests when typing, limiting it to one request every 250ms.
But ultimately what happens is when someone searches, it updates the searchQuery state variable, which we’ll use to trigger a new search query.
Before we do that, we want to have somewhere to store our search results.
Let’s create a new state variable to store our search results:
const [searchResults, setSearchResults] = useState();Now, let’s use the useEffect hook so that any time the searchQuery value changes, we trigger a search.
If you haven’t already imported it, first import useEffect:
import { useState, useEffect } from 'react';Then under our state instances, add:
useEffect(() => {
  if ( !searchQuery ) {
    setSearchResults(undefined);
    return;
  };

  (async function run() {
    const { products } = await fetch('/api/search', {
      method: 'POST',
      body: JSON.stringify({
        query: searchQuery
      })
    }).then(r => r.json());
    setSearchResults(products);
  })();
}, [searchQuery]);
Here we’re:
- Create a new instance of useEffect that will fire a function any time
searchQuerychanges - If we don’t have a search query, we’re making sure that we reset our search results state
- But if we do have a query, we’re running an asynchronous function that triggers a new request to
/api/search - Inside of that request, we POST our query in the body to our newly created endpoint
- And finally when we get the results, we set our results state with the resulting products
Note: I’m using a self-invoking asynchronous function to run my fetch request because I like to use async/await, but you can instead chain
.thenstatements instead if preferred!
Now if we start to type in a search query, we won’t quite notice anything yet, since we’re not using the results, but if we look in our network requests, we should not only see requests being made to /api/search but we should also see successful responses!
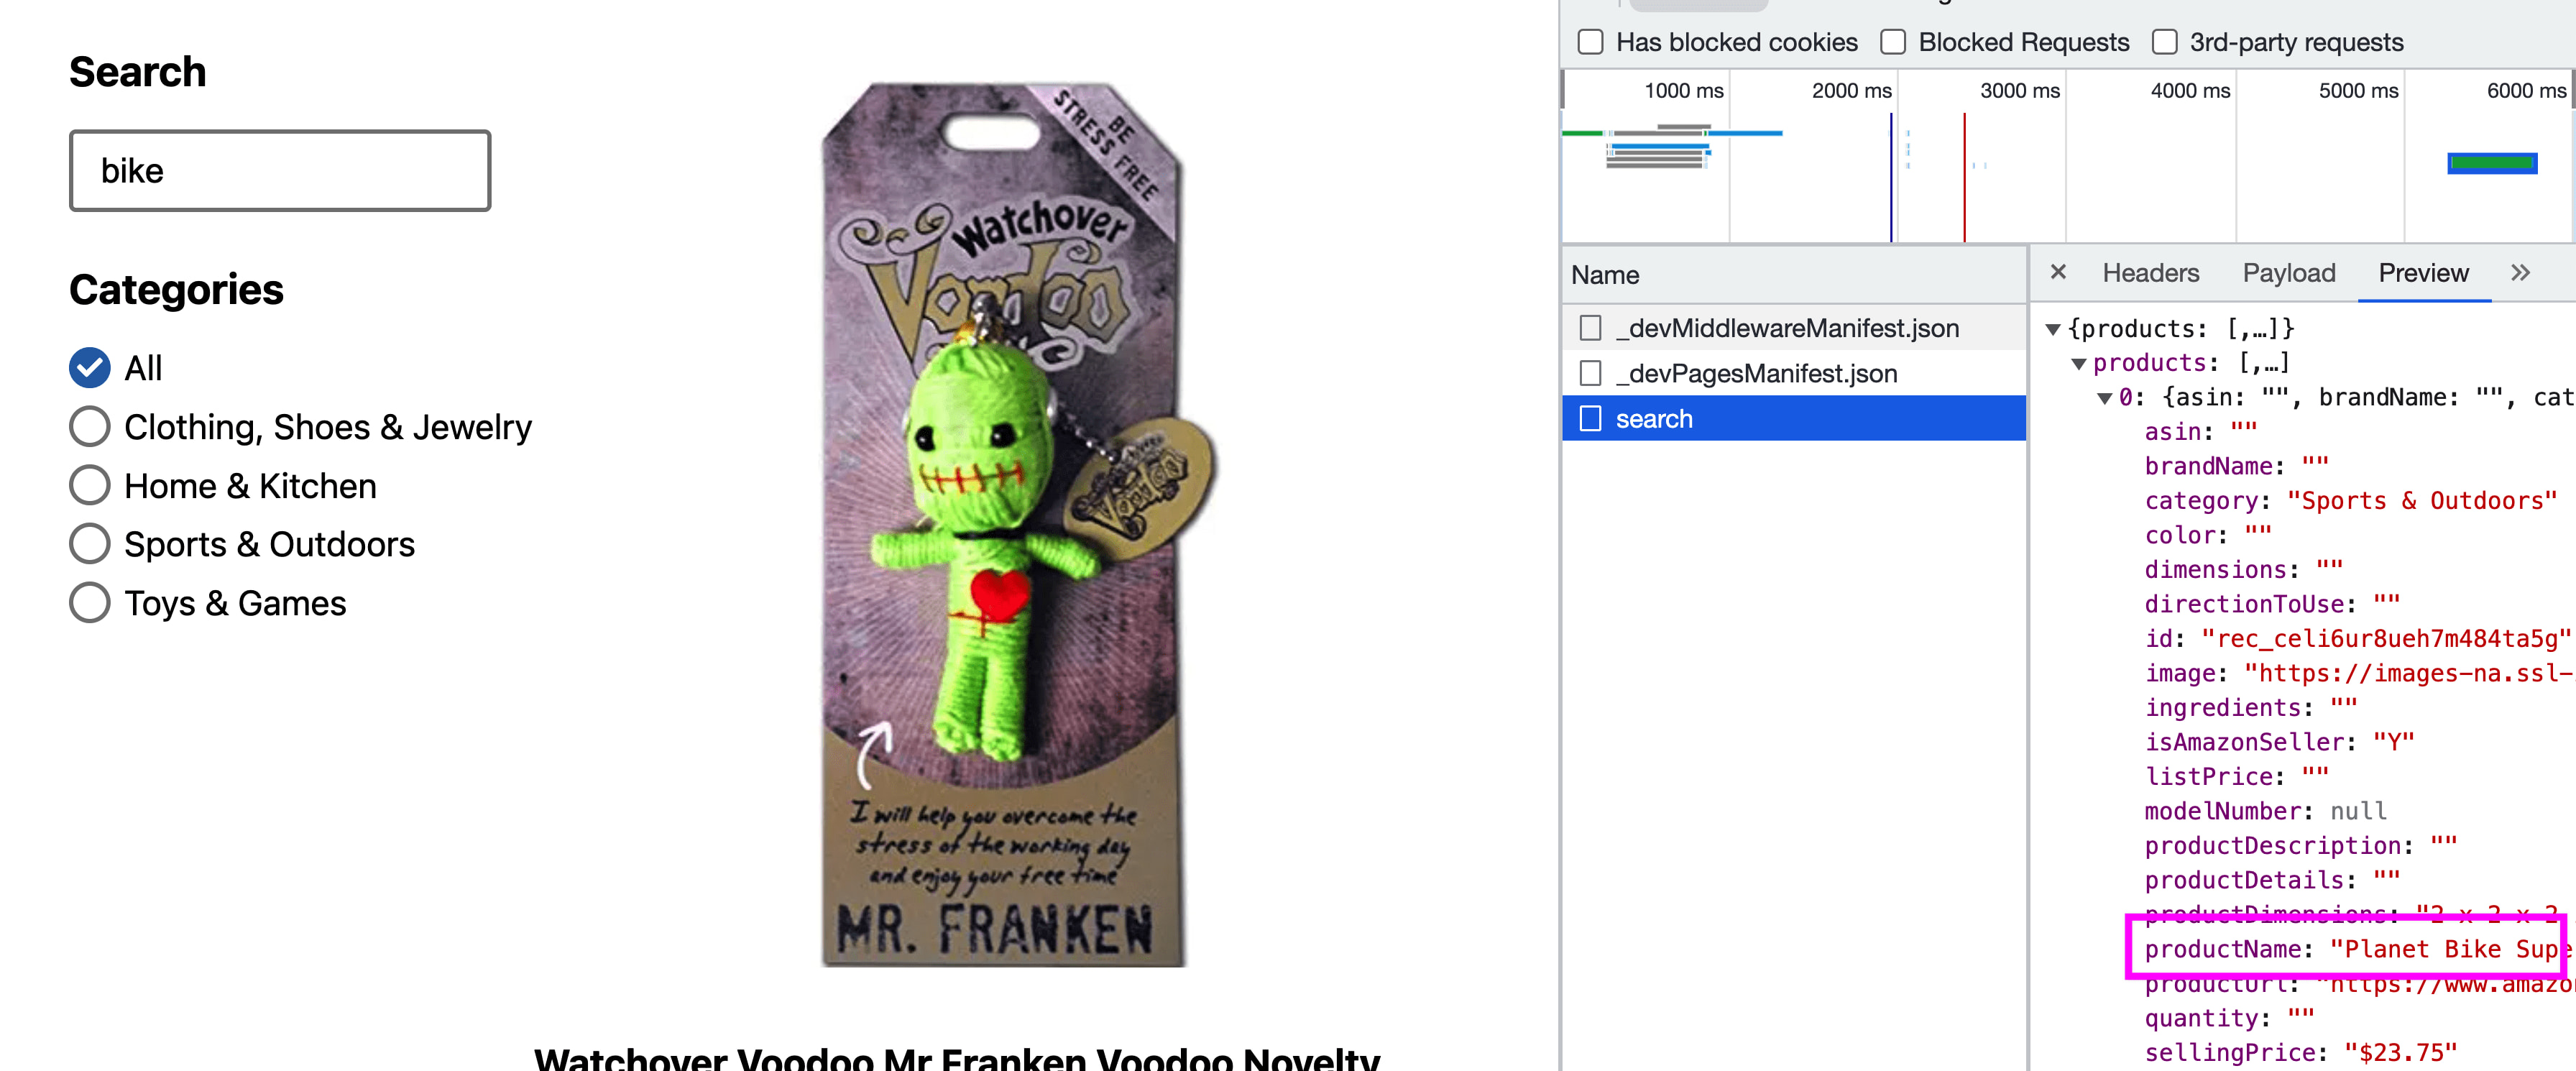
So now let’s hook up the UI.
The trick here is we only want to show search results if we have an active search, so what we’ll do is show our existing products by default, but show searchResults if we have a query.
After our searchResults state instance add:
const activeProducts = searchQuery?.length && searchResults ? searchResults : products;Here we’re:
- Creating a new
activeProductsconst - We’re first checking if we have a search query and if we have any results
- If both of those are true, we use our search results
- Otherwise we use our standard products list
And to wire up our activeProducts, update the products.map statement where we’re listing out our products to:
<ul className={styles.products}>
  {activeProducts.map(product => {
And after making the update, the app might already load the active products, but if not, make a new search, and once you do, we should now see our search results listed on the page!
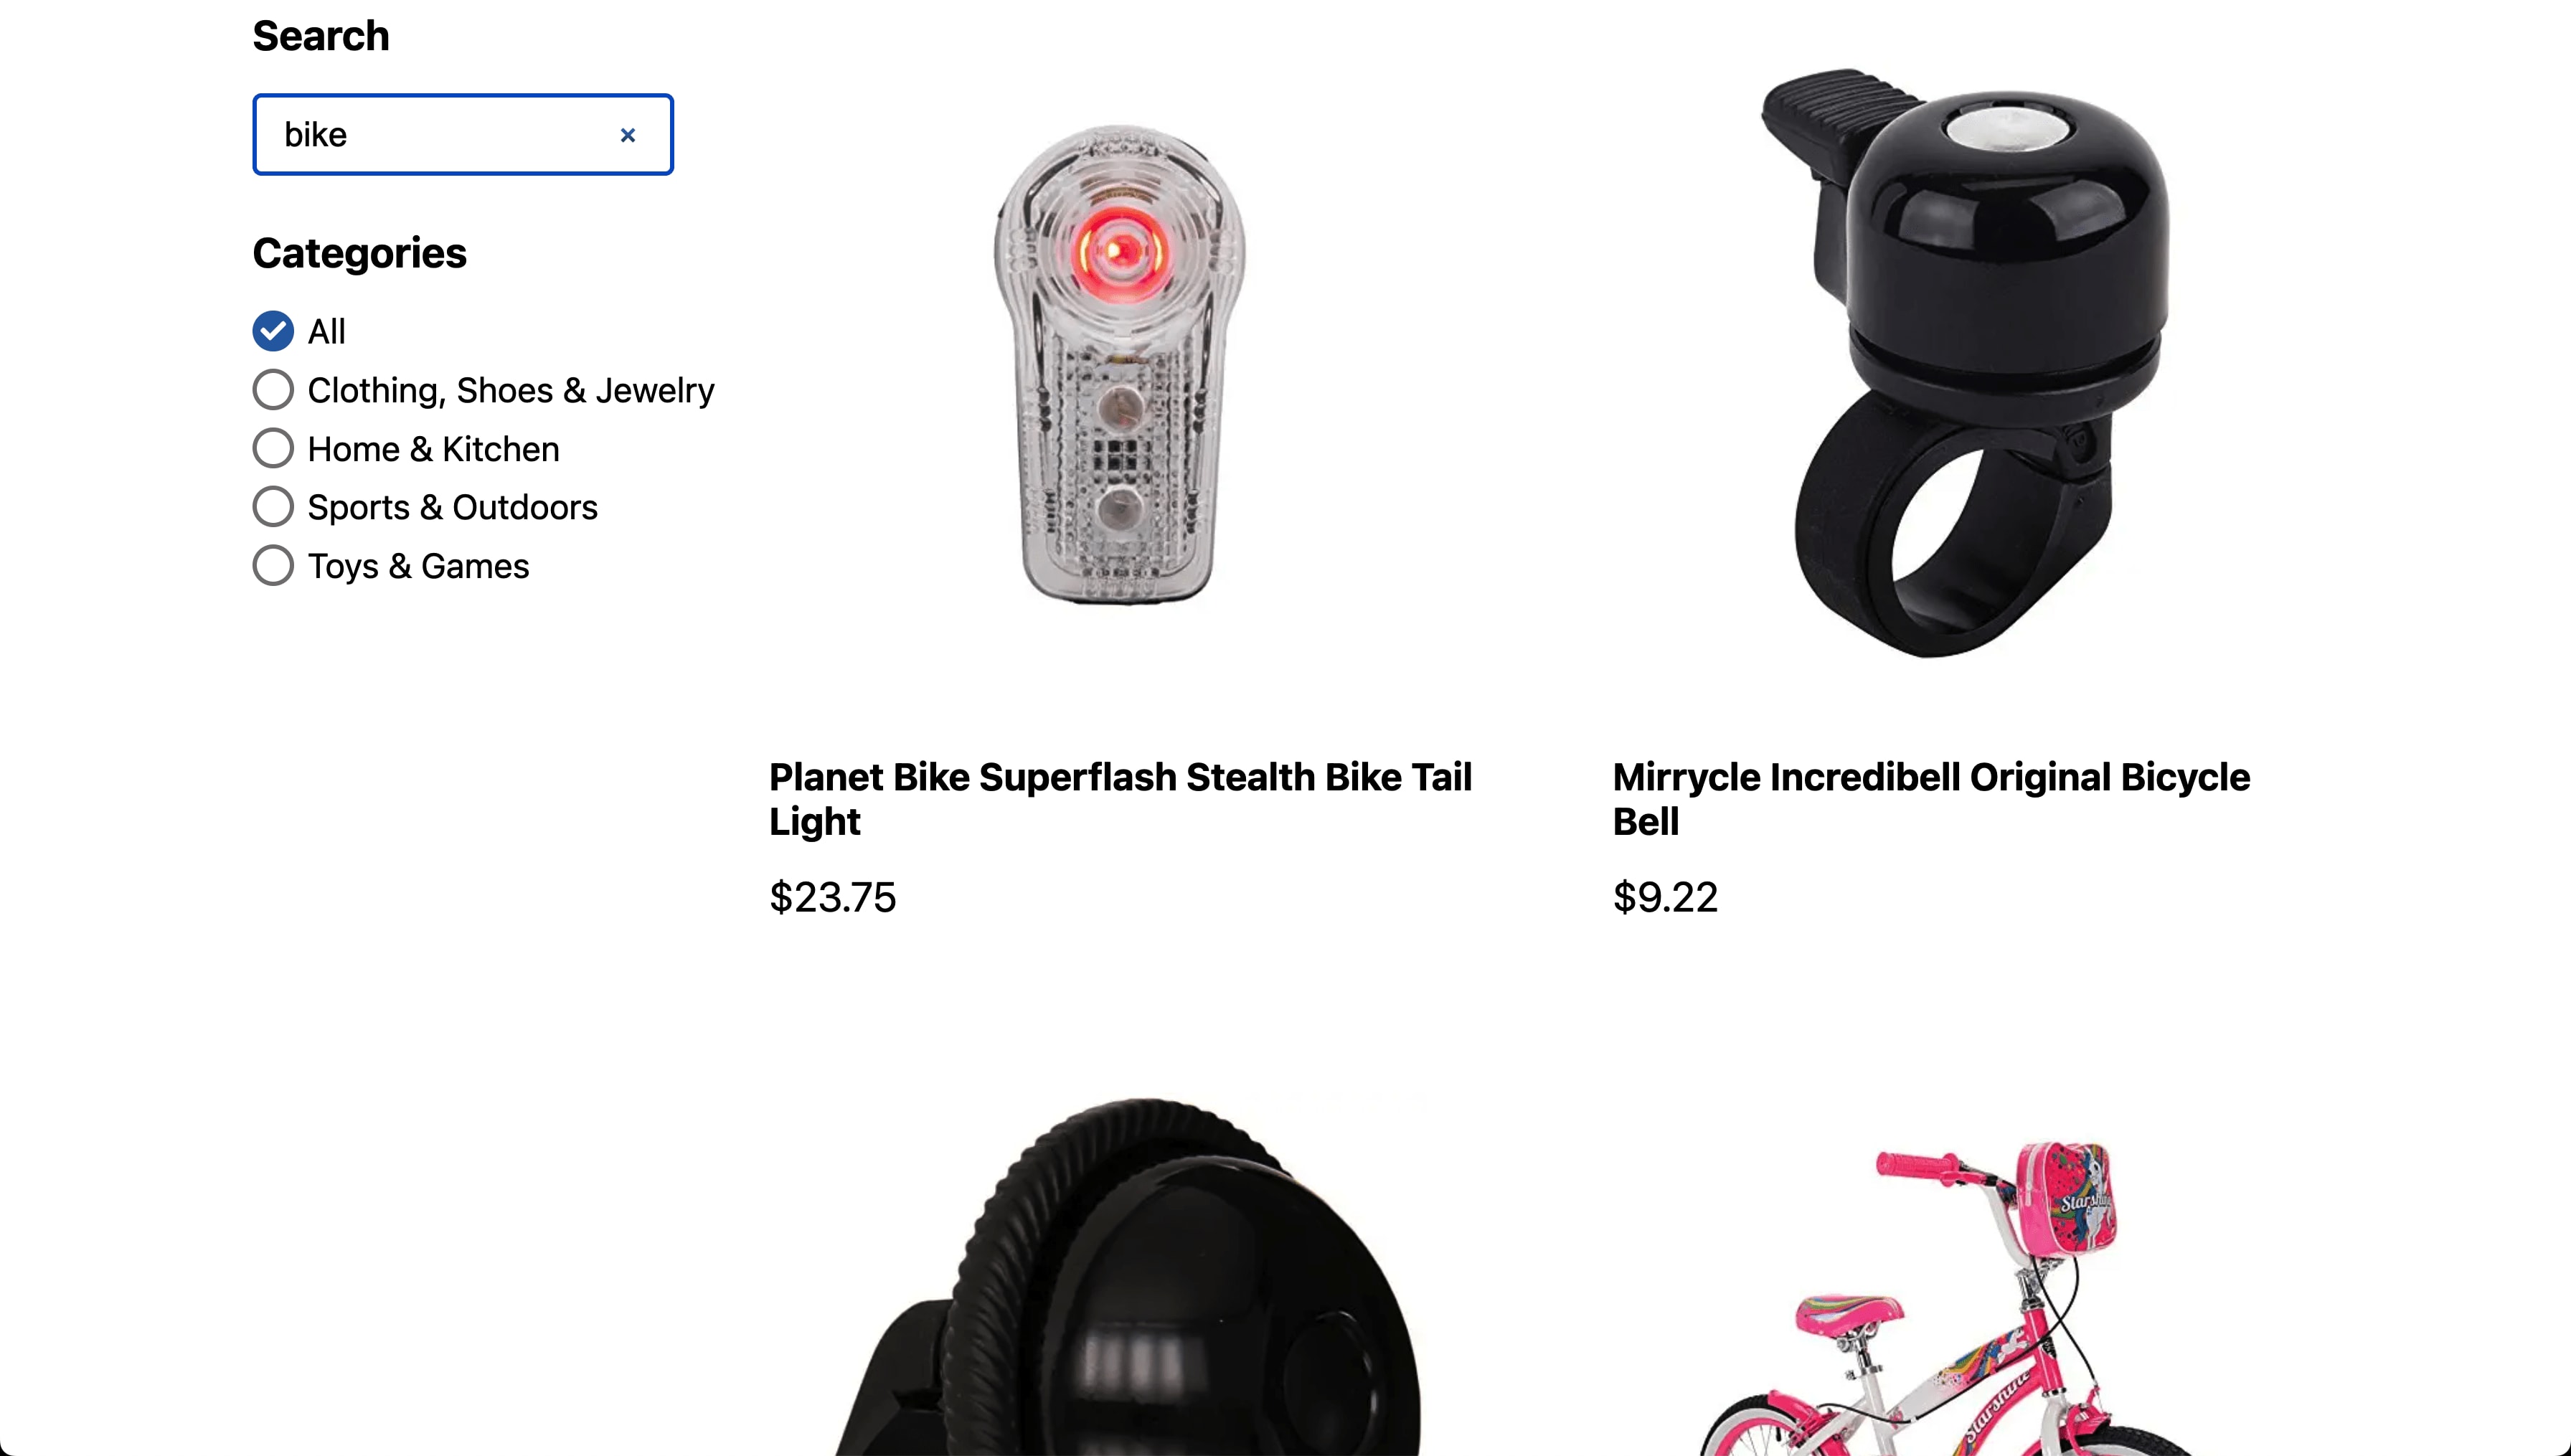
Step 5: Dynamically loading categories and number of products with Xata aggregations
We have search working, but we also want to be able to filter by category as well as see how many products are in each category.
Currently our categories are being set up manually by looking at our list of products and pulling in any existing categories.
Instead, we can load these directly from Xata dynamically.
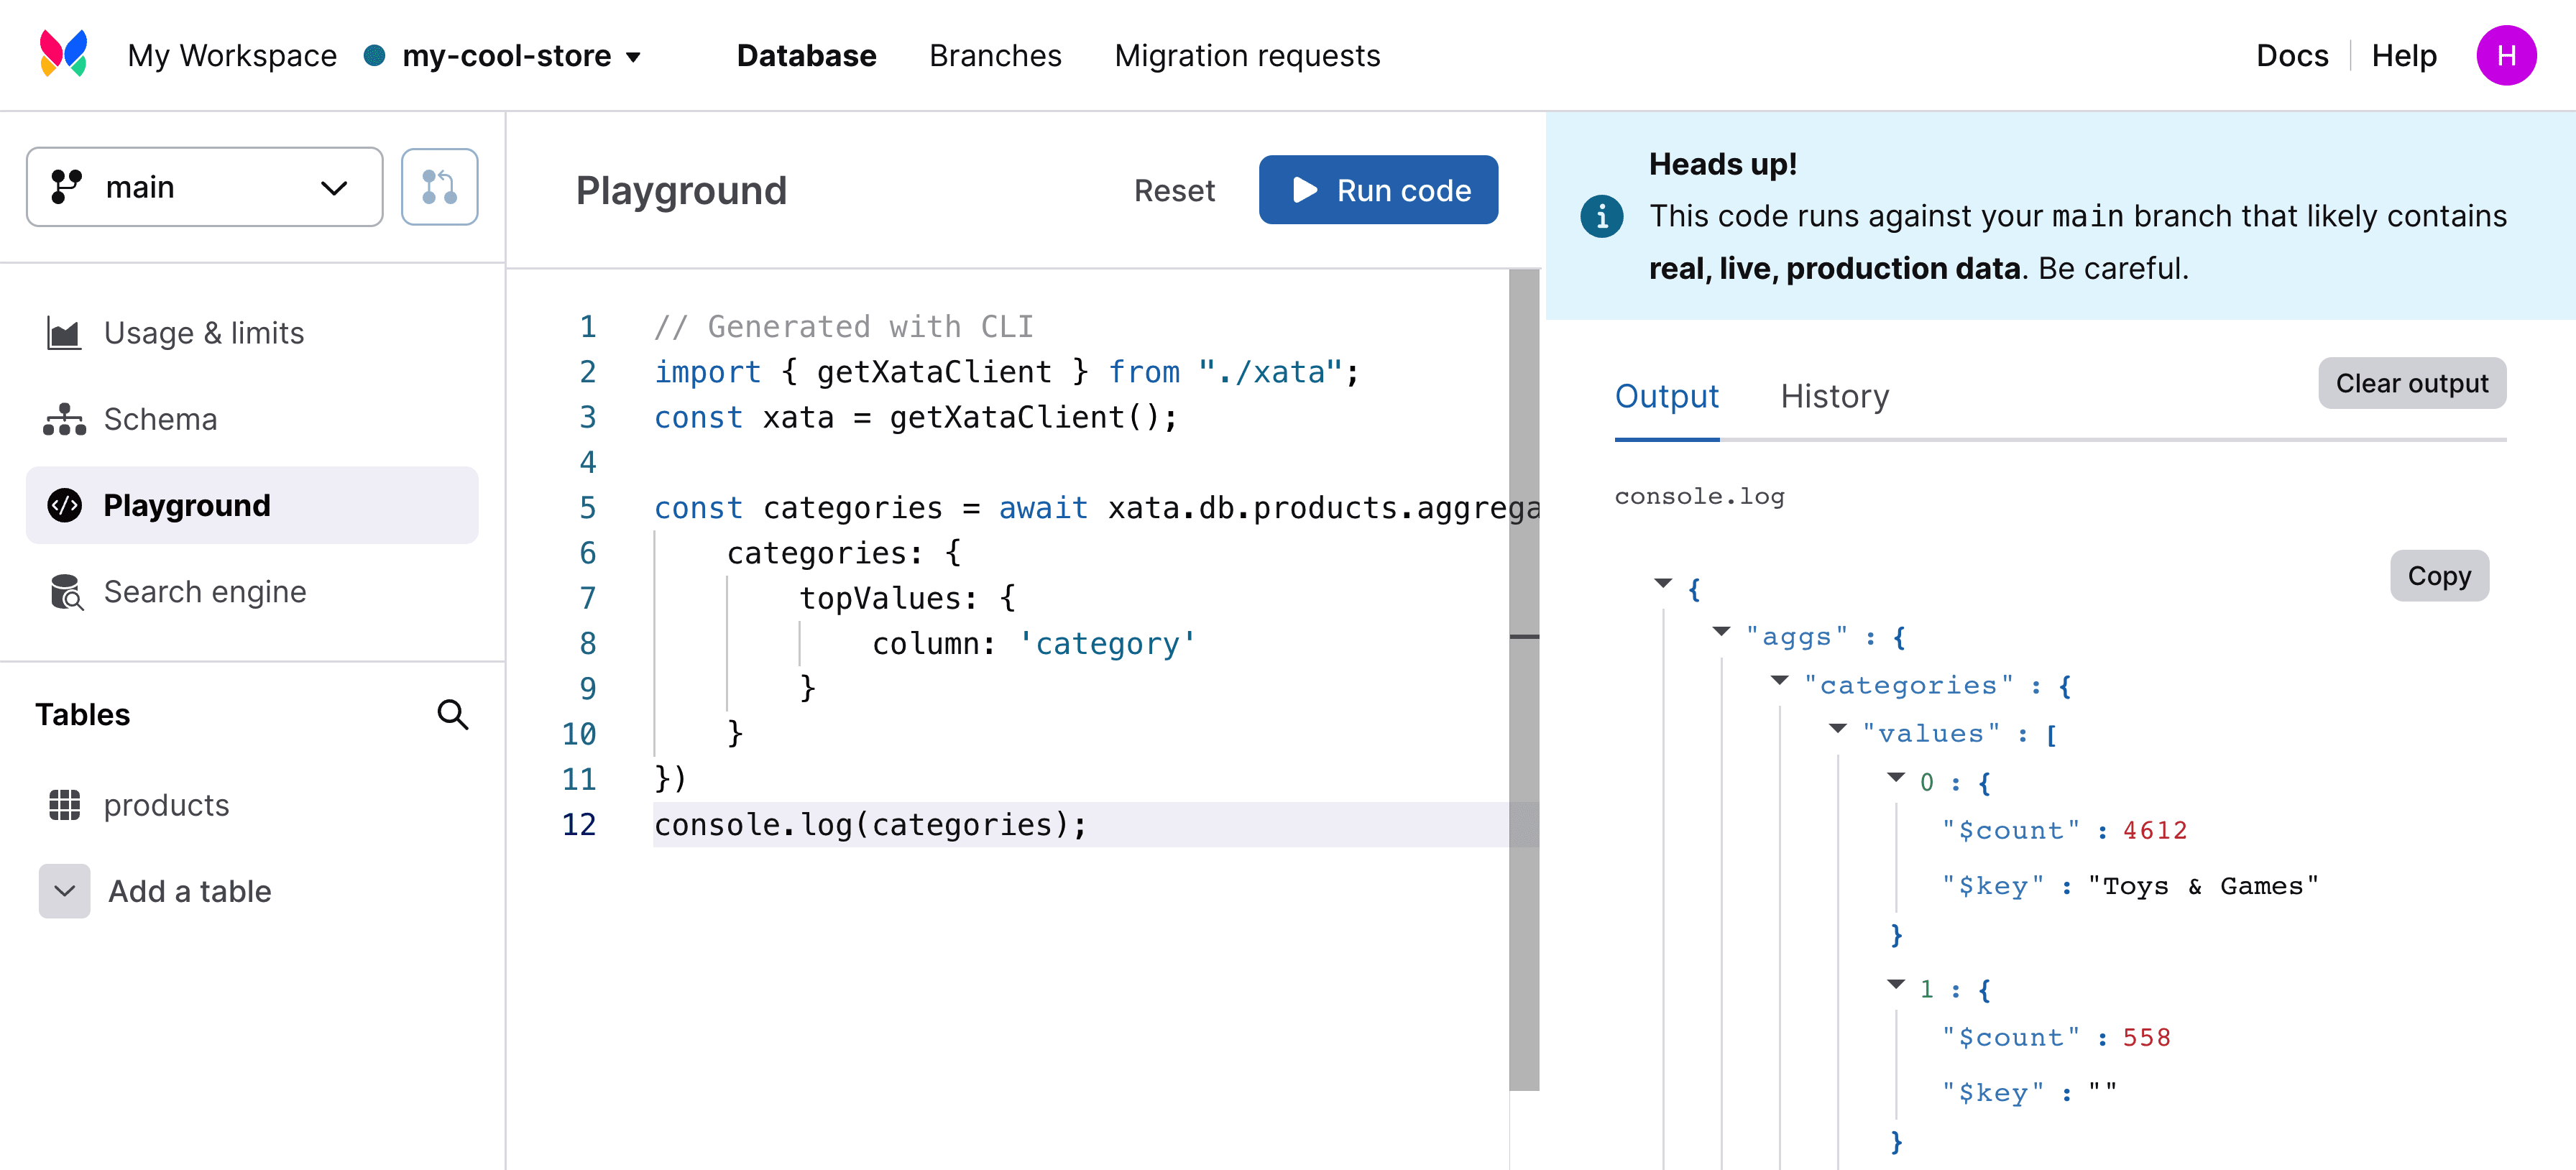
To first see how we can make this request, let’s head to Xata where we can figure out the needed request using the Playground tool.
By default, Xata shows you how to get the paginated items, but we want to get the aggregations that show existing categories and how many products each have.
If we start typing out some code, one thing we’ll notice is we’ll get code completion.
Try typing out:
const categories = await xata.db.products.aggregate()And when typing out aggregate, you’ll notice that not only do you get that code completion, we get a reference for what that method is expecting.
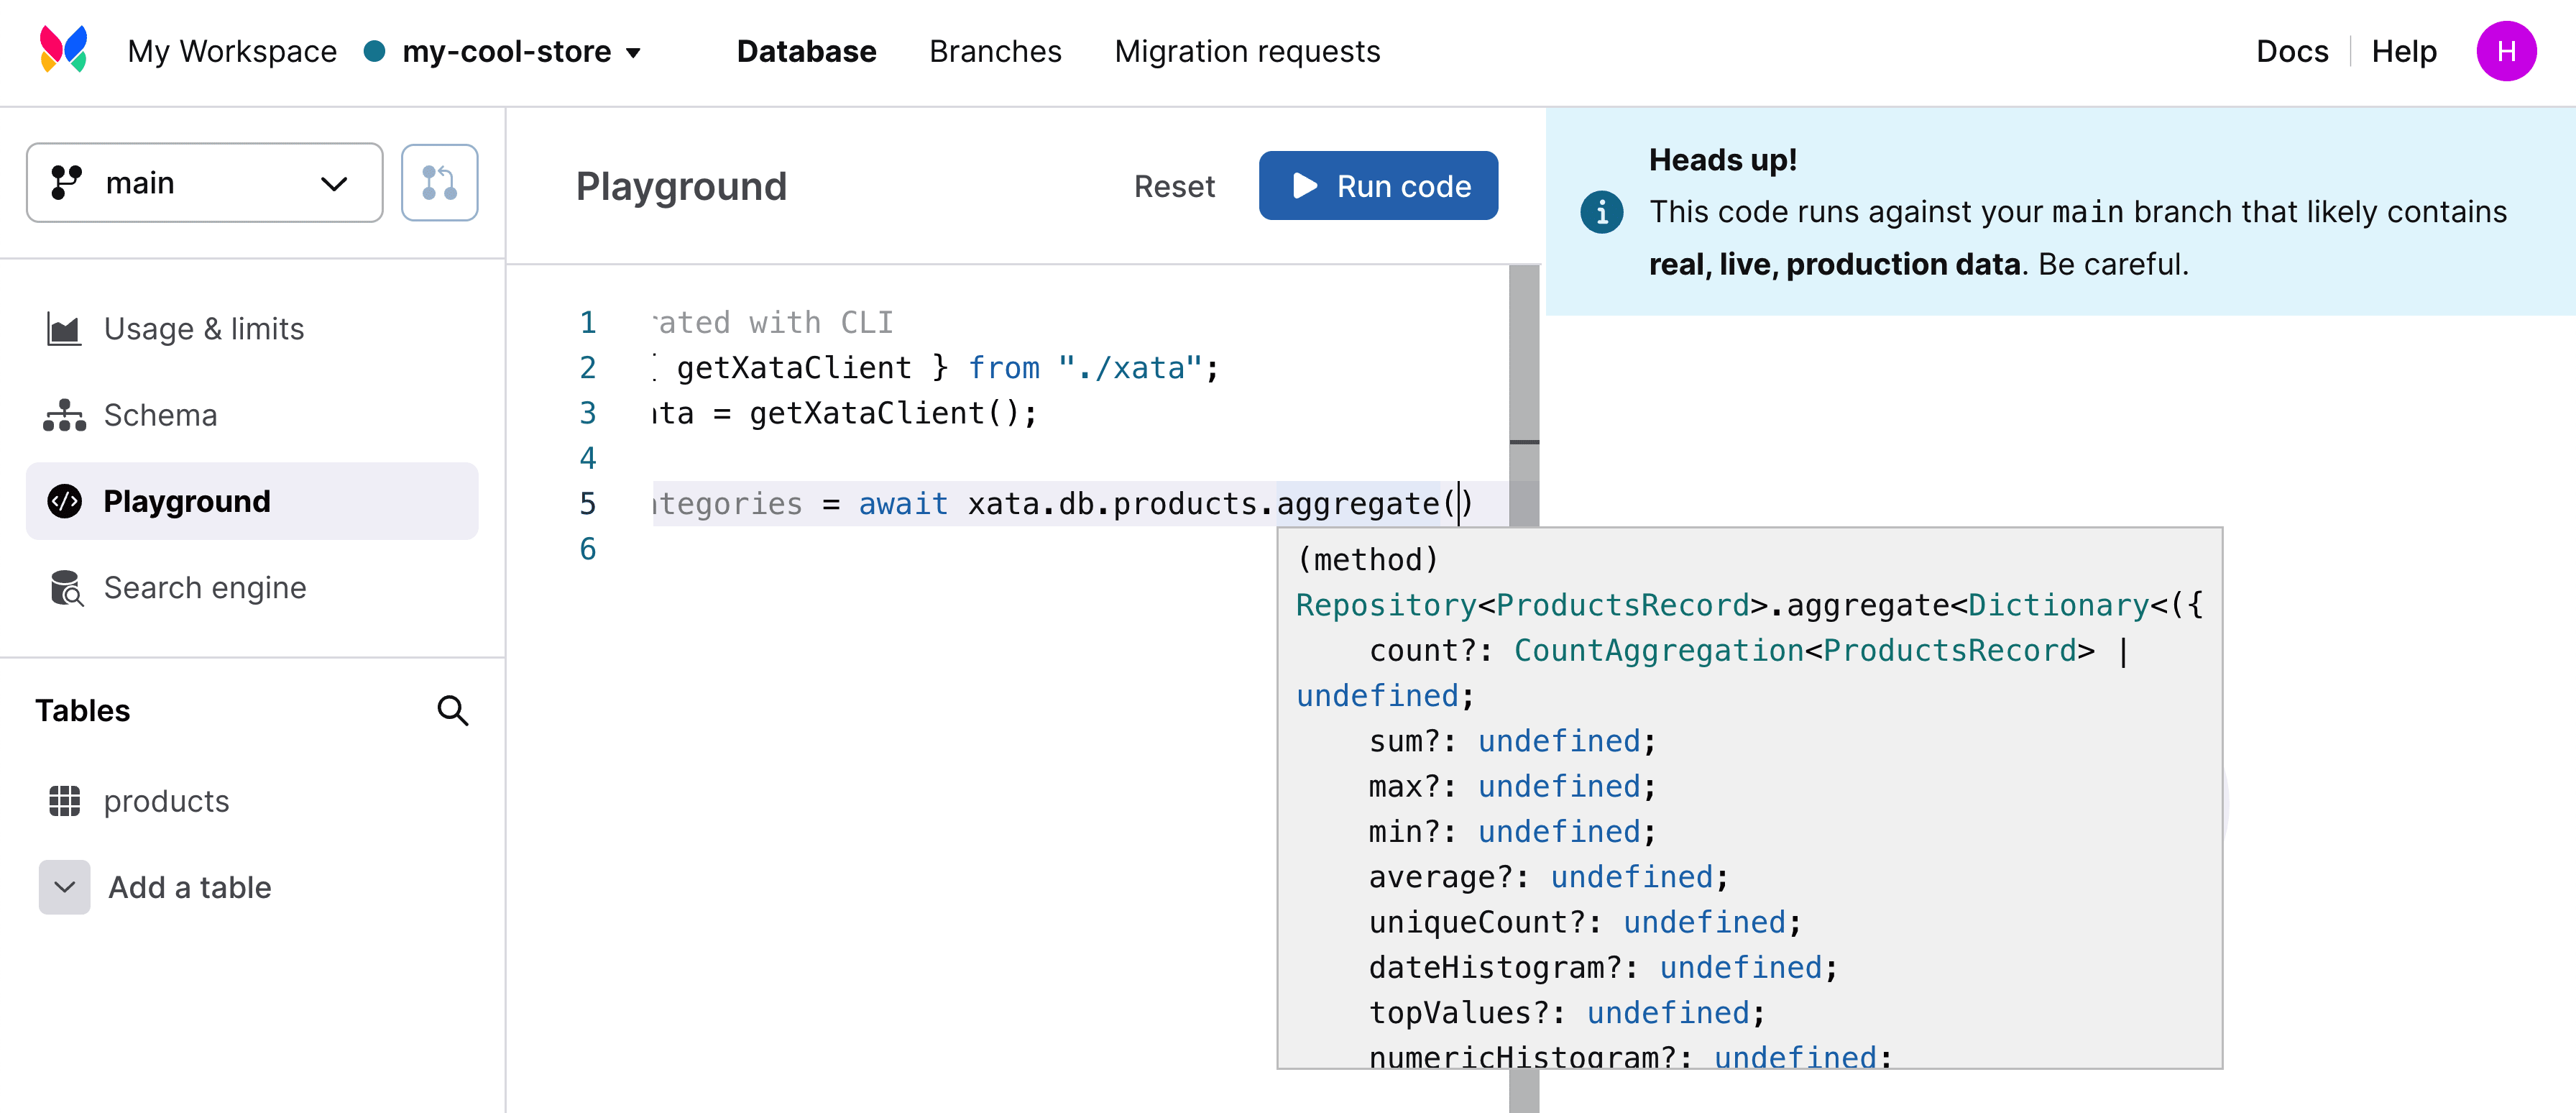
So we see we have a bunch of options, but what we’re going to do is use the topValues option on our category column:
const categories = await xata.db.products.aggregate({
    categories: {
        topValues: {
            column: 'category'
        }
    }
});
console.log(categories);
And if we run that in our Playground, we should now see all of our top categories as well as how many products are in each.
Let’s now pull that into our application.
Starting off, like Step 4, we want to first set up an endpoint to make a request for the categories.
Inside of the src/pages/api directory create a new file categories.js and inside add:
import { getXataClient } from 'src/lib/xata';

const xata = getXataClient();

export default async function handler(req, res) {
  const { aggs } = await xata.db.products.aggregate({
    categories: {
      topValues: {
        column: 'category'
      }
    }
  });

  const categories = aggs.categories.values.map(category => {
    return {
      name: category.$key,
      count: category.$count
    }
  });

  res.status(200).json({ categories })
}
Here we’re:
- Setting up a new endpoint similar to
search.js - Inside, we’re making our aggregation request to our products like we did in our playground
- Once that request is successfully made, we destructure
aggsand use the category data to create an array with the category name and number of products - Finally we return that category data
Now let’s use it in our app!
Starting off, when we request our categories, we need a place to store them, so let’s first add a new state instance:
const [searchCategories, setSearchCategories] = useState();Then we need to request them.
We’ll first add a new instance of useEffect where we’ll make the request:
useEffect(() => {
  (async function run() {
    const { categories } = await fetch('/api/categories').then(r => r.json());
    setSearchCategories(categories);
  })();
}, []);
Here we’re running a similar asynchronous function in a useEffect, but this time to our categories endpoint, where we then set our searchCategories state .
If we take a second to take a look at what our data looks like in a console log, we’ll see all of our categories and the number of products for each one.

But if you look close enough, you’ll notice that we actually have an empty category, meaning, those products never had a category set.
While we’re working with sample data, this is a real world scenario, because maybe the product manager forgot to set a category, so you’re left with all of the products without one.
Two ways we can handle this are filtering out the empty category for our list or setting a label such as “No Category”.
For now, let’s go with the former, so we’re going to create a new const to use where we can create our activeCategories much like we did with products.
Add the following below activeProducts:
const activeCategories = searchCategories?.filter(({ name }) => !!name) || [];Here we’re writing a filter that checks if the category has a name and if we don’t have any categories at all, we default to an empty array.
Finally, we need to use our new activeCategories.
Find the Categories section and replace the entire map block with:
{ activeCategories.map(category => {
  return (
    <li key={category}>
      <label className={styles.radio}>
        <input className="sr-only" type="radio" name="category" value={category.name} />
        <span><FaCheck /></span>
        { category.name } ({ category.count })
      </label>
    </li>
  )
}) }
Here’s what we’re changing:
- The map statement is now running on
activeCategoriesinstead ofcategories - Because we were previously using an array of strings, we now have an object, so we use the category’s name for values and label
- Then we use the count to additionally show it next to the category
Tip: you can also now remove the
categorieslogic fromgetStaticPropsas well as thecategoriesprop from the Home page component.
But now if we reload the page, we can see all of our categories and the number of products in each!
Tip: they’re currently sorted by number of products, but you could alternatively use a sort function to sort by name!
Step 6: Adding a category as a filter to Xata search requests
As a last step, we need to wire up our categories to actually work when selected.
In the previous step, we set up a request to dynamically load them, but we’re not currently doing anything with the selected value.
We can see that if we log out the value of searchCategory, which is being used as the state instance that’s storing the category selection value, once a category is selected, we have the name we need.

To use this, we’re going to apply a filter option to our search endpoint and pass our selected category value in during that request.
Starting off, we need our search endpoint to be able to take a custom category filter.
In order to apply a filter, we can specify the filter property on the table object we want to filter in our Xata search request.
If we head to the Playground and test this out, we’ll see that while “apple” can come up with a variety of categories, with our category filter, we only get the instances where it’s a Toy & Game.

We can set up our endpoint to dynamically take this value.
First, let’s destructure it from our payload:
const { query, category } = JSON.parse(req.body);Then let’s only apply the filter object if we’re passing in a category.
const table = {
  table: 'products'
};

if ( category ) {
  table.filter = {
    category
  }
}

const records = await xata.search.all(query, {
  tables: [table],
  fuzziness: 0,
  prefix: 'phrase',
});
But now, we can pass that value to the endpoint from our app!
Let’s update our useEffect instance where we’re making search requests:
useEffect(() => {
  if ( !searchQuery && !searchCategory ) {
    setSearchResults(undefined);
    return;
  };

  (async function run() {
    const { products } = await fetch('/api/search', {
      method: 'POST',
      body: JSON.stringify({
        query: searchQuery,
        category: searchCategory
      })
    }).then(r => r.json());
    setSearchResults(products);
  })();
}, [searchQuery, searchCategory]);
Here we’re making a few small changes:
- In our first
ifstatement, if we don’t have a query or category, we don’t have an active search - We need to pass in the
searchCategoryvalue to our endpoint - And finally add a useEffect dependency, so this updates whenever the category changes
Before we test this out, we need to also update our activeProducts which is a bit too strict given we’re now using a category only for a filter:
const activeProducts = searchResults || products;And now, if we load up the browser and click on a different category, we’ll see our results update!

We can even make both a search and select a filter, such as if we want to find any “batman” products in the Home & Kitchen category.

We have the full power of full text search while being able to give our customers a way to drill down for the products they care about.
Step 7: Using Boosters, Targeted Columns, and Fuzziness to improve search results
The default search can be really powerful, but you may need more granularity and targeted searching depending on the use case.
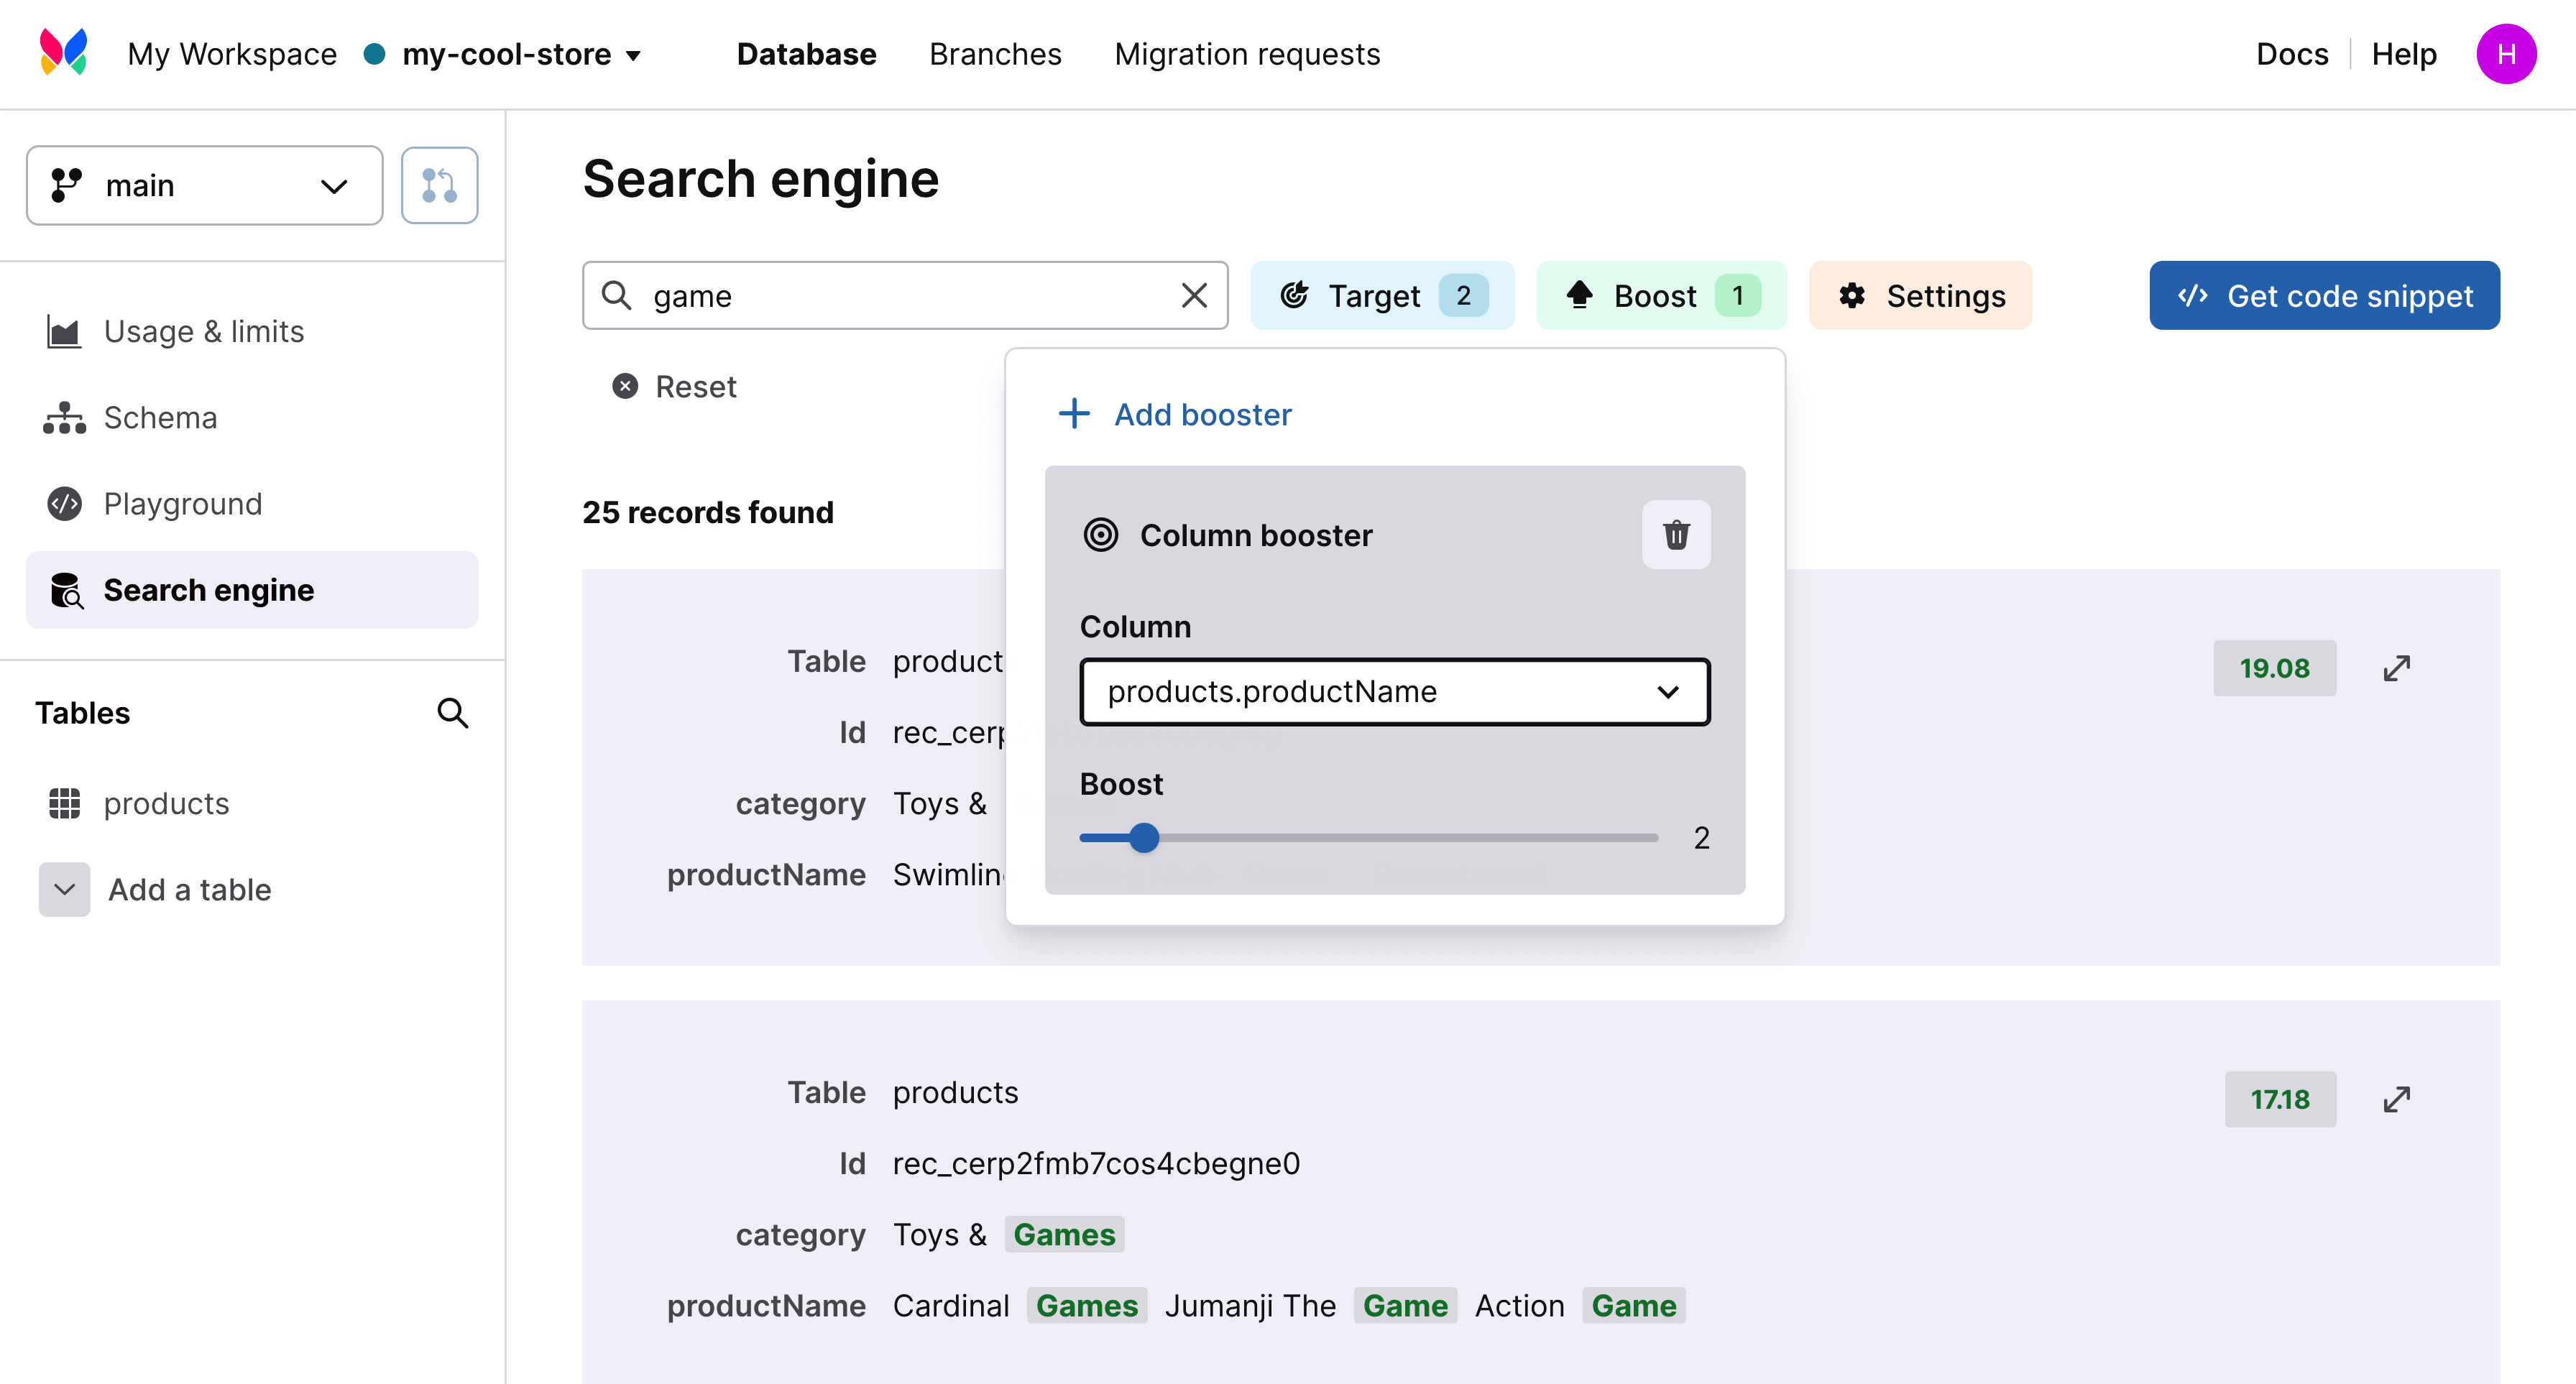
For instance, because we have multiple columns with keywords that may match searches, our query will be equally distributed in the search to those columns, where maybe we want our product name to have the most relevance.
Or maybe when we search for something like “toy”, we don’t want the product URL, which may include that word, included in that search.
To fix this, we can use boosters to increase the weight of specific aspects of the search and use targeted columns to only make searches to the columns we choose.
Let’s head back to the Search engine tab of our Xata dashboard where we can start making a search like “toy”.
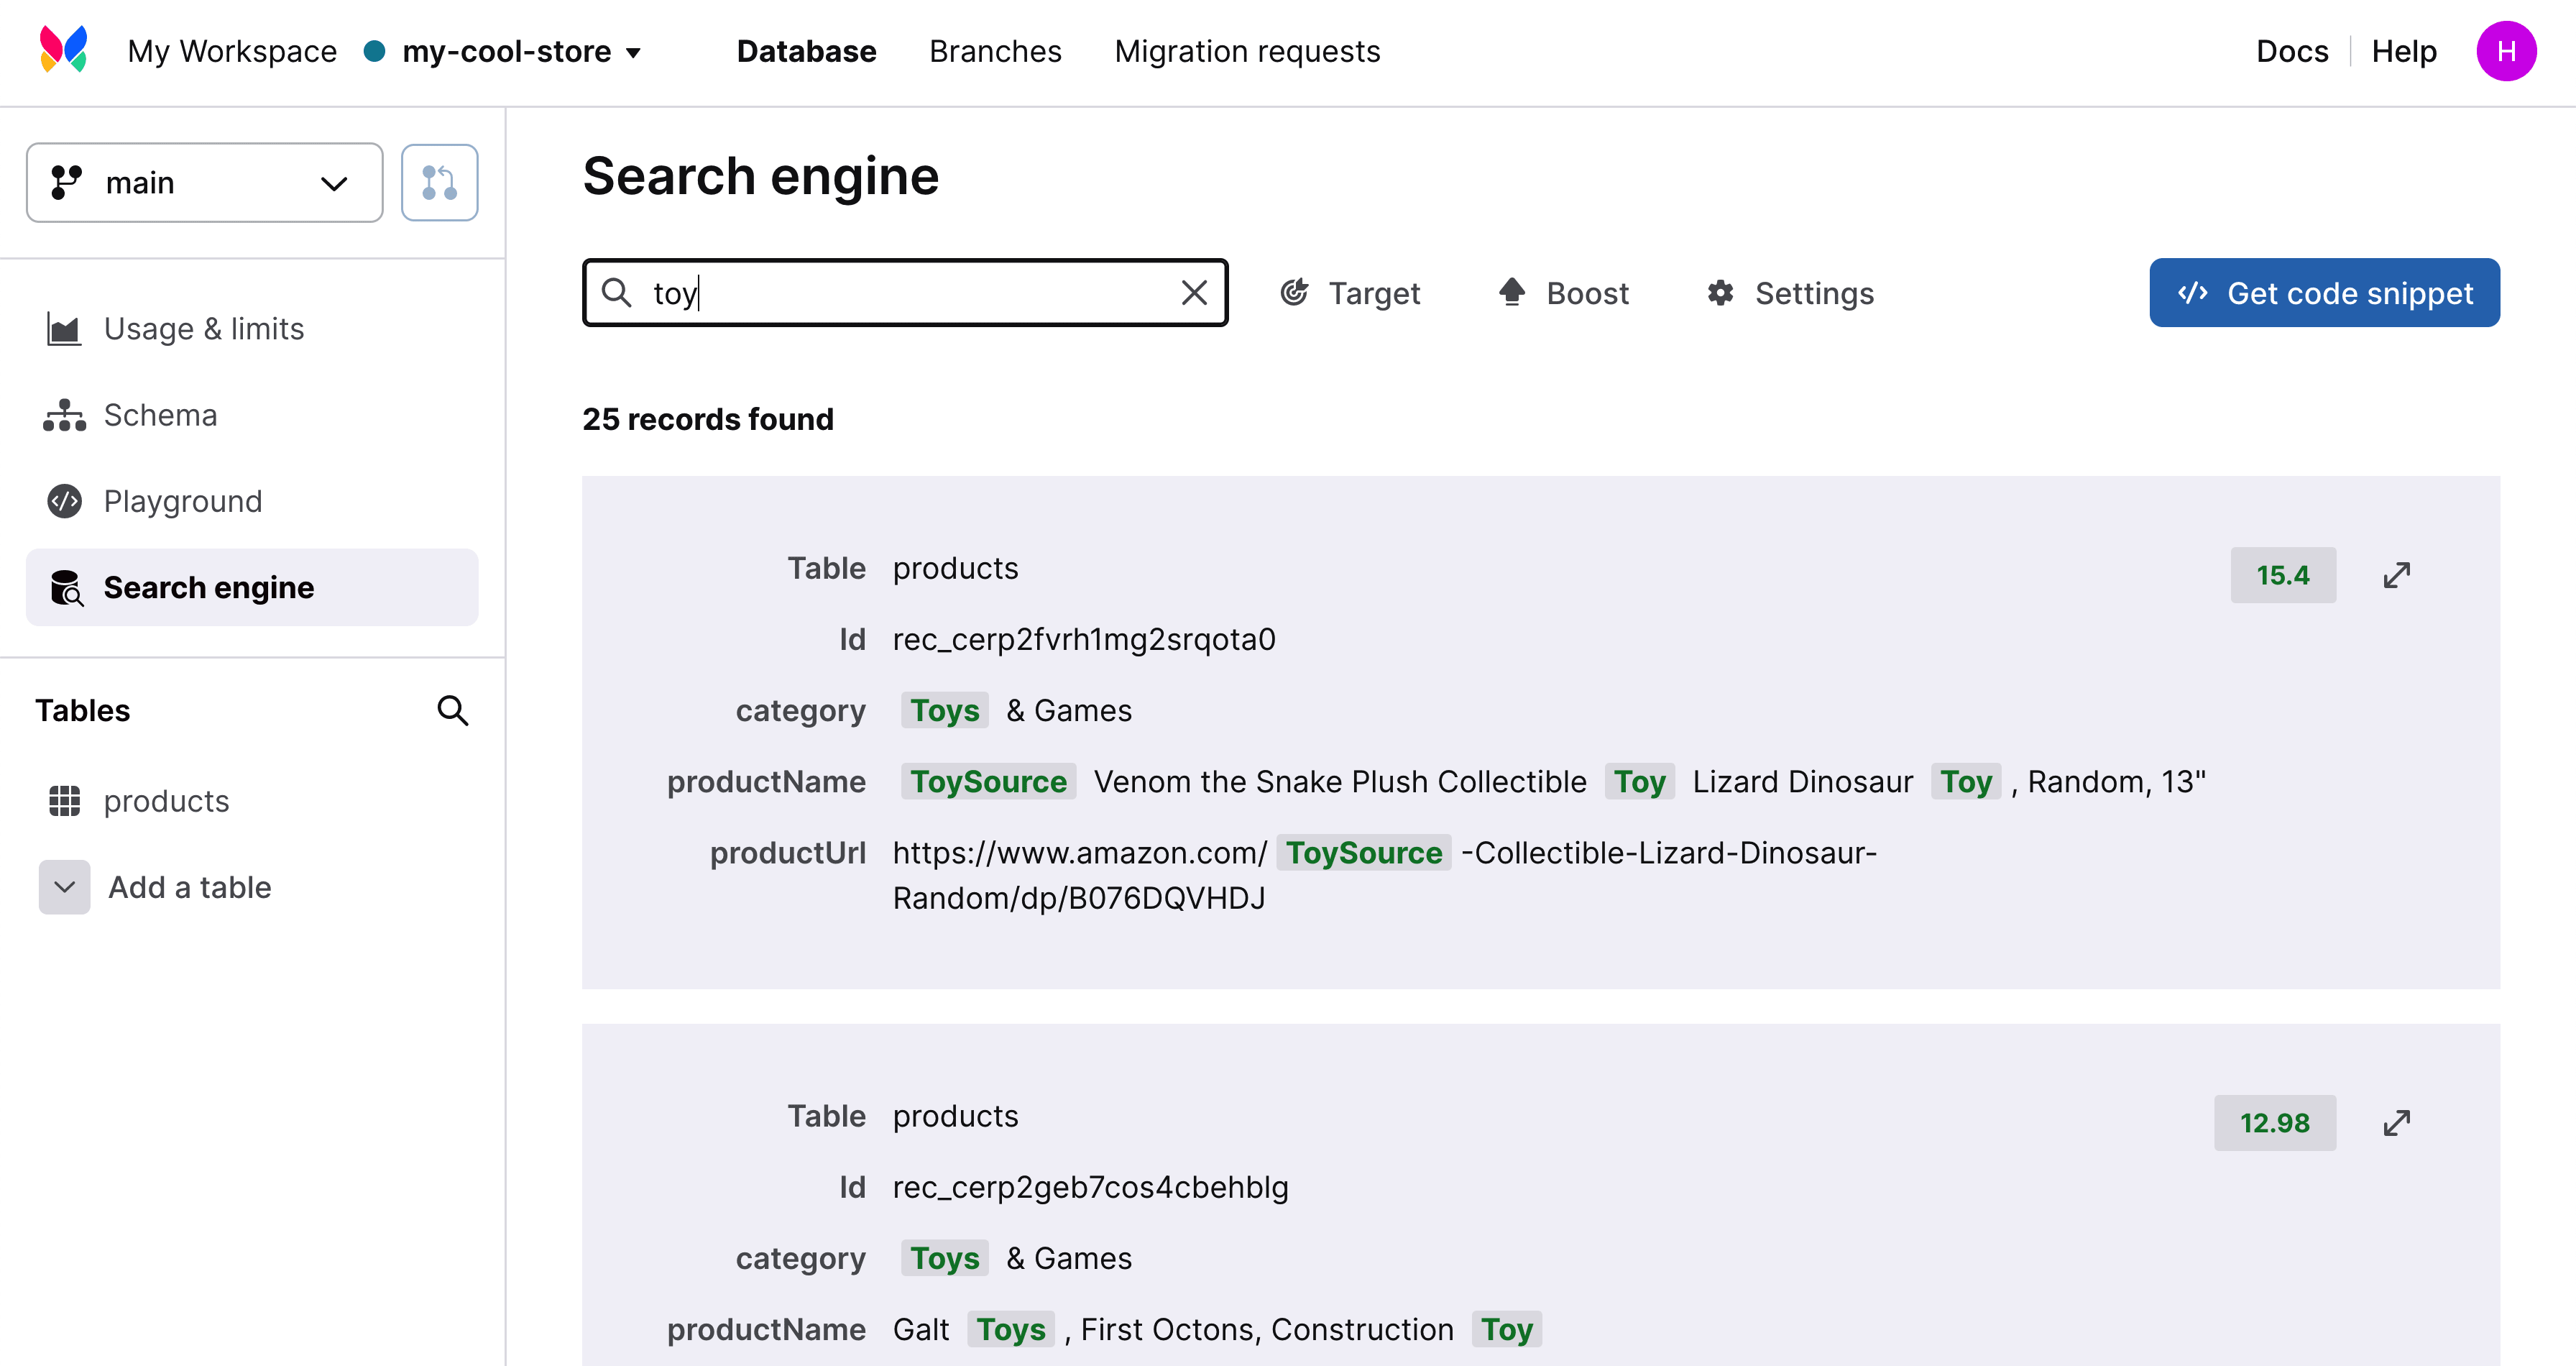
If you’re following along with the same data still, we’ll see that we are matching several different columns including category, the product name, and product URL.
To start, I don’t want to match the product URL, so we can select the Target button and uncheck all columns except for product name and category.

We’ll immediately see the results on the page change in the dashboard, which reflects what we would see in our application when making the search.
But before we implement this code, we want to make another change.
Currently we’re saying that all columns are equal, but if we’re making a search for a specific product, we’re probably looking for that word in the title.
So we can additionally boost how much weight is added to the product name during the search by clicking the Booster button, clicking Add Booster, selecting Column Booster, and picking products.productName from the dropdown. Might not hurt to additionally raise the boost level to something like 4.
While our results won’t quite change right away, because the search is already pretty confident, we’ll see the rating score on the right improve, as Xata is more confident in the result.
We can also see what this would look like by doing the opposite and selecting the category as the boosted column instead.
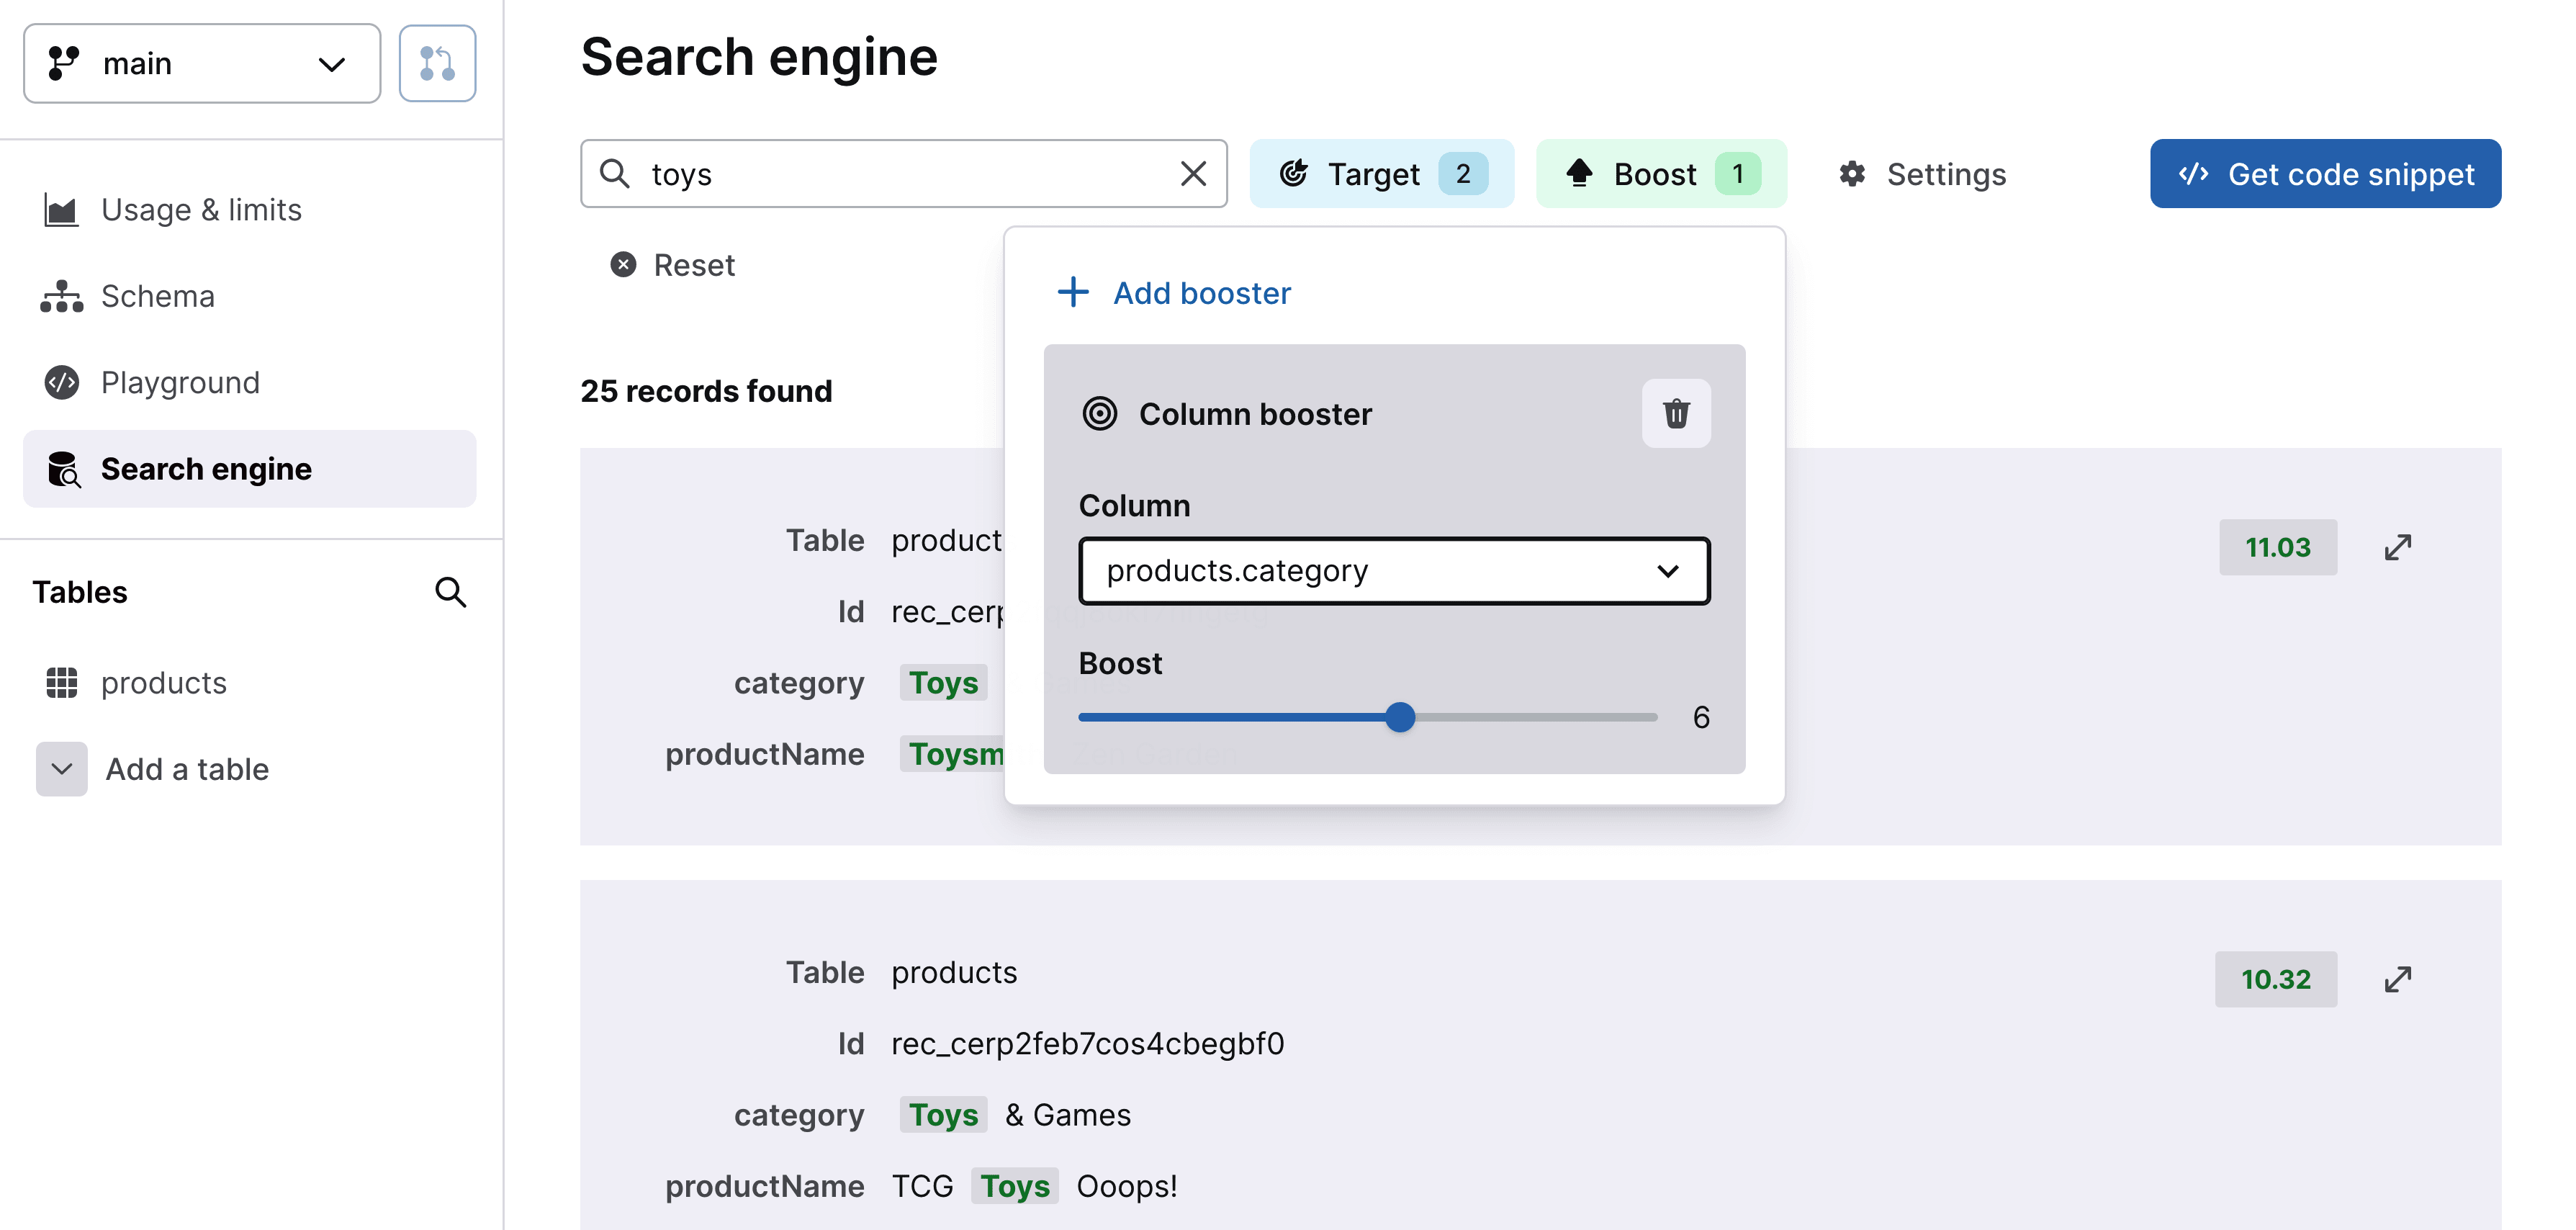
Once category is selected as the column that’s boosted, we get some different results and we can see we get a lower confidence score.
But let’s revert that back to product name since that probably makes more sense.
Finally, we want our visitors to be happy. Sometimes our visitors make typos. When they make typos, we want to show them relevant results.
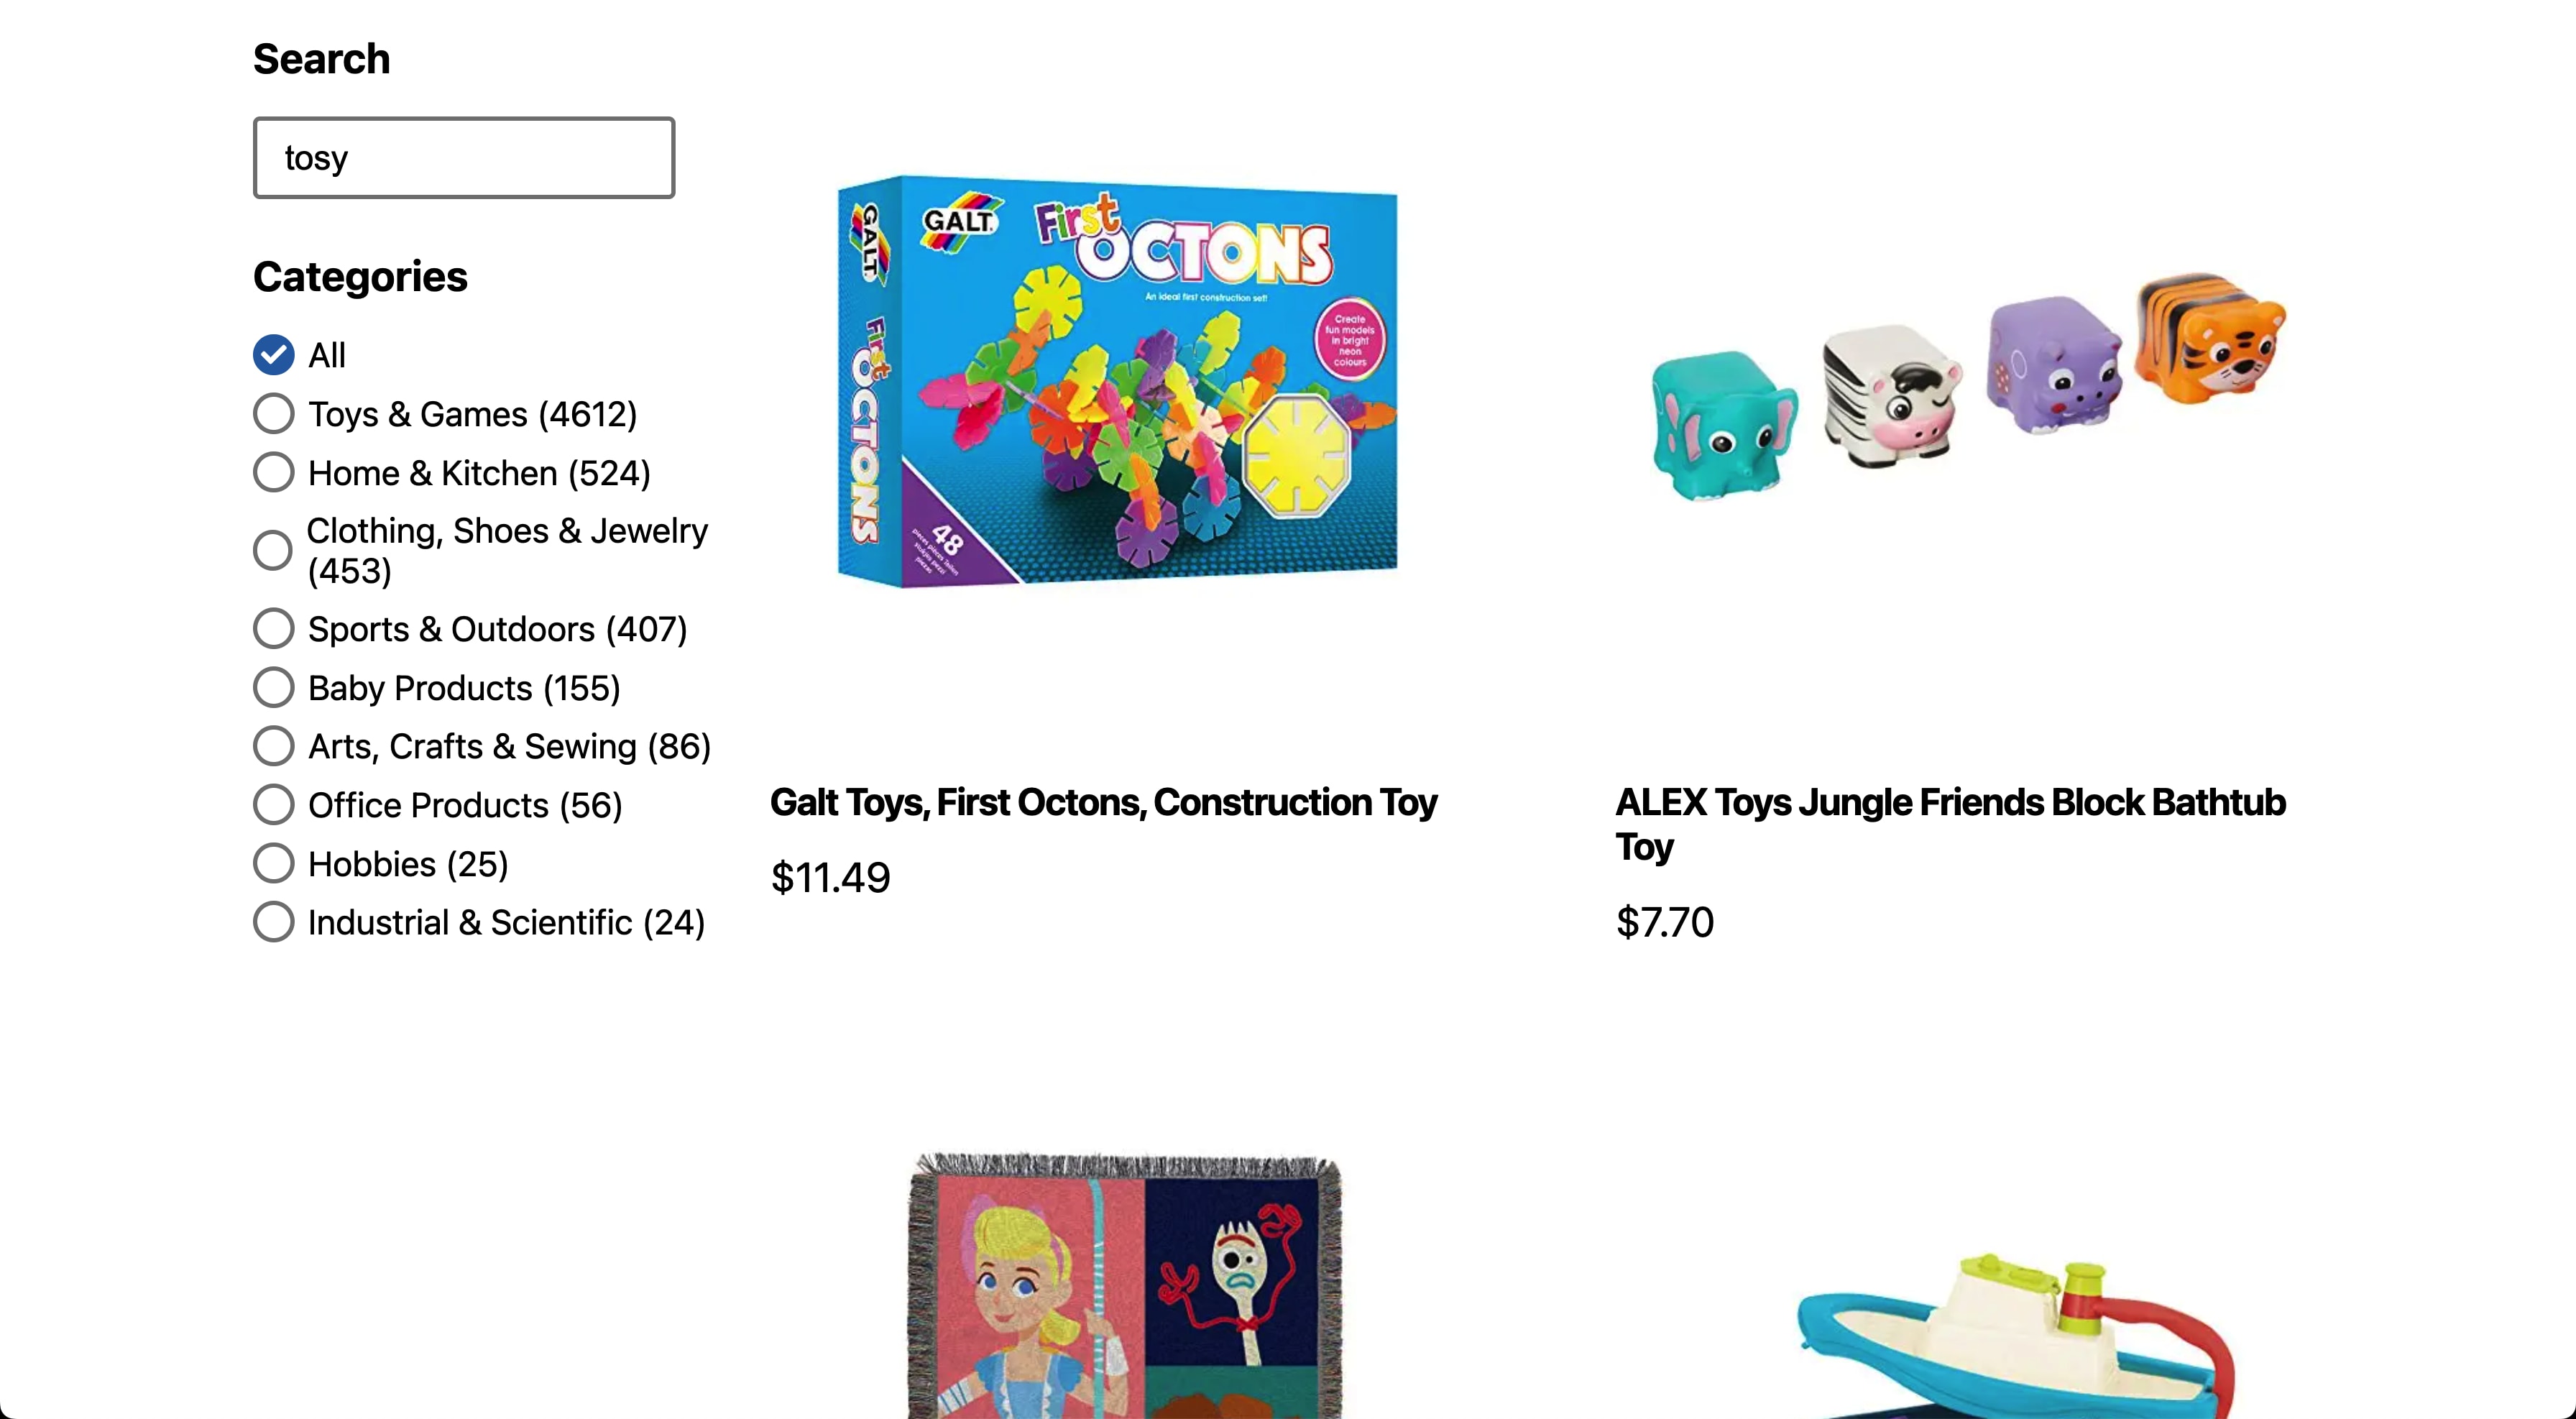
If we try searching for “tosy” (typo intentional) we don’t get any results!
So let’s fix that.
Click the Settings button on the end and set the fuzziness to 1.

We’ll immediately see that we now get results!
Fuzziness is a setting that allows Xata take into consideration that a character might be off 1 or 2 places. This helps avoid bad or no results for simple mistakes.
Tip: Try changing it to a fuzziness of 2 and you’ll see we match some other words too!
But now let’s implement this.
Like we’ve done in past steps, click Code Snippets at the top of our Search Engine page.
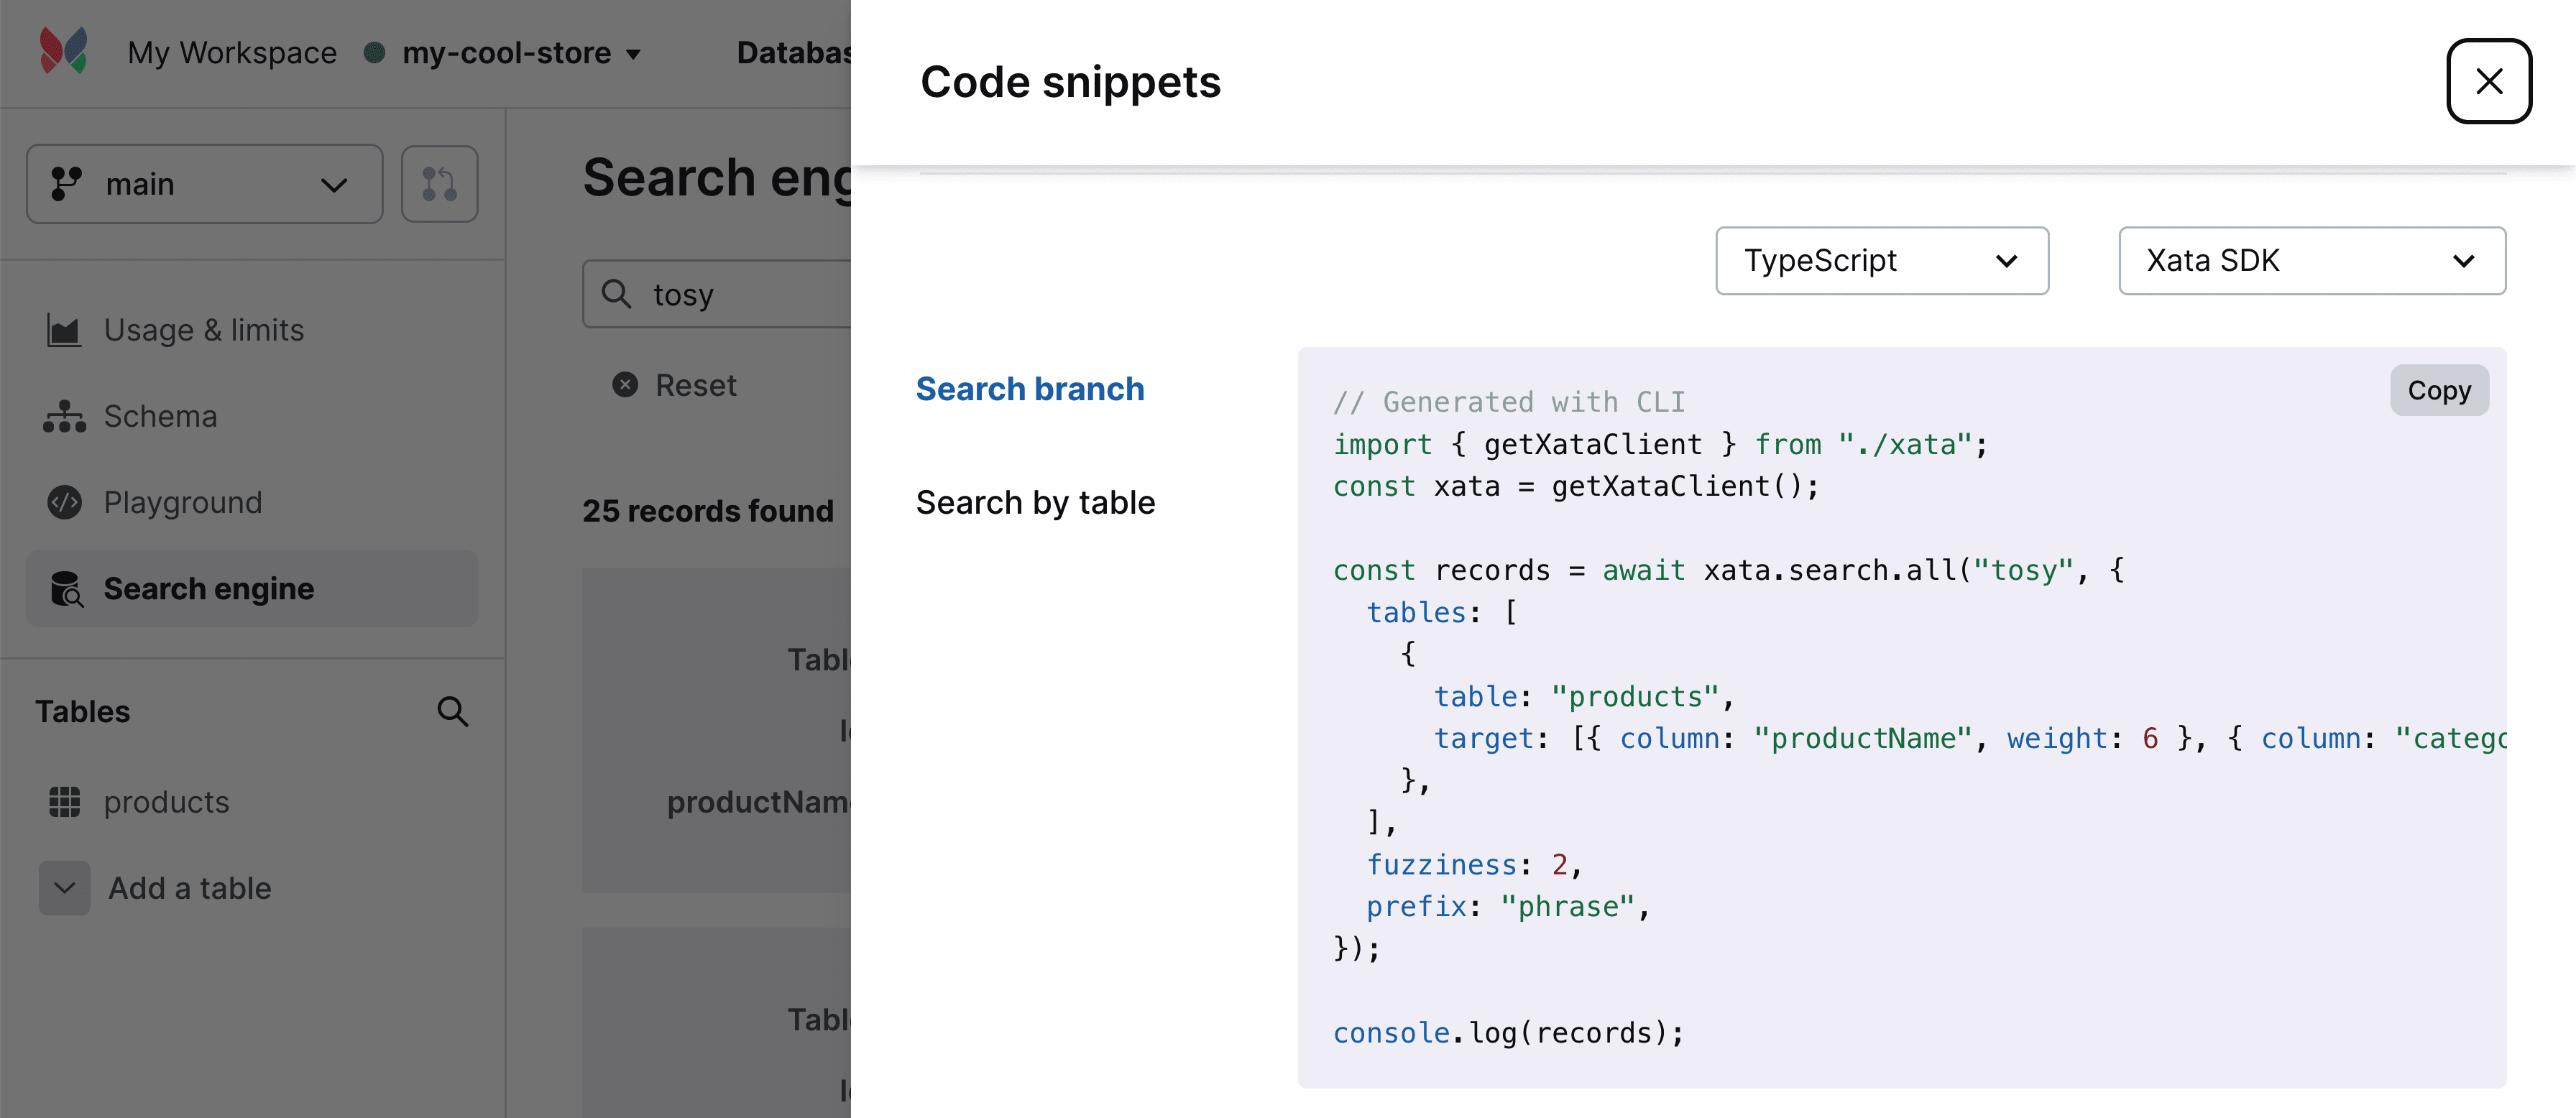
Instead of copying this line for line, we’re instead going to make the changes to our existing code since we’re already been making changes.
Inside of src/pages/search.js let’s first add the propert of target to our table definition:
const table = {
  table: 'products',
  target: [{ column: "productName", weight: 6 }, { column: "category" }],
};
This adds both of our columns as targets and additionally configures the weight of productName for us.
Then we can update the fuzziness property in our records definition from 0 to 1.
const records = await xata.search.all(query, {
  tables: [table],
  fuzziness: 1,
Then, head to your browser to test it out, where if we search similarly for “tosy”, we can see our results!
What else can we do?
Add pagination
Right now on the homepage, we’re only showing the first 15 results, but if someone wants to browse through everything, they can’t.
We can keep track of what page we want to show as well as how many we’re showing on each page to create an “offset” when making our paginated request.
Check out Paginating Results in the Xata docs: https://xata.io/docs/api-guide/get#paginating-results
Add sorting to the products
Sorting is another way to help find what you’re looking for, such as if you want to look for the cheapest items in a category.
We can add sorting by price or by name with the help of Xata’s sort method.
Check out Sorting the Results in the Xata docs: https://xata.io/docs/api-guide/get#sorting-the-results
Try a new dataset!
The dataset that we worked with is nice for getting to test out some basic features, but there’s a lot more we can expand on with more detailed datasets, whether ecommerce related or not.
Try a different set of data, like a movie catalog or products that include reviews, and see how you can make a really great search engine for that data using Xata.

