

Uploading files in React
When uploading files, there are a lot of considerations that need to be made with implementation.
What triggers the upload? Who needs access to the upload? Are there restrictions on the upload?
If you need your visitor to upload a file and need to limit what they can upload, you’ll want to be able to give them the option of a file picker along with some configuration to avoid them uploading the wrong thing.
Adding Drag and Drop for upload UX
But we also want to make sure we’re creating a smooth user experience for that upload.
A file picker is nice, but what about that little file sitting on their desktop, maybe they’d like to drag that right in? Or from other locations that make it a bit more convenient to drag in rather than select.
Drag and drop helps with this giving a nice droppable zone to create a seamless experience for your visitors.
What are we going to build?
We’re going to take an existing React application with a basic form, add a file input, and use it to upload the file to a server like Cloudinary.
We’ll learn how we can manually add an HTML file picker element, show a preview of that image, along with some configuration for our file needs, and even use React Dropzone to add drag and drop.
Step 0: Creating a new React.js application
We’ll be working inside of a React.js application. You can either join in with your existing project or follow along with a demo template I created that will scaffold a simple project with a form, Tailwind, and some basic routing.
To follow along, in your terminal, run:
npx degit colbyfayock/demo-react-form-starter my-react-file-uploadWhich will clone down the project to your local directory.
You can then navigate to that project:
cd my-react-file-uploadThen start your development server with:
npm run devAnd your project will now be available at http://localhost:5173/!

Step 1: Creating a new file input
We’ll be working out of the Contact page, which you can navigate to by clicking on Contact in the navigation or the Get Started button.
Inside of the code at /src/pages/contact.tsx, we have a form composed of some components I put together ahead of time which includes some base styles to work from.
For our file input, we’ll start off by creating a new input which you can later componentize if you’d like.
Between the Message and Submit, let’s create a new input for our file:
<input id="image" type="file" name="image" />Note: You can wrap this input with the FormRow components and add a FormLabel to keep consistent with the rest of the form.
If you open up the page, you’ll notice this sets up a new type of File input that will give us a basic filepicker within our page.

We can select a file with it, but we can’t quite do anything yet. So how do we grab that file to make use of it?
Step 2: Using and storing the selected file from a form input
Unlike the other form inputs, we can’t simply reference it’s value, it will only give us a path, a fake path (for security purposes).
Instead, we need to listen for when the file changes and upon that change, we can find the file selected and store it in state.
First, let’s import state from React:
import { useState } from 'react';Then we can create a new instance for a file value:
const [file, setFile] = useState<File | undefined>();We can then set up a new function which we’ll call handleOnChange that we’ll use to listen to changes to our form input and save the value:
function handleOnChange(e: React.FormEvent<HTMLInputElement>) {
  const target = e.target as HTMLInputElement & {
    files: FileList;
  }

  setFile(target.files[0]);
}
Here we’re using e.target which will be our input from the change event and reading the files associated with it, grabbing the first file, and using it to set our file into state.
Finally, we can set up our input to trigger this function on change:
<input
id="image"
type="file"
name="image"
onChange={handleOnChange}
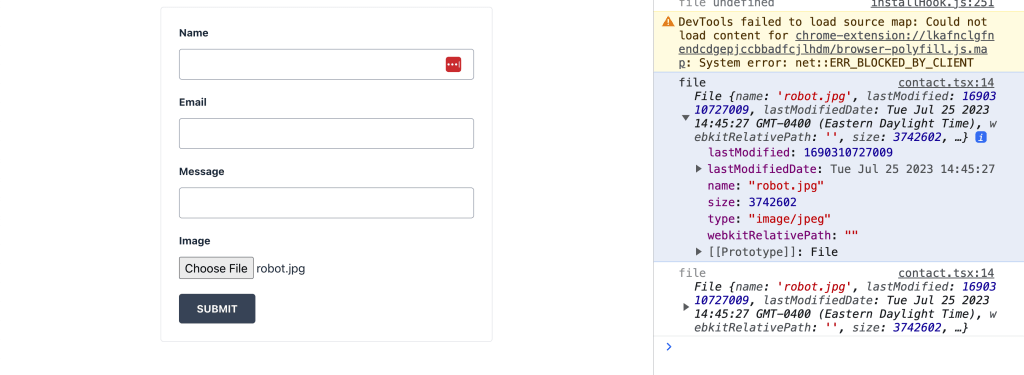
/>To test this out, we can log out the result of our file state under the useState instance and see our file value update!
Step 3: Uploading a file from a form using FormData to Cloudinary
As an example of where we can upload this file, we can use Cloudinary, an image and video platform.
To do this, we’ll use an unauthenticated request to their REST API, sending FormData long with the file.
Note: typically you would want to proxy this request with a something like a serverless function to make an authenticated request, where you can use something like the Node.js SDK, but this will work for our example.
We’ll be using our form’s submit handler, if you’re following along, that’s the handleOnSubmit function.
Inside, we can create a new instance of FormData and start to populate our information.
if ( typeof file === 'undefined' ) return;

const formData = new FormData();

formData.append('file', file);
formData.append('upload_preset', '<Your Unsigned Upload Preset>');
formData.append('api_key', import.meta.env.VITE_CLOUDINARY_API_KEY);
Here, we’re first going to avoid submitting if we don’t have a file, this will also keep Typescript happy.
We then create a new instance of FormData, where we add our file and our two required Cloudinary values of an Upload Preset and our account’s API key in the form of an environment variable.
Next, we can send this FormData right to Cloudinary:
const results = await fetch('https://api.cloudinary.com/v1_1/<Your Cloud Name>/image/upload', {
  method: 'POST',
  body: formData
}).then(r => r.json());
Note: Make sure to replace
<Your Cloud Name>with your Cloudinary Cloud Name.
We pass our FormData as the body of a POST request to the Image Upload endpoint and with just that, we have an uploaded file!

Step 4: Allowing only certain filetypes like images to be selected
When adding a file picker, you may not want ALL filetypes available to select, maybe you only want someone to upload images.
The input element takes an accept attribute where we can specify exactly only the filetypes we want available.
Update the input element to:
<input
  id="image"
  type="file"
  name="image"
  accept="image/png, image/jpg"
  onChange={handleOnChange}
/>
Which only allows certain image types, or:
<input
  id="image"
  type="file"
  name="image"
  accept="image/*"
  onChange={handleOnChange}
/>
To allow any image type.
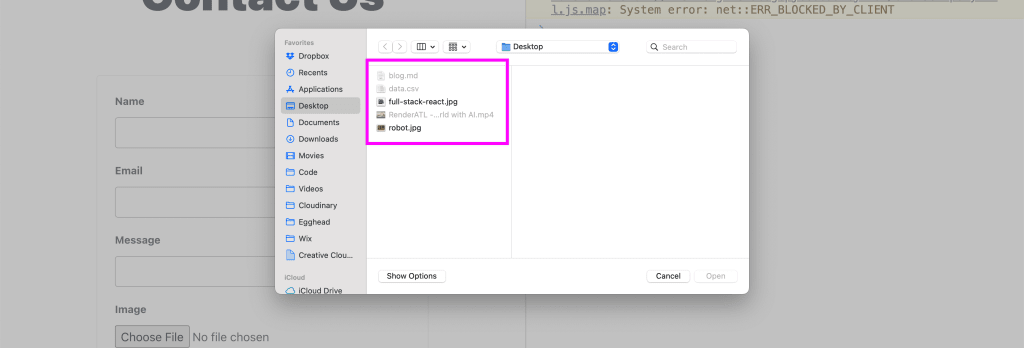
And now when we open the file picker, we’ll see that only image files are allowed to be selected!
Step 5: Showing a preview of an image on select
Currently when someone selects an image, they have to hope they selected the right one by the name, but what if that name doesn’t make sense?
We can show a preview of the image to help their confidence in what they pick.
We’ll use the FileReader API to do this and save a preview version via a data URL that will allow us to update an image source with that value.
First, lets create a new instance of state where we’ll store this preview:
const [preview, setPreview] = useState<string | ArrayBuffer | null>(null);Our potential values are a string, ArrayBuffer, or null (default value), so we want to make sure it’s properly typed.
Next, let’s update the handleOnChange function to read our file:
function handleOnChange(e: React.FormEvent<HTMLInputElement>) {
  const target = e.target as HTMLInputElement & {
    files: FileList;
  }

  setFile(target.files[0]);

  const file = new FileReader;

  file.onload = function() {
    setPreview(file.result);
  }

  file.readAsDataURL(target.files[0])
}
And now, we can add a new image below our file input that only displays once that preview is available:
{preview && (
  <p><img src={preview as string} alt="Upload preview" /></p>
)}
If we now load up our app and select a file, we should see our robot in all its glory!

Step 6: Adding drag and drop with React Dropzone
Finally, selecting a file is nice, but how can we also let our visitors drag an image in from their desktop?
We can use React Dropzone to easily add drop support to our React app.
First, install the package to your project:
npm install react-dropzoneNext, import the dependencies into your page:
import { useCallback } from 'react';
import { useDropzone} from 'react-dropzone';
Here we’re also importing React’s useCallback which we’ll use as recommended to wrap our callback functions for Dropzone.
To start using Dropzone, first invoke the useDropzone hook:
const { getRootProps, getInputProps, isDragActive } = useDropzone();And then we want to replace our existing file input with React Dropzone’s UI:
<div {...getRootProps()}>
  <input {...getInputProps()} />
  {
    isDragActive ?
      <p>Drop the files here ...</p> :
      <p>Drag 'n' drop some files here, or click to select files</p>
  }
</div>
We can see that the way React Dropzone works, is they provide us with an object of props that we can easily use in the UI to configure it as needed.
If we open up our app, we can see the text, which isn’t styled much but we can see if we start to drag a file over, it updates meaning it works!
At this point it’s not doing anything, we can’t even see that the file was selected, but we can use an onDrop callback to use our existing preview logic to update the page.
First, let’s create our onDrop callback:
const onDrop = useCallback((acceptedFiles: Array<File>) => {
  const file = new FileReader;

  file.onload = function() {
    setPreview(file.result);
  }

  file.readAsDataURL(acceptedFiles[0])
}, [])
In our callback function, we get acceptedFiles which allows us to access the selected file. We use that with FileReader to grab our image and again set our preview.
Then we need to pass this onDrop function to useDropzone:
const { getRootProps, getInputProps, isDragActive } = useDropzone({
  onDrop
});
And now, when we drag our file in, we can see it update with a preview!

From here, we can also destructure acceptedFiles from the useDropzone hook, which will allow us to use the file to upload to Cloudinary:
if ( typeof acceptedFiles[0] === 'undefined' ) return;

const formData = new FormData();

formData.append('file', acceptedFiles[0]);
formData.append('upload_preset', '<Your Upload Preset>');
formData.append('api_key', import.meta.env.VITE_CLOUDINARY_API_KEY);
And with the result and the rest of the form, send along to wherever the form’s destination goes!
Learn how to build Full Stack React Apps!
Want to dive deeper into building a full stack React app? I’m building a course with Appwrite that will allow you to build a complete solution for
Get updates and learn more: spacejelly.dev/reactappwrite