

What is MDX?
MDX is a content format that combines Markdown with JSX.
With it, you can use the Markdown format, which is a lightweight syntax for writing content for the web, along React components (or other JSX) to produce rich, dynamic content.
What is the challenge with MDX in Next.js?
It’s not a challenge per se, but it doesn’t work out-of-the-box, meaning we need to configure it to work if we want to use MDX.
Luckily configuration isn’t too bad, it even comes with a first-class package to help support it, but we’ll see where that falls short and another option we can use for our MDX needs.
Step 0: Creating a Next.js app
Getting started, you’ll want to be working out of a Next.js project. You can use any Next.js project, but I’ll be walking through using the App Router, so configuration will be a little different if you’re in the Pages router.
You can start from scratch or use an existing project, but a prerequisite is having some MDX content to test this with, but you can simply create a new MDX file or two and use that as your test basis.
Alternatively, you can grab some of the files I’m using in my example.
If starting from scratch, in your terminal run:
npx create-next-app@latestThen follow along with the options of your choice and finally, start adding some MDX content.
Step 1: Sourcing MDX content in Next.js
The first step we’ll take in sourcing MDX content is by using the official Next.js MDX package.
This method uses @next/mdx along with official MDX JS packages @mdx-js/loader and @mdx-js/react to render MDX content in Next.js.
Installing MDX Dependencies
First install the dependencies:
npm install @next/mdx @mdx-js/loader @mdx-js/reactWe’ll then need to do two things inside of our next.config.js file:
- Telling Next.js that we want to support additional page file extensions
- Wrapping our configuration object with the MDX module
Inside of next.config.js add:
const withMDX = require('@next/mdx');

/** @type {import('next').NextConfig} */
const nextConfig = {
  pageExtensions: ['js', 'jsx', 'md', 'mdx', 'ts', 'tsx'],
};

module.exports = withMDX()(nextConfig);
And then we need to add a boilerplate file that will allow us to configure custom components in the future.
Create a new file mdx-components.tsx inside of your src directory or in the root of your project if not using src (adjacent to your app directory) and inside add:
import type { MDXComponents } from 'mdx/types'

export function useMDXComponents(components: MDXComponents): MDXComponents {
  return { ...components };
}
And from here, this is all you need to configure MDX, next is prepping the MDX content to run through the Next.js pipeline.
Rendering MDX Content
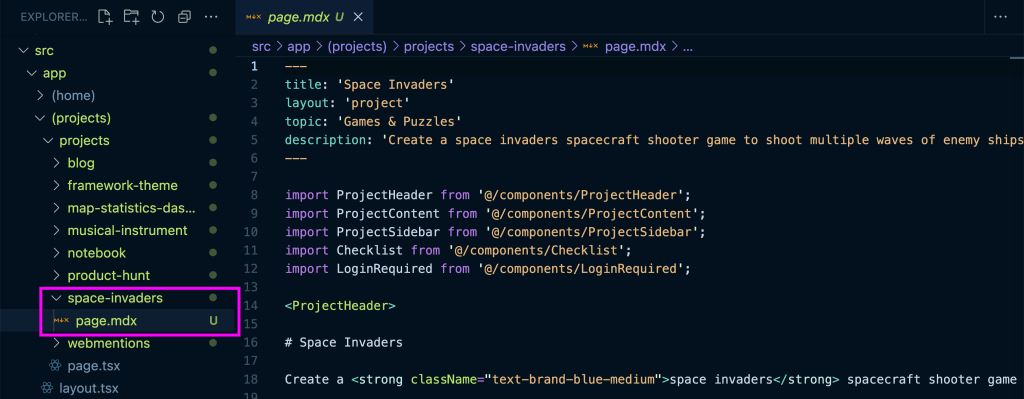
The trick here though is that to use the official Next.js MDX package, our content needs to be located inside of the app directory, just like any other page file.
Similarly, the file pattern will also be just like any other page route, where we need to use the <name>/page.mdx pattern to create a new MDX-driven route.
So for instance, if you have a content directory with files like mycontent.mdx, you’ll need to move that file into the app directory such as app/mycontent/page.mdx.
Tip: Before you start renaming all of your files, check out the next Step which uses a different method allowing you to keep your files in the same spot!
After updating the file names and locations, we should now be able to go to that page just like any other page route, and see our markdown rendered in the browser!
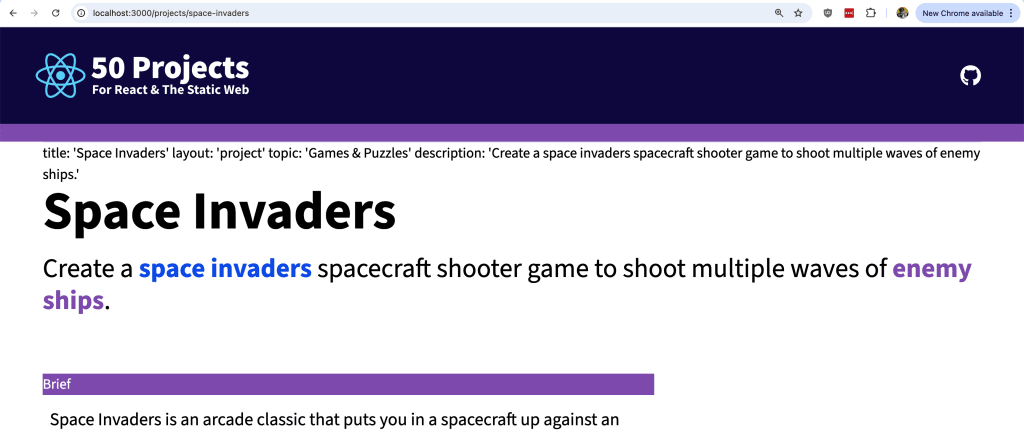
But wait, we might notice an issue depending on how our MDX is formatted. Our frontmatter is showing at the top of the page, that’s not right.
Tip: What’s frontmatter? Frontmatter is metadata that can be placed at the top of an MDX file that can be used as structured data.
While Next.js has a few options they mention you can use to solve this, none are first class, and are a bit involved.
Alternatively, we can use a different approach and at the same time, solve the issue of having to follow the Next.js page filename convention to render MDX.
Tip: If you’re happy with the results of this first step, you can probably just stop here! Otherwise, if you want to load MDX from a different directory and support frontmatter, continue on.
Step 2: Rendering MDX with Next MDX Remote
Another option to source MDX content in Next.js is Next MDX Remote.
This package intends to solve a slightly different use case of “remote” content, which could be remote as in outside of the app directory or literally from a remote location, such as requesting it from a server.
But in our example, say we have a content directory in the root of our project with a dump of our MDX, and it’d be tedious, and frankly a bit overwhelming to put that all inside of the app directory with the page filename pattern, we can instead use Next MDX Remote to render our content from where it is.
Reverting Step 1
To get started, we can undo some of our changes from the previous step, including:
- Removing or moving the content MDX content from inside of the
appdirectory to an outside folder - Removing the
mdx-components.tsxfile - Reverting the
next.config.jschanges - Uninstalling
@next/mdx @mdx-js/loader @mdx-js/react
Installing Next MDX Remote
Next let’s install Next MDX Remote:
npm install next-mdx-remoteSetting Up Dynamic Page Routes
To create our dynamic pages, we’re going to use dynamic routes, much like if we were using an API to generate content from a CMS.
For my example, my MDX files describe a list of projects, so I want each project available at /projects/<name>, so I’ll be using “projects” as my identifier and grouping. If you for instance are creating a blog, you might use posts instead.
Inside of the app directory, create a new folder where you want your page to live, such as /projects.
Inside app/projects create an additional folder [projectSlug] and inside create a new file page.tsx.
By wrapping projectSlug in brackets in the folder name ([projectSlug]), we’re telling Next.js we want that to be a dynamic route.
Next, inside app/projects/[projectSlug]/page.tsx let’s set up a basic page:
export default async function ProjectPage() {
  return (
    <div>Content</div>
  )
}
Note: Notice the
asyncwhich will be important for loading our content into the page.
If we now try to go to our page in the browser, such as in my case http://localhost:3000/projects/space-invaders, you should get an empty page with the word Content inside.
Next let’s render our MDX.
Sourcing MDX Content with Next MDX Remote
To source the content, we’re going to use Next MDX Remote along with the fs and path modules to grab our page content and structure our file paths.
First, import Next MDX Remote along with fs and path:
import { MDXRemote } from 'next-mdx-remote/rsc'
import { promises as fs } from 'fs';
import path from 'path';
We’re importing the MDXRemote component from the rsc subpath. We’re also importing the promises version of fs so we can use async/await.
Then we want to grab our mdx file content from our local directory.
First, we need to obtain our dynamic page parameters. Update the page component to the following:
export default async function ProjectPage({ params }: { params: { projectSlug: string }}) {Then at the top of your page component, add:
const content = await fs.readFile(path.join(process.cwd(), 'src/projects', `${params.projectSlug}.mdx`), 'utf-8');Here w’ere using the readFile method which does what it sounds like. We’re also using path to piece together the different dynamic segments of our file path. We use process.cwd() in order to get the “current working directory” from where our project is running, so that we have a way to confidently specify where our files are at.
Note: Update
src/projectsalong with any other values to point to the location of where you’re storing your files.
Then to render our content, we’re going to simply pass it to our MDXRemote component where we’re rendering our content:
import { MDXRemote } from 'next-mdx-remote/rsc'
import { promises as fs } from 'fs';
import path from 'path';

export default async function ProjectPage({ params }: { params: { projectSlug: string }}) {
  const content = await fs.readFile(path.join(process.cwd(), 'src/projects', `${params.projectSlug}.mdx`), 'utf-8');
  return (
    <div>
      <MDXRemote source={content} />
    </div>
  )
}
Now if you have basic markdown in your files, you might be able to spin up your page in the browser and it should render! But if you’re like me, i’m using components inside my MDX, so my page currently returns an error.
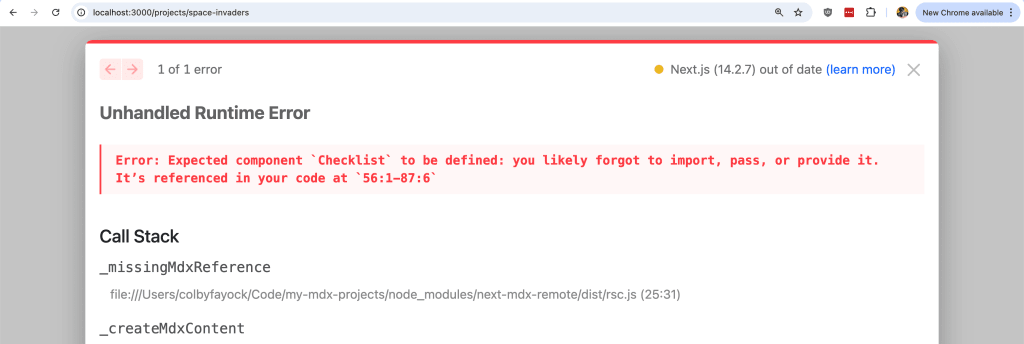
With Next MDX Remote, we need to define the components that will be used and imported, unlike the standard Next.js way from Step 1, but that’s easy, we just need to attach them to the MDXRemote component, where in my case, I’m using a few different types of components:
<MDXRemote
source={content}
components={{
// Your Components here
}}
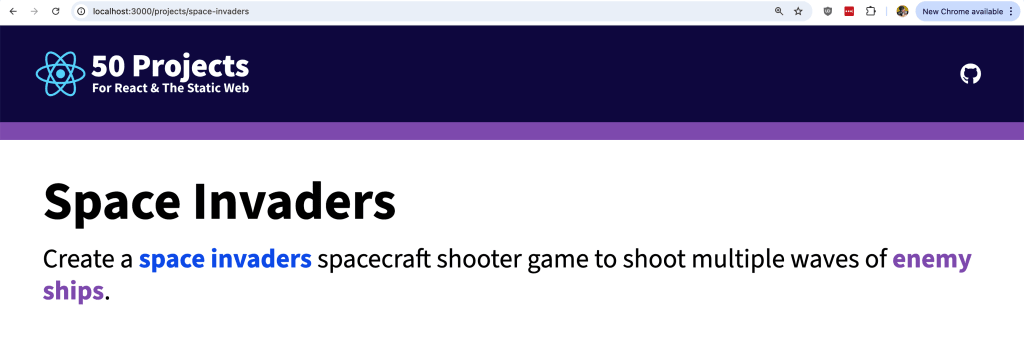
/>But now, you should be able to load the page and see your MDX content rendered!

Except we have an issue, we’re still not rendering our frontmatter.
While the frontmatter isn’t rendered by default, now that we’re hooked into Next Remote MDX, we can take advantage of their APIs to parse the frontmatter and render the rest of the content.
Step 3: Parsing frontmatter in MDX
In order to parse our frontmatter, we’re going to use a different function from the Next Remote MDX package.
But not to worry, it’s basically the same API, only we’re using a function instead of a component.
To start, let’s update our import statement:
import { compileMDX } from 'next-mdx-remote/rsc'Next, because we’re using a function, we’re going to parse our frontmatter and content before our return statement, so under the line where we’re reading our file into the content variable, add:
interface Frontmatter {
  title: string;
}

const data = await compileMDX<Frontmatter>({
  source: content,
  options: {
    parseFrontmatter: true
  },
  components: {
    // Your Components here
  }
})
Note: Be sure to update the types to match your frontmatter!
Then we can replace the MDXRemote component with our parsed frontmatter and content:
return (
  <div>
    { data.content }
  </div>
)
Where depending on your use case, you may not even need the frontmatter in your rendered web view. For example, my MDX documents include an H1, so I don’t need to use the frontmatter title for the H1. But in case you do, it will be available at data.frontmatter, such as:
<h1>{ data.frontmatter.title }</h1>But with that, we should now see our content properly rendered on the page!
Step 4: Listing MDX Files from a Local Directory
Now that we have our dynamic pages set up, we need a way to route people to those pages.
One way is to simply list out all of our files, similar to what you might find on a blog homepage.
To do that, we’ll use a similar method to how we read our local files, only this time, we’ll read the directory, then read our file contents, so we have something to display.
Starting off, wherever you’re listing your files (ex: /projects), let’s first import the dependencies:
import { promises as fs } from 'fs'
import path from 'path';
import { compileMDX } from 'next-mdx-remote/rsc';
Next, we want to read the filenames from our local directory, which we can use the readdir method of fs:
const filenames = await fs.readdir(path.join(process.cwd(), 'src/projects'))Note: Reminder to update your file path!
If you log this out, this will be a list of filenames from your directory (ex: space-invaders.mdx).
Now that we have that list, we can grab the content of each one like we did on our dynamic page route to get the metadata we need to create a user-friendly list.
interface Frontmatter {
  title: string;
}

const projects = await Promise.all(filenames.map(async (filename) => {
  const content = await fs.readFile(path.join(process.cwd(), 'src/projects', filename), 'utf-8');
  const { frontmatter } = await compileMDX<Frontmatter>({
    source: content,
    options: {
      parseFrontmatter: true
    }
  })
  return {
    filename,
    slug: filename.replace('.mdx', ''),
    ...frontmatter
  }
}))
Here we’re looping through each file name, reading the file, and performing the same compileMDX function as before, only this time, we only need the frontmatter, so we return that, along with the filename in case we need it later, and importantly we’re returning a “slug” version of the filename without the file extension which is how we’ll create our dynamic page path.
All’s left now is to take our list and add links to our page:
<ul>
  {projects.map(({ title, slug }) => {
    return (
      <li>
        <Link href={`/projects/${slug}`}>{ title }</Link>
      </li>
    )
  })}
</ul>
Here we’re passing in a dynamic path to our Link element which will allow us to point to our individual pages.
And now, you should see a list of links when opening the page in your browser!

What else can we do?
Generate SEO Metadata
An important part of dynamic pages is being able to dynamically generate SEO metdata, including the title, description, and even Open Graph images.
We can export and use the generateMetadata function and similarly parse the frontmatter with Next Remote MDX to populate all of the meta tags we need!