

What are blurred placeholders?
When loading media on the web, you often don’t want to load every single image and video all at the initial page load.
By doing that, you create a ton of network request for large files, some potentially not needed yet, slowing down the experience for the visitor of your page.
In addition to Lazy Loading, which defers loading until we need the media item, we can use blurred placeholder images, which are very tiny inline representations of the image.

Because of the size, they load super fast, allowing us to gracefully trickle in loading of the full assets as we have resources.
What is BlurHash?
BlurHash is an open source library that takes an input image and generates a small, blurred representation of that image.
It’s available in a variety of languages but we’re interested in the JavaScript world, so we can use the Typescript flavor, where we can install it right from npm.
Note: Don’t worry, you don’t need to know Typescript, we don’t use it at all in this tutorial.
How does this work with Cloudinary and Netlify Functions?
One of the features of Cloudinary is the ability to use Custom Functions giving developers a way to run their own processing on images.
Cloudinary invokes this function and caches the results, meaning every subsequent request will be super fast from it’s CDN.
This is where Netlify Functions come in, where we can use Netlify to easily build and deploy serverless functions that allow us to make requests to an API endpoint.
By combining the two, we have a great way to run our own custom processing.
What are we going to build?
We’re going to create a Netlify serverless Function that will take some input image data, convert it to a BlurHash representation, and return it back. We’ll be able to test that this is working using a tool called Postman.
Once that’s finished, we’ll inject it into the Cloudinary transformation pipeline when generating an image, so that we can create that blurred placeholder on the fly.
To do this we’ll need to “sign” our image URL so that we can securely use the serverless function, so we’ll also walk through doing that.
In order to follow along, you’ll need both a free Netlify account and a free Cloudinary account.
Disclaimer: I work for Cloudinary as a Developer Experience Engineer.
Step 0: Starting a new npm project from scratch
We’re going to building this project from scratch and later on we’ll need to use npm in order to install libraries to our project (Cloudinary and BlurHash to start).
That means we should scaffold our project to prepare for that step.
Create a new directory and inside that directory run:
npm initAt this point npm will prompt you for some questions, including the project name, and the author, where you can walk through these questions or keep hitting Enter until you reach the end.
Once finished you should now see a package.json file inside of your project.
Next we should add a .gitignore file as if we check this into Git, we don’t want to check in all of our node modules, resulting in a huge repository.
To do this we can first initialize our Git repository with:
git initStep 1: Creating a new Netlify Function
To get started, we need our base Netlify Function which we’ll use to process our image data.
To do this we need to set up a few things:
- Netlify configuration file
- Functions directory
- Function file
First in the root of the project, let’s create our Netlify configuration file at netlify.toml. This will allow us test our function locally and to later deploy our function to Netlify.
Inside netlify.toml add:
[build]
  functions = "functions"
All we’re doing here is telling Netlify where our functions directory is at, which speaking of, let’s next create a new folder called functions.
Inside functions let’s create our function file called blurhash.js.
Inside functions/blurhash.js add:
exports.handler = async (event, context) => {
  return {
    statusCode: 200,
    body: JSON.stringify({ status: 'Ok' })
  }
};
In the above, we’re creating a new async function handler that does one thing, it returns a successful status.
At this point, we’re done with the “base” of our function, next we’ll learn how to test it.
Step 2: Testing Netlify Functions locally with the Netlify CLI
In order to test our work out locally, we need to be able to run a local development server. We’ll do this by using the Netlify CLI.
To start, you can install the Netlify CLI globally with:
npm install netlify-cli -gIf you run the following you can verify that it worked and see all the options the tool has:
netlify -hBut we’re more interested in testing our function.
So let’s start by running:
netlify devAt this point Netlify will spin up a new development server. It will even try to open up a new page in your browser, but we don’t have a web app running, so it will say Not Found.
What we want to do is test that our function is working.
Functions are available in the following pattern in a Netlify request:
<Hostname>/.netlify/functions/<Function or File name>With this in mind, our function with the default settings will now be available to see at:
http://localhost:8888/.netlify/functions/blurhash
If you open that up in the browser, we should see our status of “ok”!

Now before we move on I want to note that when hitting the URL in our browser we’re making a GET request, which doesn’t allow us to send our data along with the request, meaning, we won’t be able to realistically test our function in the browser, rather, this is just to make sure it works.
Cloudinary will be using a POST request to send the function payload to the endpoint, which will simulate next.
Step 3: Simulating a Cloudinary function request with Postman
Having a local environment to test our functions is important because it avoids the need to continuously redeploy any time a change is needed. This takes a long time and also makes debugging hard.
Instead we can use Postman and simulate our requests.
Note: Postman is completely optional, but I find it’s a good way to test APIs. There are other options out there including simple cURL requests.
To start you’ll need to download Postman which is free and set it up locally.
Tip: Want to learn more about using Postman? Check out my tutorial How to Use Postman to Test APIs and Manage Collections
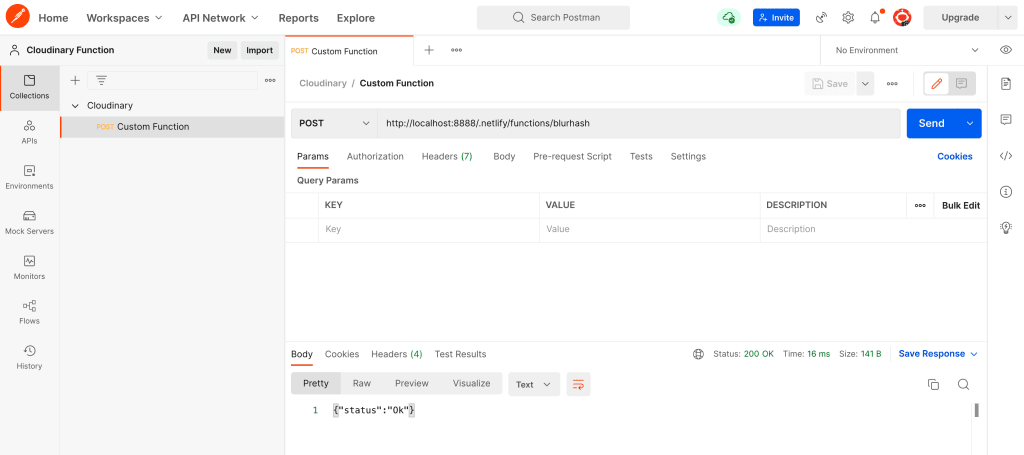
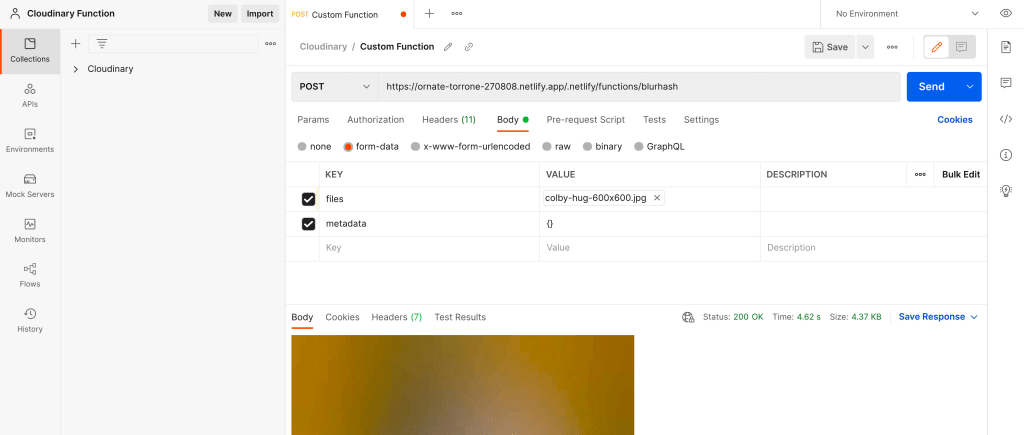
Once Postman is ready, create a new request with the following configuration:
- Method: POST
- URL: http://localhost:8888/.netlify/functions/blurhash (or whatever your function endpoint)
After configured, simply hit Send and we should see our same status of ok!
Next let’s add some details to simulate a Cloudinary custom function request. We can see what Cloudinary is sending us by checking out the Cloudinary Remote Function documentation.
We’ll be updating two sections: Headers and Body.
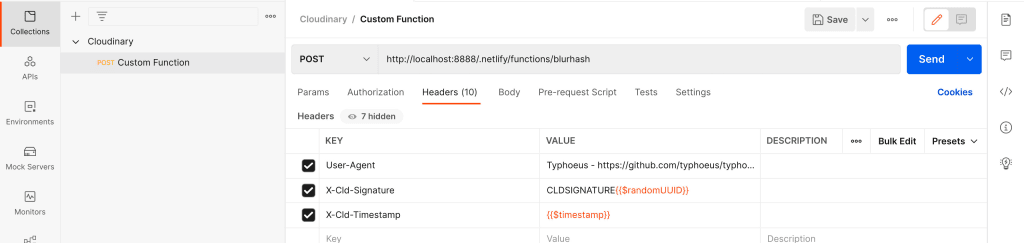
Under Beaders, add the following:
User-Agent:Typhoeus - [https://github.com/typhoeus/typhoeus](https://github.com/typhoeus/typhoeus)X-Cld-Signature:CLDSIGNATURE{{$randomUUID}}X-Cld-Timestamp:{{$timestamp}}
The headers aren’t necessarily critical for the work we’re doing but it helps show the values added to the request. Well also see there that they’re relatively randomly generated, if doing more advanced things such as validating the signature, you would need to have a real signature passed through.
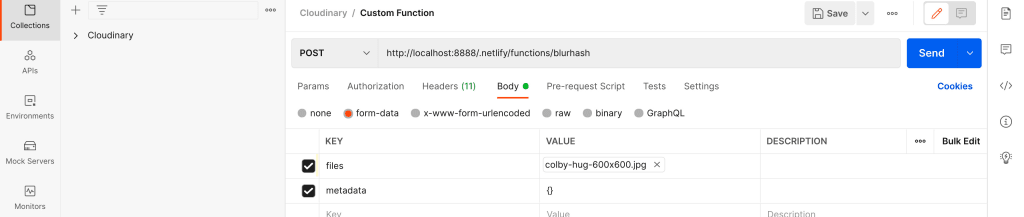
Now let’s also update the Body.
First update the Body type to form-data.
Then enter the following values.
files: type of “file” with a selected image filemetadata: type of “text” with{}
Tip: to change the “type”, hover over the right side of the “key” field.
At this point if we hit Send again, we should see the same response, but let’s console log out the data we’re sending in our function to see that it’s working.
Inside functions/blurhash.js add the following logs at the top of the function.
console.log('event.headers', event.headers);
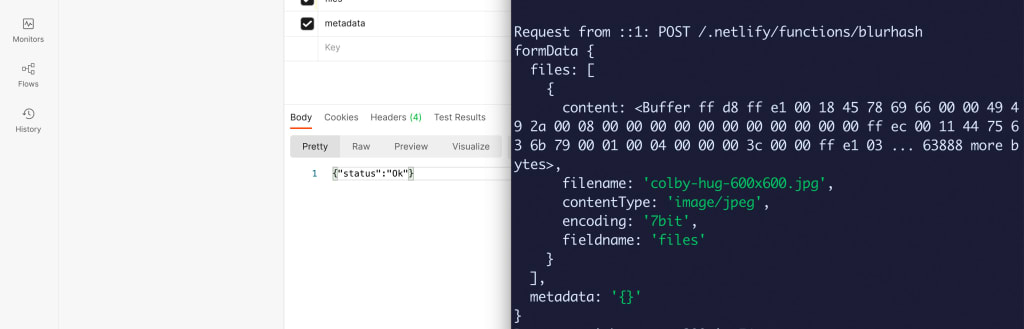
console.log('event.body', event.body);If we hit Send again and look in our terminal, we should see the headers we passed in along with some default headers.
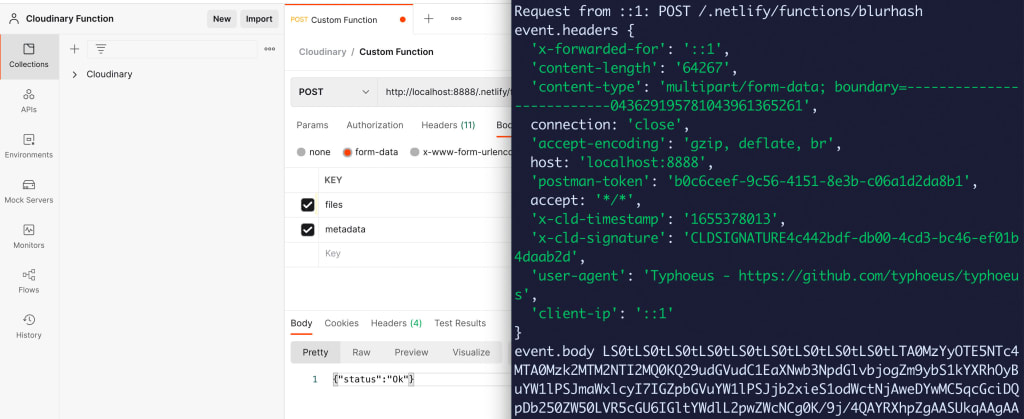
We’ll also see a random-looking string as our body, which looks like a bunch of junk, but it’s actually our data being passed in as a multi-part form which we’ll need to parse, which we’ll do next!
Step 4: Parsing multi-part form data in a Netlify function with lambda-multipart-parser
To parse our form data we’ll need to use a library that makes it easy to translate into something usable.
For this we’ll be using lambda-multipart-parser.
To get started install the package via npm with:
npm install lambda-multipart-parser --saveOnce installed, at the top of functions/blurhash.js add:
const parser = require('lambda-multipart-parser');Then, we can pass our function event into the parser.
Inside the handler function add:
const formData = await parser.parse(event);If we now hit Send again in Postman, we should now see somethig much more usable!
But now comes in the interesting part where we can take this data and transform it into a BlurHashed version!
Step 5: Converting image data into a BlurHash image
Now I’ll be straight with you here, there’s a lot of moving parts and I’m not an expert in how these parts work, but after looking through docs and Issues I was able to get it working with the following, meaning, bear with me, there will be some copy and pasting with some unknowns, but we’ll get it working!
When receiving our image data from Cloudinary (and Postman) we’ll have a Buffer of our image.
To use BlurHash, we need to pass it a Buffer, but it also needs to be a Uint8ClampedArray.
On top of that, we need to know the dimensions of our image, which we don’t have, so we’ll need to use a tool called sharp to process our Buffer and get that metadata.
So before we dive in, here’s what we’re going to do:
- Use sharp to extract the metadata from our image data and ensure it’s in a format BlurHash recognizes
- Encode our image data with BlurHash
Once we have our BlurHash data, we need to turn it back into something Cloudinary will understand, which is that original Buffer.
To do that we’ll:
- Decode our BlurHash image with BlurHash
- Use Sharp to convert our decoded data into a Buffer that Cloudinary will understand
Let’s do this!
First let’s install the packages we’ll need:
npm install sharp blurhash --saveThen let’s import those modules at the top of our file:
const { encode, decode } = require('blurhash');
const sharp = require('sharp');
Under our existing form data, let’s first use sharp to extract our data:
const { data, info } = await sharp(formData.files[0].content)
  .ensureAlpha()
  .raw()
  .toBuffer({
    resolveWithObject: true
  });
Here we’re passing in the file content from our form data to sharp, where along with a few configurations, ultimately getting a Buffer.
Tip: the GitHub issue I used to come up with the above settings and some of the below https://github.com/woltapp/blurhash/issues/107
Next we need to encode that with BlurHash:
const encoded = encode(new Uint8ClampedArray(data), info.width, info.height, 4, 4);We’re taking the data from sharp along with the metadata (info) to encode our data. I believe the 4‘s represent the channels, but being honest I don’t quite understand how that works at the time of writing this.
Then we need to decode that same data:
const decoded = decode(encoded, info.width, info.height);We’re passing in our encoded data along with the same metadata to ensure we’re using the same consistent width and height.
Finally, we can now take our decoded data and use sharp again to transform it into something Cloudinary will understand:
const image = await sharp(Buffer.from(decoded), {
  raw: {
    channels: 4,
    width: info.width,
    height: info.height,
  },
})
  .jpeg({
    overshootDeringing: true,
    quality: 40,
  })
  .toBuffer();
We’re creating a Buffer from our decoded data and passing it to sharp to ultimately give us a properly formatted Buffer to send back in our response.
Tip: the GitHub issue I used to come up with the above settings https://github.com/woltapp/blurhash/issues/43#issuecomment-759112713
Phew! Finally, let’s update our actual response so that we can test this thing out.
Inside of the Cloudinary documentation for Remote Functions we can see exactly the response we need to send.
So let’s use that for our response:
return {
  statusCode: 200,
  headers: {
    'Content-Type': 'image/jpeg',
    'Content-Length': image.length
  },
  isBase64Encoded: true,
  body: image.toString('base64')
}
Here we’re sending a 200 response (which is a success status), the headers telling Cloudinary that it’s a JPG along with the dynamic image length, that we’re sending it encoded as Base64, and finally sending the body as a Base64 string.
Now let’s head to Postman and hit Send!
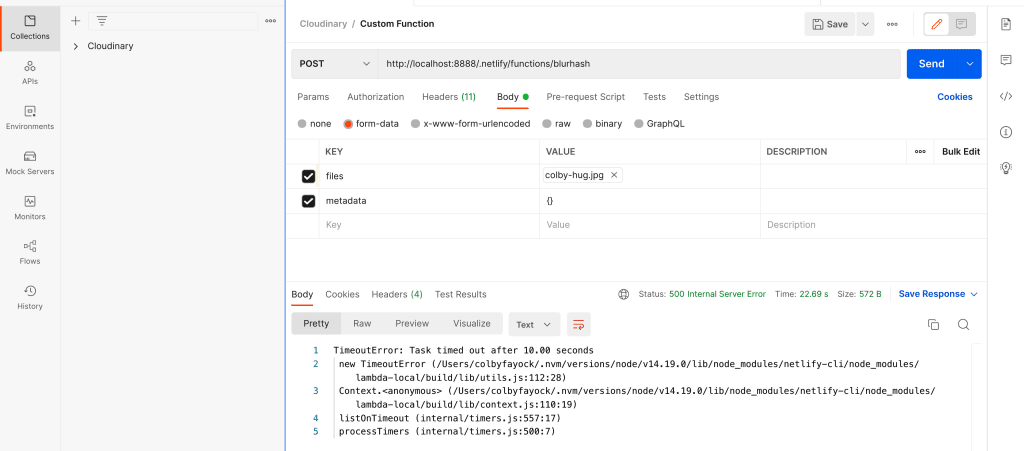
Uh oh, that doesn’t seem right.
Depending on the image you selected, you may or may not have hit this snag, but Netlify Functions by default have a maximum timeout of 10 seconds, meaning, if our function didn’t process and respond within 10 seconds, it fails.
If you’re on the Pro tier it looks like you can request a bump but if not, we’ll have to live with that limit.
Tip: if you need a longer running function you can consider creating your own AWS Lambda manually, but Netlify is just much easier to do this!
That said, let’s try a smaller image and see the result.
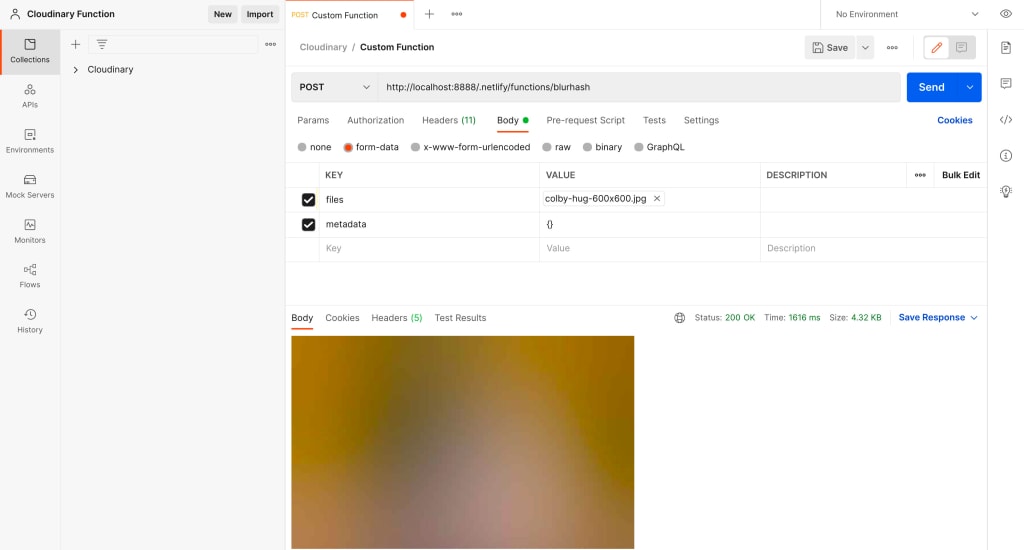
Success! We can see in the body of the response our new image!
We can see a blurred representation of the image we uploaded processed with BlurHash.
Next we’ll deploy our function to Netlify.
Step 6: Deploying a function to Netlify
To deploy our Netlify function, we’re going to use GitHub.
I’m not going to walk through this process, but GitHub has a great guide if you don’t know how to do this.
Once your project is on GitHub, we can head to our Netlify dashboard where we want to click Add New Site and Import an Existing Project.

Netlify will take you to a page where you can authenticate with your favorite Git provider (doesn’t have to be GitHub) and then select your repository from the list.
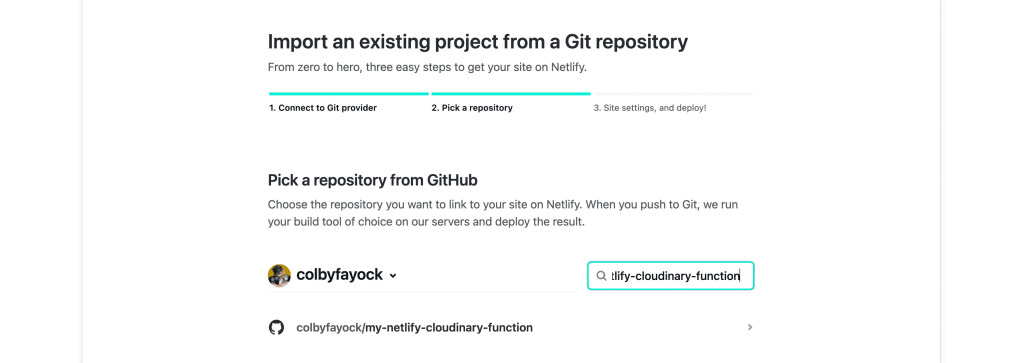
After selecting your project, you’ll be given an opportunity to configure your build. If you’re following along, you don’t have to do anything as the default settings are perfect and we already told Netlify where our functions are with our netlify.toml file.
So that means you can scroll to the bottom and click Deploy site.
Once you do, Netlify will kick off the deploy process and set up your function!
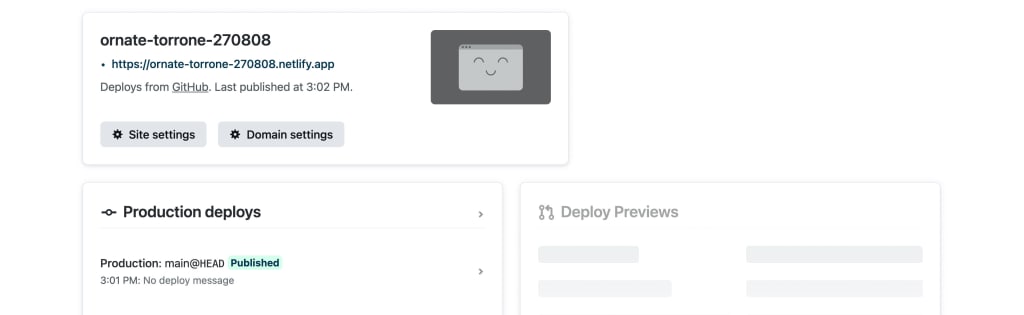
This should be relatively quick since we’re only deploying a single function, but once it’s Published, our function should now be available at the same pattern as we saw earlier:
<Hostname>/.netlify/functions/<Function or File name>So that means with my site above which was deployed to [https://ornate-torrone-270808.netlify.app](https://ornate-torrone-270808.netlify.app) my function should be available at:
https://ornate-torrone-270808.netlify.app/.netlify/functions/blurhashTip: you can also find this URL by navigating to the Functions section of your Netlify project and selecting your function
But now that it’s deployed, we can test that it’s working by simply replacing our URL in Postman.
And once complete, we should see the exact same response! Success!
Now let’s use our function with Cloudinary.
Step 7: Generating a signed Cloudinary image using a custom remote function
Finally we can use our function to process our image data programmatically.
To do this we’re going to use the Cloudinary node.js SDK.
Now realistically you would use this inside of an existing node project, but given we don’t have a project, we’ll use a little script to generate our image and see how it works.
In the root of your project let’s create a folder called scripts and inside create a file called signed-image-blurhash.js.
const cloudinary = require('cloudinary').v2;

const image = cloudinary.url('<Your Public ID>', {
  sign_url: true,
  secure: true,
  custom_function: {
    function_type: 'remote',
    source: '<Netlify Function Endpoint>'
  }
});

console.log(image);
We’re generating an image URL with Cloudinary
Just make sure you update Your Public ID with the Public ID of an image from your media library and Netlify Function Endpoint with your Netlify endpoint from the previous step.
Now before we run this we need to authenticate this request, so we need to export our environment variables.
Tip: we’re going to export our variable in our terminal but you could alternatively create a
.envfile along with using dotenv to load those variables!
At the top of your Cloudinary dashboard, we have a few Account Details, where we particularly want to use the API Environment Variable.
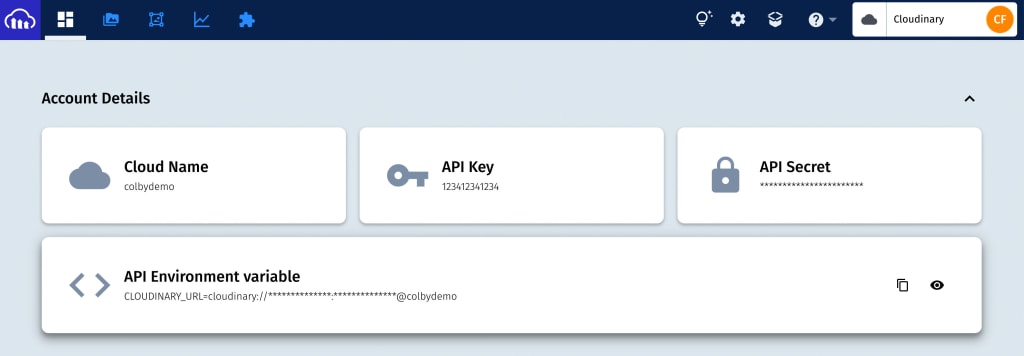
Click the button on the right to copy the value.
Next head to your terminal then…
If you’re on a Mac or Linux type export with a space then the copied string.
It should look like:
export CLOUDINARY_URL=cloudinary://API_KEY:API_SECRET@CLOUD_NAMEIf you’re on Windows type set with a space then the copied string
set CLOUDINARY_URL=cloudinary://API_KEY:API_SECRET@CLOUD_NAMEFinally we can run our script!
In your terminal run:
node scripts/signed-image-blurhash.jsThis will log a URL.
Open that URL in the browser and after it finishes loading, you should see your same blurred image generated by BlurHash but now inside of the Cloudinary image pipeline!
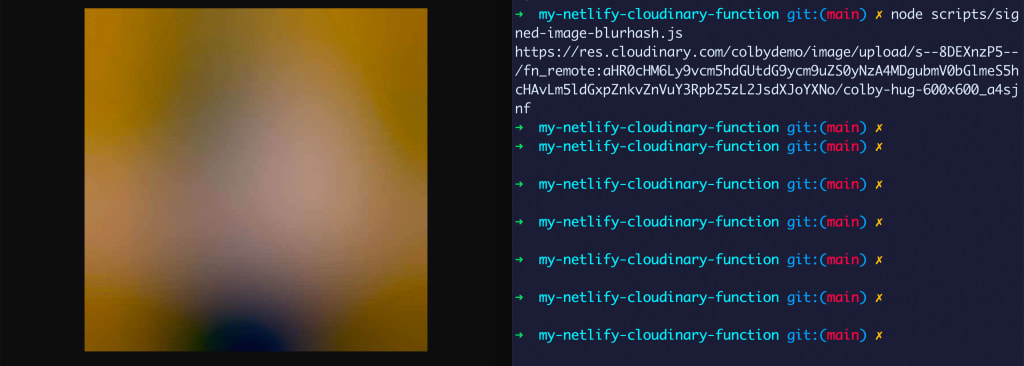
Now that first request might have taken a few seconds, but every subsequent cached request will be lightning fast as it’s now cached and served from the Cloudinary CDN.
What else can we do?
Run other custom processing in a function
BlurHash is just one example of what you can do with custom processing. Maybe you simply want to add metadata or maybe you want to use tools like TensorFlow to run machine learning models.
Using a custom function gives us the ability to basically whatever we want!
Note: come up with something cool? Let me know on Twitter
Add other Cloudinary Transformations
While custom processing is cool, Cloudinary has a ton of other functionality built right in including removing backgrounds and adding filters and effects.
There are a lot of things you can do with existing functionality and build on top of it with something custom.
Try other serverless function services
Netlify Functions is great, but there are a lot of services now that allow you to build functions.
Roll up your sleeves and try to deploy your own serverless function on AWS using Lambda which will allow you to unlock more features and bypass any of the default times-outs of Netlify.
Learn more about Postman
We really just scratched the surface of Postman, it’s an awesome tool for working with APIs.
Get to know more about Postman including building custom requests, collections, and even running scripts on your requests.