

Why is creating pages important in React?
Before we dive into how this works, it’s important to understand where page creation helps and what it’s solving.
A basic React application that doesn’t use a framework like Next.js works by mounting to an entrypoint in an HTML document (DOM node), where it then uses JavaScript to load all of the dynamic parts of the page.
The issue comes where the original HTML document and first request only includes that simple HTML to load the app, nothing along with it such as SEO metadata or other parts of the page that might be important to load before JavaScript kicks in.
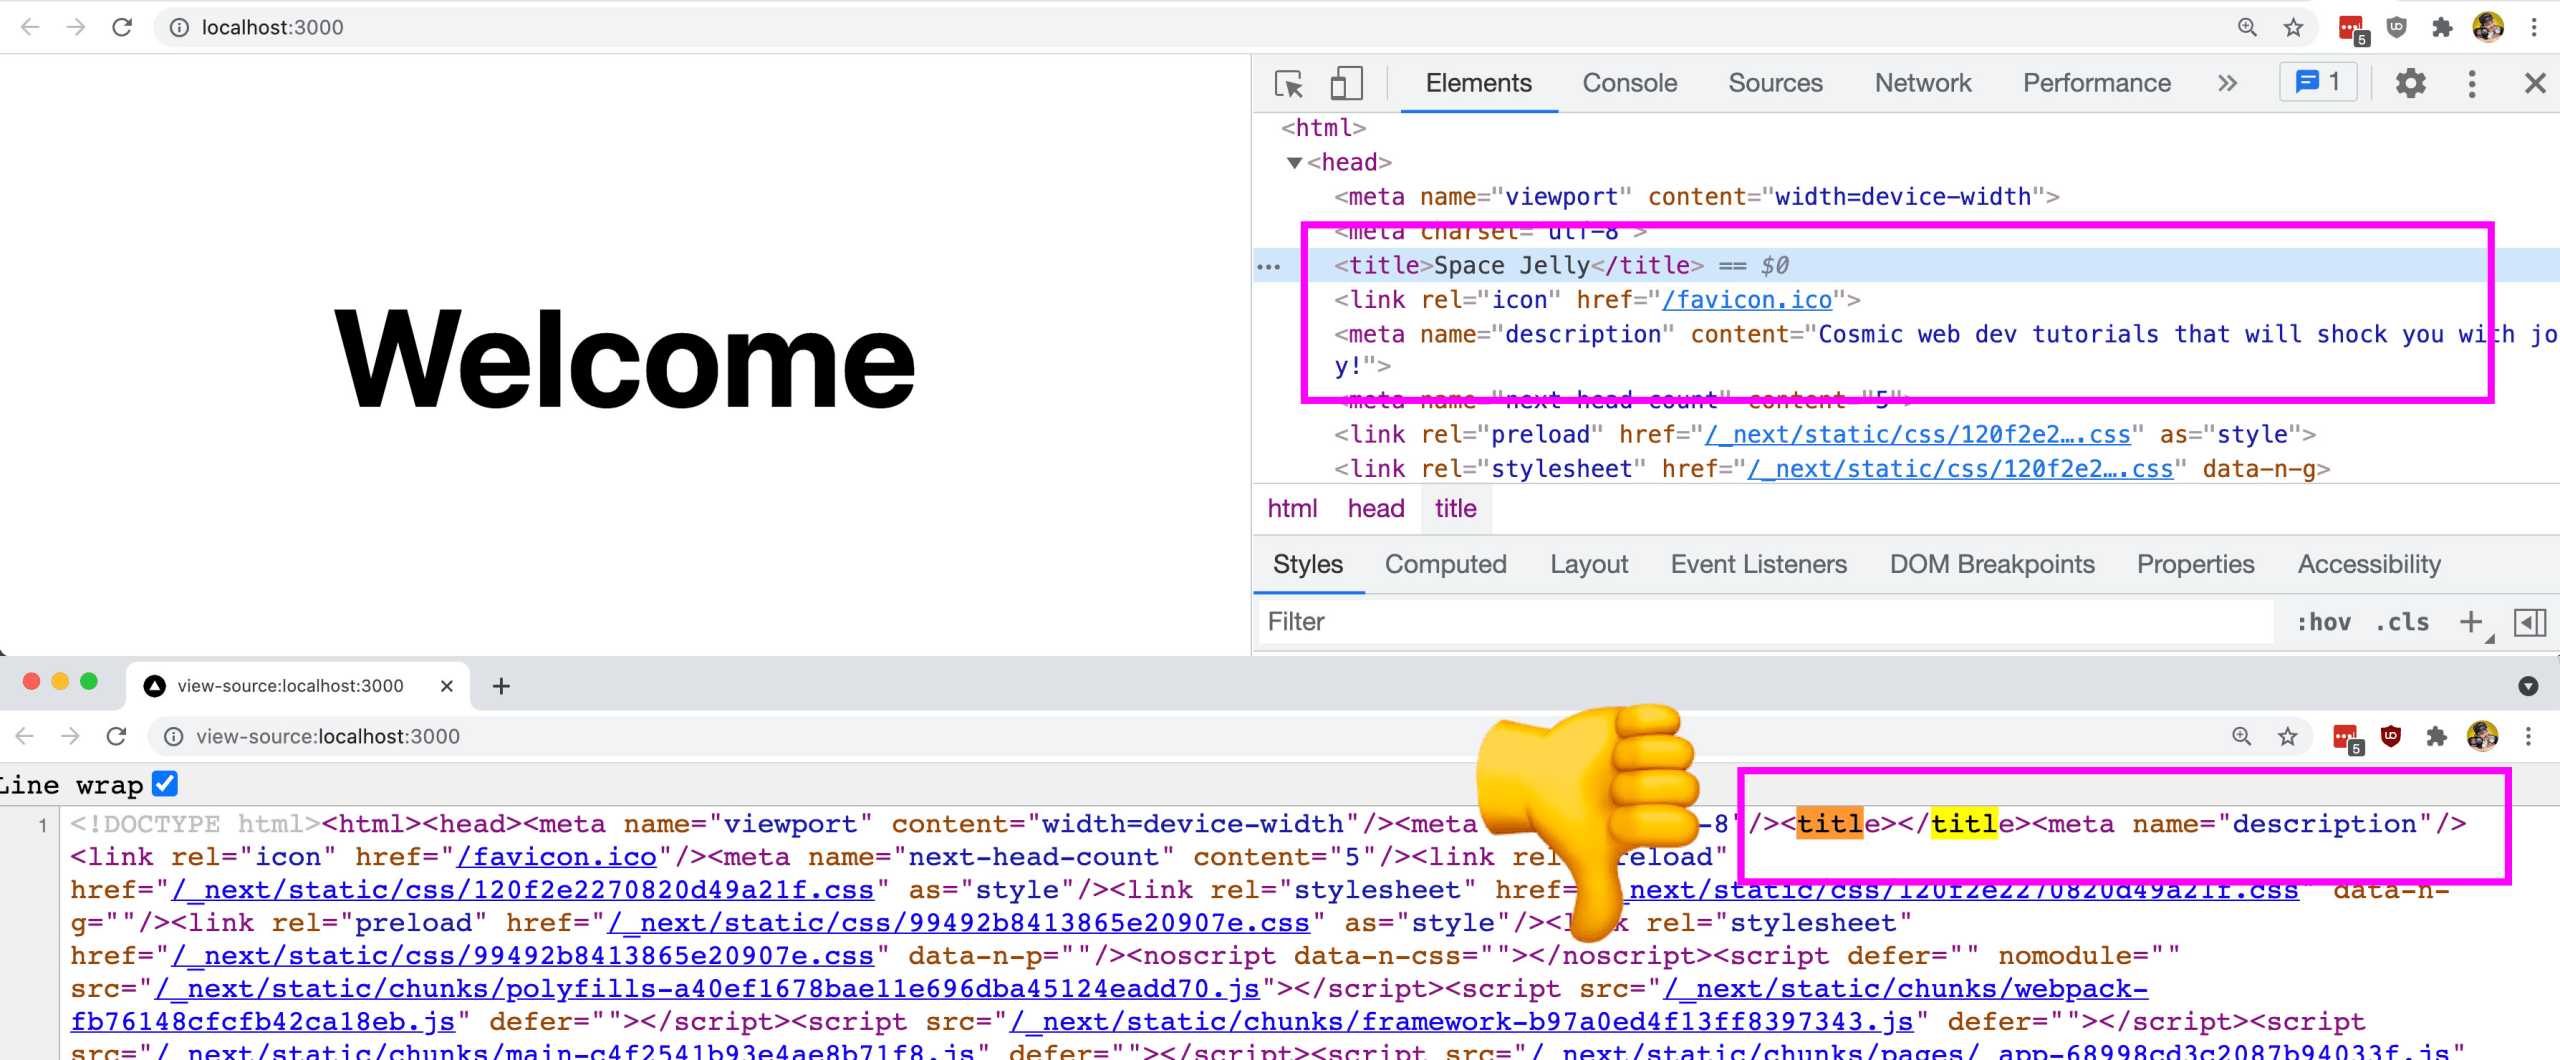
This means that Google and other social media websites won’t be able to see your dynamic meta tags, which will hurt your chances of ranking in search.
Like in the image above, this can be confusing when debugging with browser tools, as often the HTML you see when you inspect is the HTML after JavaScript has manipulated the page, whereas for SEO, you need to make that available for the first request HTML.
“Prerendering” the page whether statically during compilation or dynamically on the server also helps with performance, where you’re able to give your visitors something to look at and potentially interact with before JavaScript loads.
The good news is Next.js has a ton of support for making sure we’re delivering everything we can for a performant and SEO-friendly website or app, starting with generally how we can create new pages.
Creating pages in Next.js
One of the great features of Next.js is that it supports a file-system based router. What this means, is in order to create a new page, you simply create a new file with the name of that route and add your React page component.
For example, if you want to create a Homepage, About page, and Contact page, it might look like:
pages
- about.js (/about)
- contact.js (/contact)
- index.js (/)
Next.js also includes the ability to nest routes. If you have an ecommerce store and wanted to show different categories, you might add:
pages
- apparel
--- pants.js (/apparel/pants)
--- tshirts.js (/apparel/tshirts)
- home
--- kitchen.js (/home/kitchen)
--- bedroom.js (/home/bedroom)
- products.js (/products)
These are very “static” ways of managing routes though, meaning, you have to manually update each and every route you want to support. Instead we can manage these routes dynamically based on our available data.
Creating dynamic routes in Next.js
Next.js also gives you the ability to create routes dynamically. This is useful if you wanted to dynamically create the category routes like above or if you are supporting a catalog of products. In that case, you wouldn’t want to manually create each route or you might not even know what those routes look like.
For the example of using it to support a variety of products, that might look like:
product
-- [productId].js (/product/1, /product/2)
By wrapping productId in brackets, we’re telling Next.js that we want to treat that as a “parameter” which will then be used when fetching data, which we’ll explain below in the Data Fetching section.
But you can even take this a step further, where if you wanted to support both a new page for each product as well as capture deep routing for each of those pages, you could use a “catch all route” which would look like:
product
-- [...productSlug].js (/product/1, /product/1/gallery, /product/1/reviews)
By using the spread operator along with the brackets, we’re telling Next.js that for each path, we might have additional parameters which will come in the form of an array, that we can use to support different types of pages.
If we wanted to make those parameters optional, such as if in the above, we wanted to additionally support /product, we could wrap it with another set of brackets, which tells Next.js a route wouldn’t require parameters:
product
-- [[...productSlug]].js (/product, /product/1, /product/1/gallery)
But ultimately, we need to use dynamic data to create these routes as well as grab the data to build each of these pages, which is where we’ll need to know how to fetch data in Next.js.
Data fetching in Next.js
When fetching data in Next.js, our options are limited to a few different APIs:
Note: wondering why getInitialProps isn’t listed? Next.js explicitly recommends using the 3 above methods instead, so we’ll stick with only those for this walkthrough.
While fetching data in Next.js isn’t required, it’s important to understand the different approaches when trying to create pages that include dynamic data whether that’s being pulled in at compile time, rendered on the server, or fetched in the browser client-side.
The first two, getStaticProps and getServerSideProps are specifically used to fetch or inject data into your page’s React component via props. This can happen at compile time (getStaticProps) or at request time (getServerSideProps).
// Compile time

async function getStaticProps({ params }) {
  return {
    props: {
      product: await getProduct(params.productId)
    }
  }
}

// Request time

async function getServerSideProps({ params }) {
  return {
    props: {
      product: await getProduct(params.productId)
    }
  }
}
You’ll also notice one of the APIs above doesn’t fit in with the others: getStaticPaths. getStaticPaths is the mechanism that is used to tell Next.js what static routes (paths) of the website actually exist.
async function getStaticPaths() {
  const products = await getProducts();
  return {
    paths: products.map(product => {
      return {
        params: {
          productId: product.id
        }
      }
    }),
    fallback: false
  }
}
For instance, if we’re building a static ecommerce store with a variety of products, our process might look like:
- Inside getStaticPaths, find out what products exist, and tell Next.js those routes need to be created and available in the app (/product/1, /product/2)
- Inside getStaticProps, find the data for that specific product (/product/2)
- getStaticProps will then pass that data as props to the component, which will be then used to build the page
On the other hand, if you’re just using a server-side approach, you might just be using getServerSideProps, where you can dynamically look up a product and serve it, without having to actually worry about managing the pages.
Both ways come with trade-offs, static (SSG) or server-rendered (SSR), that will be up to you to decide how to approach your project.
But now let’s use all of this in practice to get a good sense of what’s going on.
What will we build?
In order to get an idea of how all of this works, we’re going to create a simple example using the Avatar: The Last Airbender API.
We’ll walk through the following:
- Creating a basic new page (no data)
- Creating a statically generated page with dynamic data
- Creating multiple pages statically generated pages from dynamic data
- Creating a server rendered page with dynamic data
Note: We’re going to cover the basics of page creation of routing, which won’t include things like metadata for each page and styling.
Step 0: Creating a new Next.js app with Create Next App
We’re going to start off with a new Next.js app using Create Next App.
Inside of your terminal, run:
yarn create next-app my-last-airbender-wiki
# or
npx create-next-app my-last-airbender-wiki
Note: feel free to use a different value than
my-last-airbender-wikias your project name!
Once installation has finished, you can navigate to that directory and start up your development server:
cd my-last-airbender-wiki

yarn dev
# or
npm run dev
And once loaded, you should now be able to open up your new app at http://localhost:3000!

Step 1: Creating a basic new page in a Next.js app
Starting from the top, let’s create a new, basic page.
Inside of our pages directory, we already see that we have an index.js file, which is our homepage.
To create a new page, we can create a new file inside of pages with the name of the route we’d like it available at. So let’s create an About page!
Inside pages create a new file about.js and inside add:
export default function About() {
  return (
    <div>
      <h1>About This Wiki</h1>
      <p>This wiki is all about Avatar: The Last Airbender!</p>
    </div>
  )
}
The core of any Next.js page is an exported function that’s marked as the default export for that file.
Here we’re exporting the About function that returns a React component including a little content about the page.
If we go to the About page at /about (or http://localhost:3000/about by default) we should be able to see our new page!

By creating a file at pages/about.js we made a new route at /about which renders our new page.
Step 2: Using getStaticProps to statically generate a page with dynamic data
Next up is getStaticProps and statically compiling our page.
The benefit here is we’re delivering the page with all of the data loaded in at compile time so that we don’t have to have the server do that work at request time, which makes it extra fast!
To start, let’s create a new file called avatars.js under pages which we’ll use to show a list of all Avatars from the show.
Inside pages/avatar.js add:
export default function Avatars() {
  return (
    <div>
      <h1>Avatars</h1>
      <p>All of the Avatars that appeared in the show:</p>
      <ul>
        <li>Aang</li>
      </ul>
    </div>
  )
}
This should look similar to Step 1, where right now, we’re not doing anything dynamic. If we load this up in our browser, we should see a pretty static page.
But we want to make this dynamic so that we can show all of the Avatars, not just Aang.
To do that, we’re going to use getStaticProps and make a request to the The Last Airbender API to get that list.
At the bottom of pages/avatars.js add:
export async function getStaticProps() {
  const avatars = await fetch('https://last-airbender-api.herokuapp.com/api/v1/characters/avatar').then(res => res.json());
  return {
    props: {
      avatars
    }
  }
}
Here we’re using fetch to make our API request which Next.js makes available to use. With that data, we’re returning it inside of a props object, which means we’re making it available as a prop for our React component.
So next, we need to expose that prop so we can use it. Let’s update our Avatars page component:
export default function Avatars({ avatars }) {Now before we move on, if we add a console.log statement with the avatars prop, we should be able to see all of our data right inside of our web console!
This means we can use it inside of our app, so let’s update our list (ul) to dynamically render our data:
<ul>
  {avatars.map(avatar => {
    return (
      <li key={avatar._id}>{ avatar.name }</li>
    )
  })}
</ul>
And we can see all of the Avatars listed from the API!
We can even take advantage of having additional data and add images:
<ul style={{ display: 'grid', gridTemplateColumns: '1fr 1fr 1fr', gridGap: '4em' }}>
  {avatars.map(avatar => {
    return (
      <li key={avatar._id}>
        <p>{ avatar.name }</p>
        <img src={avatar.photoUrl} width="100%" alt="" />
      </li>
    )
  })}
</ul>Step 3: Dynamically creating pages routes with getStaticPaths
If we wanted to give more details to each character, we likely wouldn’t want to try to include all of that information inside a single page. Instead, we would want to create a page for each character.
To do that, we’re going to use getStaticPaths to define each route (or path) we want to render statically.
Let’s start off by creating a new directory characters inside of pages and inside, create a new file called korra.js.
Inside pages/characters/korra.js add:
export default function Character({ character }) {
  return (
    <div>
      <img src={character.photoUrl} alt="" />
      <div>
        <h1>{ character.name }</h1>
        <p>Affiliation: { character.affiliation }</p>
      </div>
    </div>
  )
}

export async function getStaticProps() {
  const results = await fetch('https://last-airbender-api.herokuapp.com/api/v1/characters?name=korra').then(res => res.json());
  return {
    props: {
      character: results[0]
    }
  }
}
To start off we’re building a page similarly to how we built our Avatars page where we’re using the Characters endpoint to search for a character by name and return the first result.
Note: this method of searching the API for a character by name is imperfect where typically you might use an ID but this works to demonstrate our example.
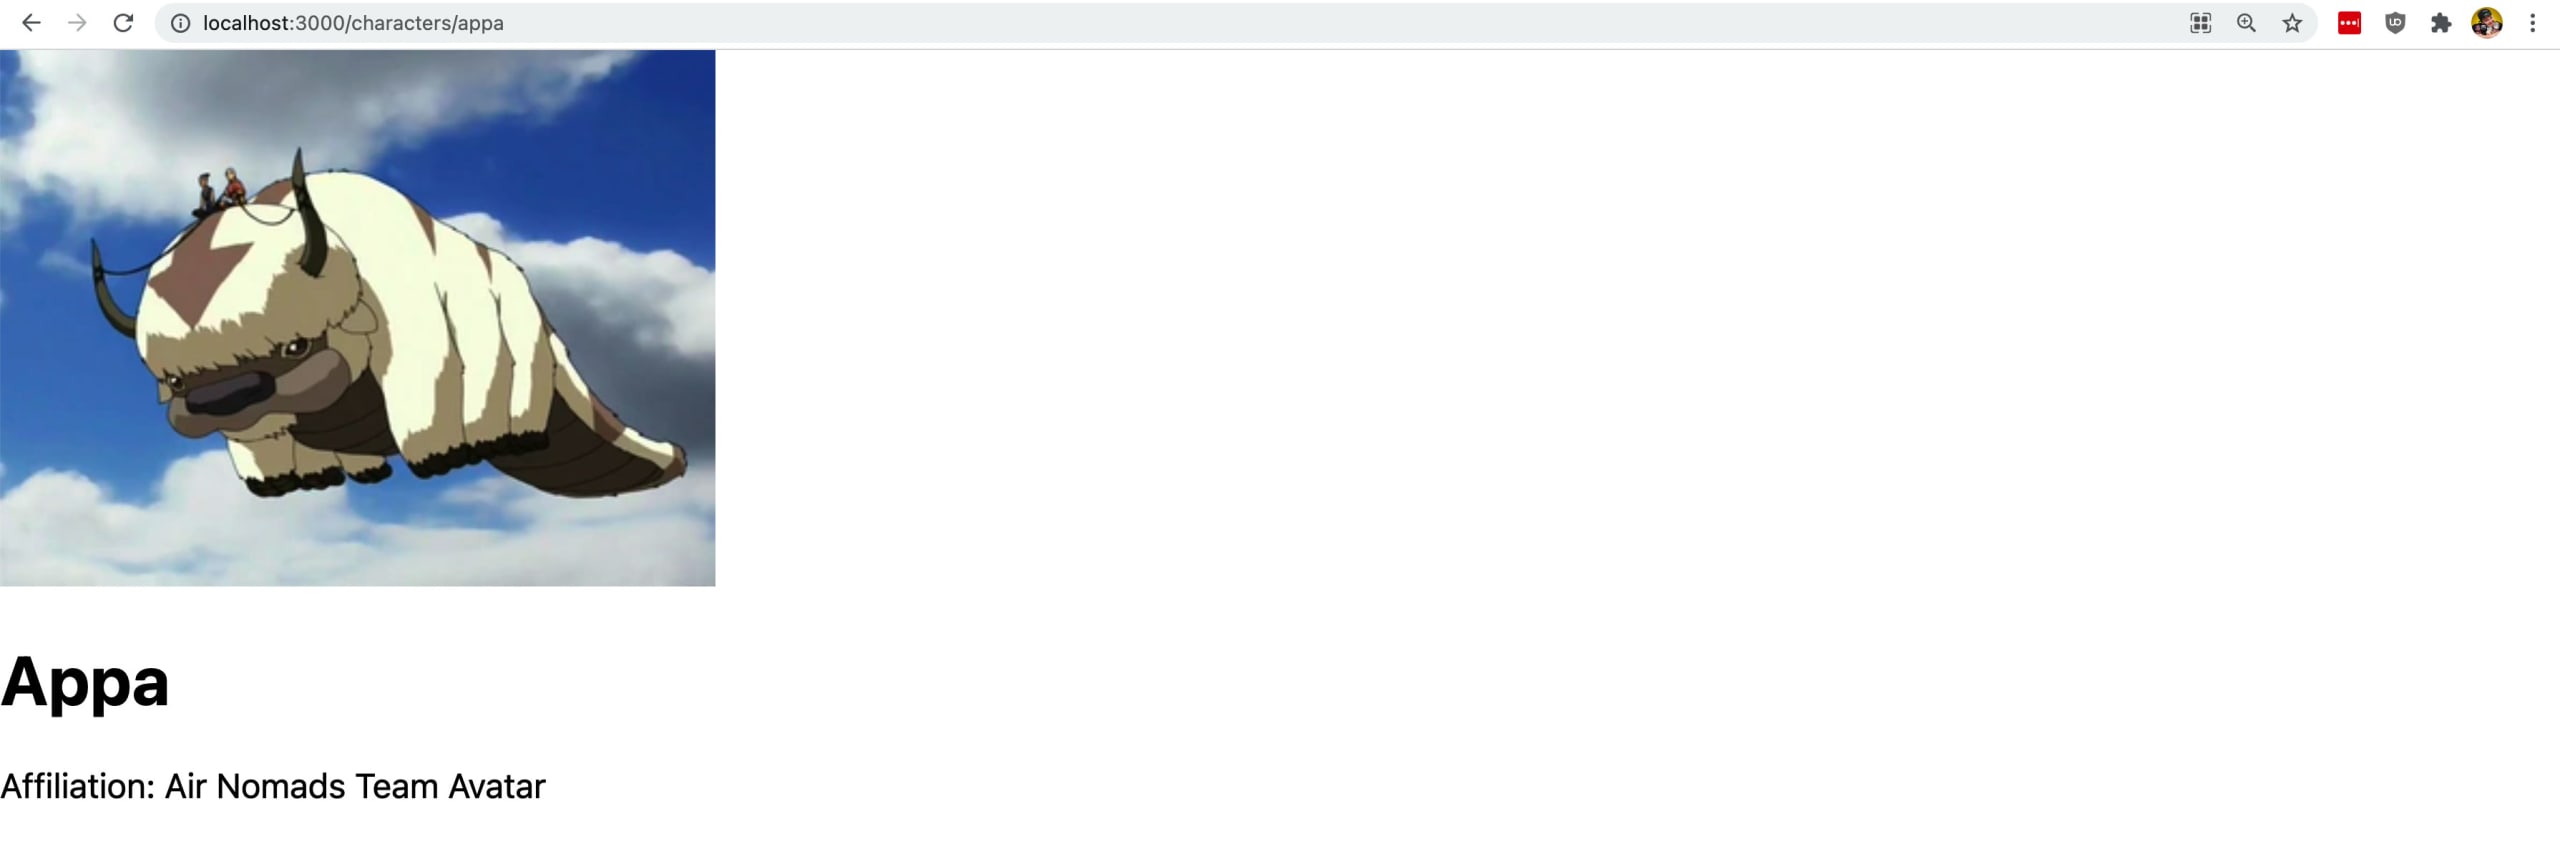
But now if we go to /characters/korra (http://localhost:3000/characters/korra) we should see Korra!

But this page only works for Korra, we want it to work for any character.
So now, we’ll use getStaticPaths so we can make that search parameter dynamic, so we can support looking up any of our favorite characters.
First, we need to rename the file to support the dynamic route.
Rename:
pages/characters/korra.jsto:
pages/characters/[characterId].jsNow at the bottom of pages/characters/[characterId].js add:
export async function getStaticPaths() {
  const characters = await fetch('https://last-airbender-api.herokuapp.com/api/v1/characters?perPage=500').then(res => res.json());
  return {
    paths: characters.map(character => {
      const characterId = character.name.toLowerCase().replace(/ /g, '-');
      return {
        params: {
          characterId
        }
      }
    }),
    fallback: false
  }
}
Here we’re requesting all of the characters of the API (a little less than 500) and using each one to create a path configuration that supports a unique characterId.
This will create all of the different routes for our app which we’ll inspect in a second, but we then need to update getStaticProps to take in our dynamic parameter.
Let’s update getStaticProps to:
export async function getStaticProps({ params }) {
  const characterId = params.characterId.replace(/\-/g, '+')
  const results = await fetch(`https://last-airbender-api.herokuapp.com/api/v1/characters?name=${characterId}`).then(res => res.json());
  return {
    props: {
      character: results[0]
    }
  }
}
Instead of passing in korra statically, we’re using the characterId that will be passed in as a parameter to dynamically make a search request for our character.
If we go to any of the following URLs, we should be able to see our characters!
- /characters/korra (http://localhost:3000/characters/korra)
- /characters/aang (http://localhost:3000/characters/aang)
- /characters/suk (http://localhost:3000/characters/suki)
- /characters/appa (http://localhost:3000/characters/appa)
Let’s inspect our paths to see how this is actually working.
Update getStaticPaths to the following:
export async function getStaticPaths() {
  const characters = await fetch('https://last-airbender-api.herokuapp.com/api/v1/characters?perPage=500').then(res => res.json());
  const paths = characters.map(character => {
    const characterId = character.name.toLowerCase().replace(/ /g, '-');
    return {
      params: {
        characterId
      }
    }
  });
  console.log(paths)
  return {
    paths,
    fallback: false
  }
}
Above we’re just putting our paths into a variable and logging it before returning it.
If we refresh our page and look in our terminal, we can see all of the pages we’re making available in our app.
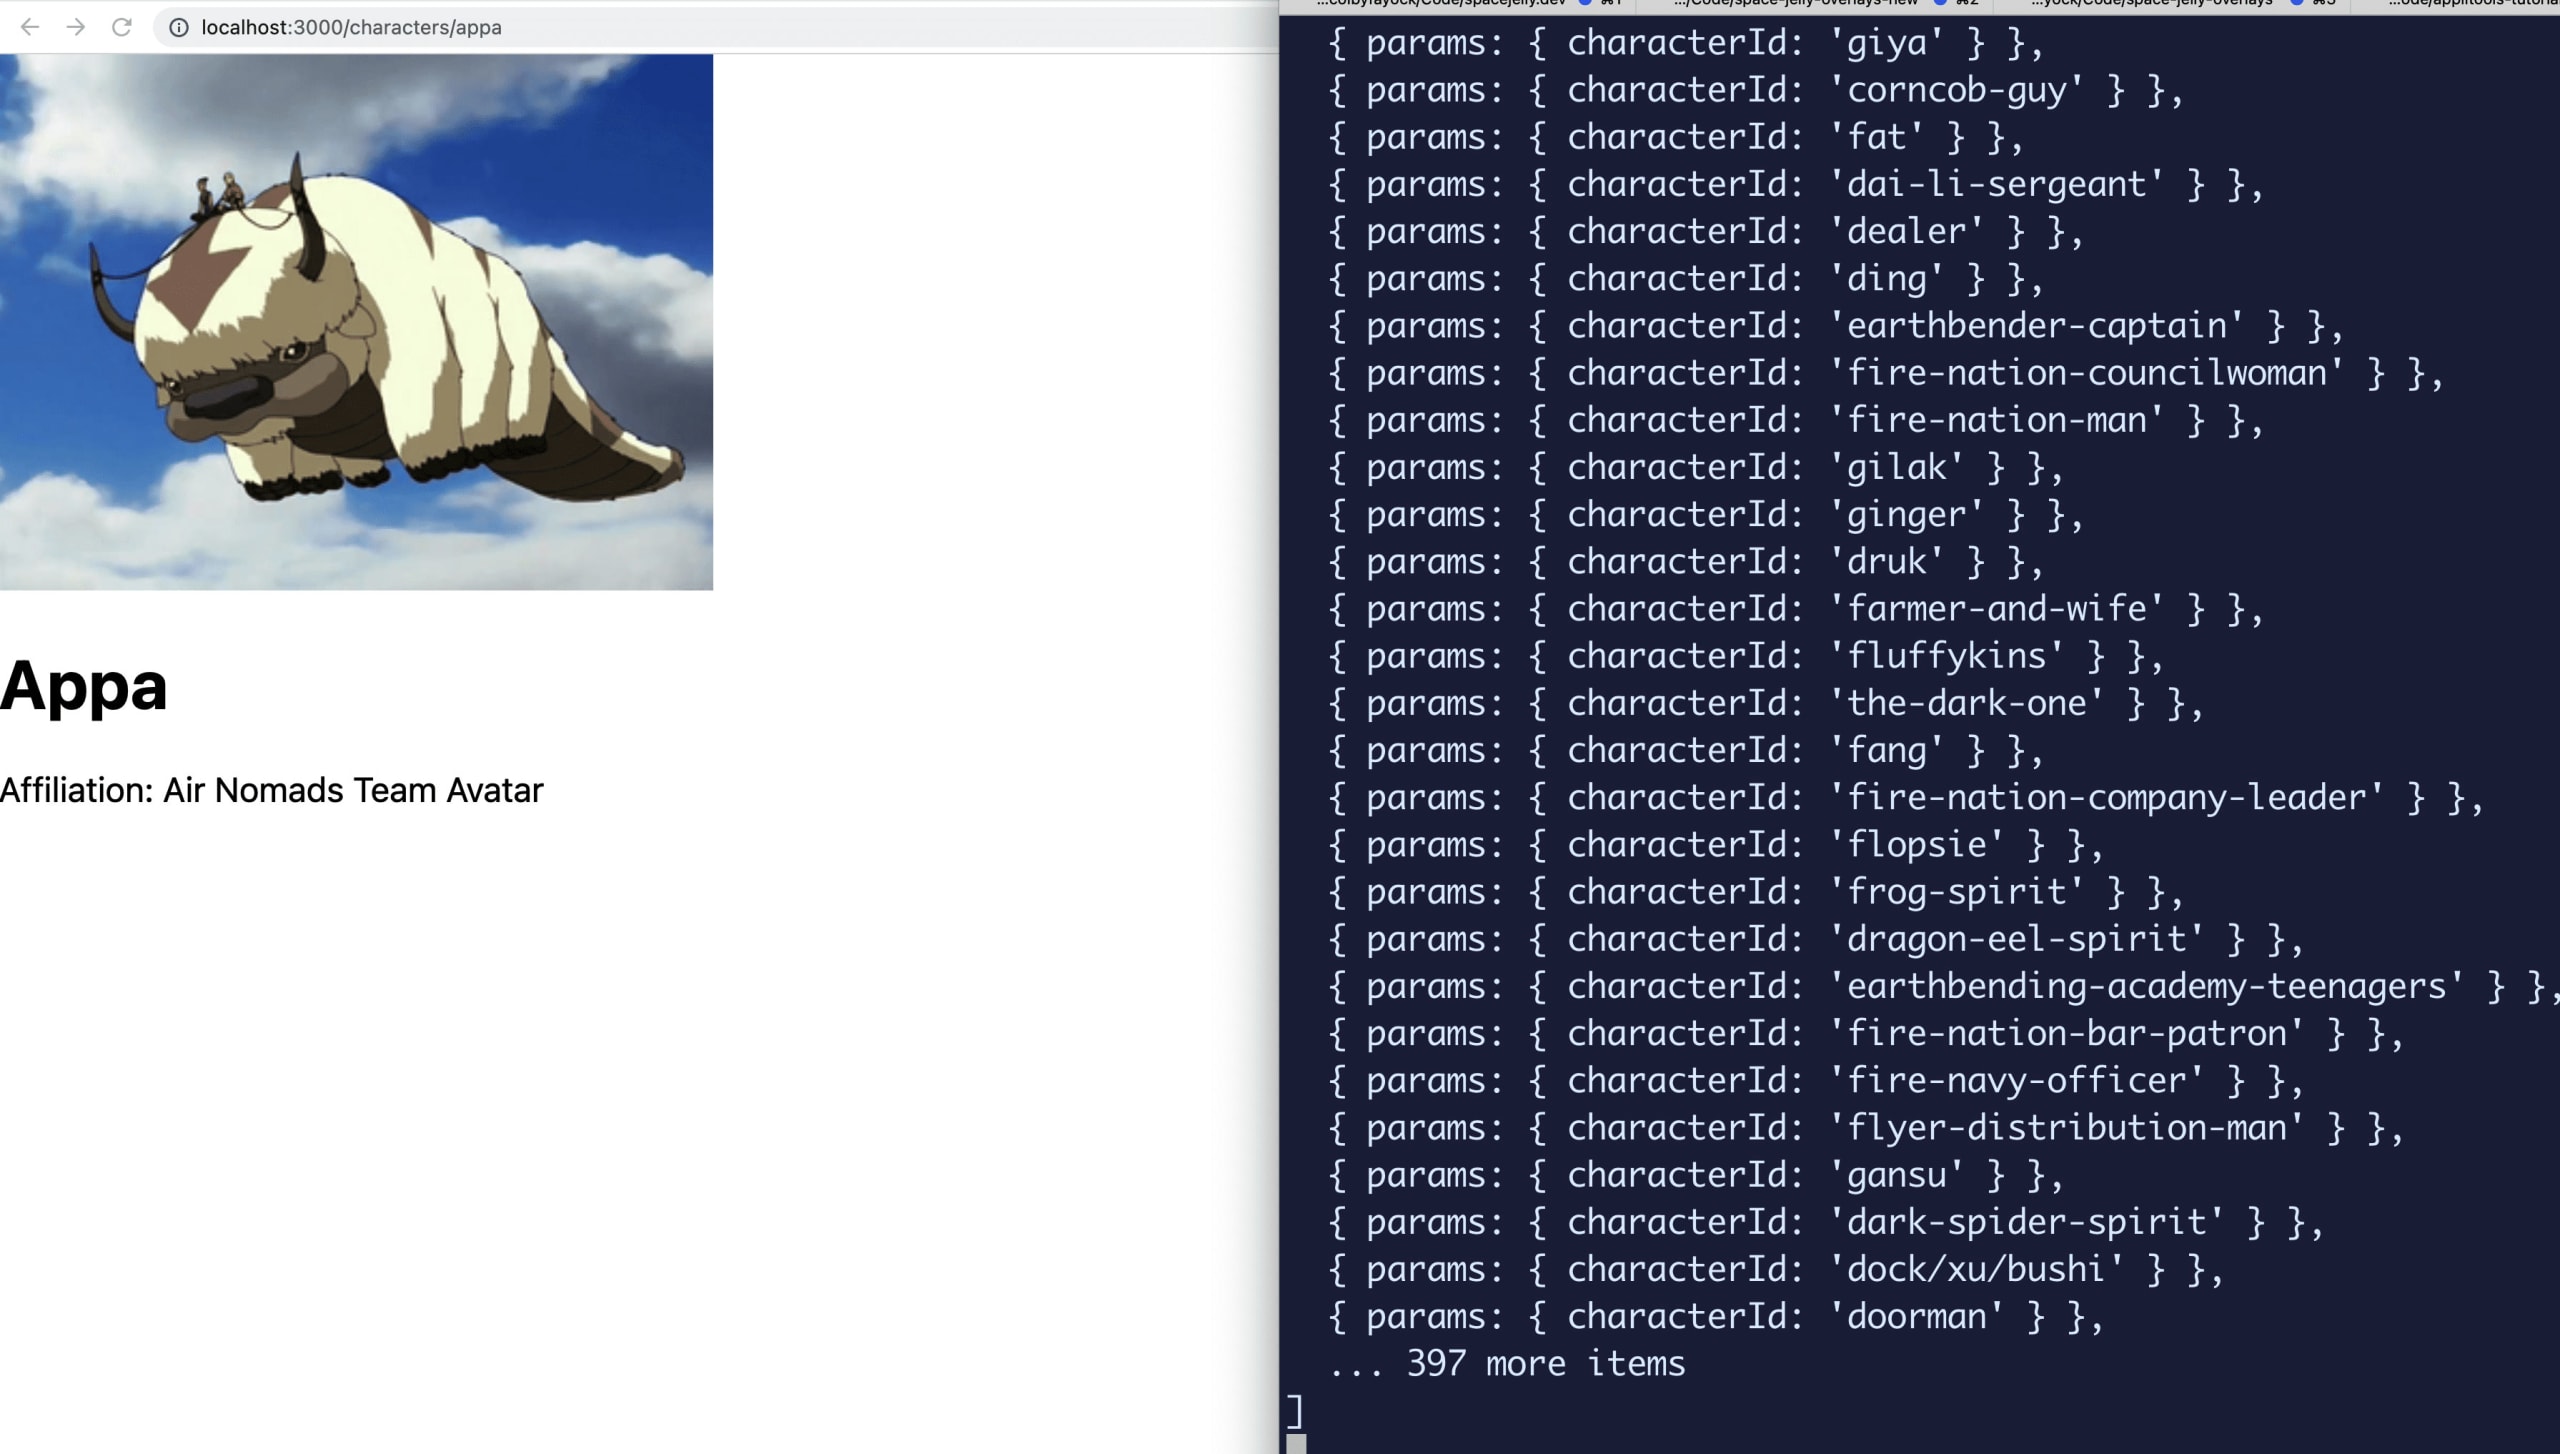
We can see every single characterId that’s made available. That means in our URL, we can go to any of those pages!
Now as I noted earlier, the method that we’re using to create our name parameter and use that to search for the character is imperfect, as we can get some unexpected results, especially if we’re not handling special typographic characters.
We could do the exact same thing but instead us the _id value as the characterId however it would be much more difficult for us to navigate to each one rather than going to something friendly like /character/suki.
But our goal here was to illustrate how we can generate a list of pages and dynamically look up the details about each one, which we’ve successfully done!
Step 4: Using getServerSideProps to dynamically look up data at request time
Finally, let’s look at how we can use getServerSideProps to make our lookups on the server.
While the last few examples were completely static, with getServerSideProps, as it sounds, we’re processing the request and rendering of the HTML on a server instead of at compile time.
The downside is we might spend more time on the request before returning the page, but the upside is we can be a bit more dynamic in how we work with our APIs and pages.
To get started, let’s create a new directory under pages called affiliations and inside add [affiliationId].js.
Inside pages/affiliations/[affiliationId].js add:
export default function Affiliation({ characters, affiliationId }) {
  return (
    <div>
      <h1>Characters Matching Affiliation "{affiliationId.replace(/\+/g, ' ')}"</h1>
      <ul style={{ display: 'grid', 'grid-template-columns': '1fr 1fr 1fr', 'grid-gap': '4em' }}>
        {characters.map(character => {
          return (
            <li key={character._id}>
              <p>{ character.name }</p>
              <p>{ character.affiliation }</p>
              <img src={character.photoUrl} width="100%" alt="" />
            </li>
          )
        })}
      </ul>
    </div>
  )
}

export async function getServerSideProps({ params }) {
  const affiliationId = params.affiliationId.replace(/\-/g, '+')
  const characters = await fetch(`https://last-airbender-api.herokuapp.com/api/v1/characters?affiliation=${affiliationId}`).then(res => res.json());
  return {
    props: {
      affiliationId,
      characters
    }
  }
}
Now this is a big chunk of code and we’ll walk through it like we usually do, but if you look around, you’ll notice that we’re doing very similar things like we did in the past steps except we’re somewhat combining them and simplifying the requests.
Inside of the page component, we’re looping through a list of characters that we’re receiving as a prop like in Step 2 along with showing dynamically an affiliate ID to show what our search is.
Under that is getServerSideProps, where we’re taking an affiliationId parameter and using it make a request to the API similar to how we did in Step 3.
Now if we try to go to something like /affiliations/water (http://localhost:3000/affiliations/water), we should see a list of characters from the water tribes!
The biggest difference here is we didn’t need to define a list of static paths in order to make this work. Because the dynamic parts happen on the server at request time, we can take that dynamic parameter and look it up on the fly.
Now just like Step 3, this is still an imperfect way of handling this, as when we go to the /affiliates/water, we get results for all varieties of water tribes as it’s not an exact match.
If we instead go to /affiliations/northern-water-tribe (http://localhost:3000/affiliations/northern-water-tribe).
We can see that although we didn’t predetermine those two separate pages existed, we were able to narrow down our results, as if changing the URL parameter acts as a search within itself.
The best part about Next.js is we can mix and match our data fetching APIs just like we did in this walkthrough where if we know our data will always be static, we can maximize performance and statically generate everything with getStaticProps and getStaticPaths.
Otherwise, if we need it to be a bit more dynamic, we can use getServerSideProps and make sure we’re able to do everything we need at request time!
What else can we do?
Add links to all of the pages
In our examples, we spent time dealing with the page content, not how to get to the pages.
Similar to how we created our static paths in Step 3, we can make a request to get all characters and build a list in our UI (like the homepage) that links to each one.