

What is a Twitch chat bot?
If you’ve spent some time watching some Twitch streams, you may have noticed users posting with the word “bot” in their name or some sort of automated system that could be used for anything from ads to custom commands.
That chat bot is essentially a server that’s hosted somewhere on the internet, that will “listen” to the chat, reading each message, and trying to understand it, to determine whether or not it needs to take action on that message or respond. It can also be used as a mechanism to regularly send updates to the chat, such as if you wanted to help update the audience about the stream or if you wanted to promote something every so often.
Part of the fun with chat bots, whether for Twitch or any other platform (like Discord), is these bots can be used to provide more interaction and self-help for the stream. This can include info about the host, the guest, simple shortcuts for links, or even some kind of game that let’s the audience interact with the stream.
But either way, that bot ultimately gets deployed to a server where it “lives” and can actively keep running, listening to that Twitch stream, which is where Heroku comes in.
What is Heroku?
Heroku is a platform that allows developers to deploy apps to the cloud. They support a wide variety of services like running a Node.js server or spinning up a new Postgres database.
While Heroku isn’t the only kid on the block, it’s one of the most popular, between the ease of getting a new server up and running and the fact that it’s free tier supports running a single bot server 24/7 (after validating a credit card and without running anything else).
The great thing is to interact with Twitch, we can use libraries like tmi.js available on npm that we can run on a node server, giving us an easy way to get a new bot up and running.
What is tmi.js?
Starting off, tmi.js stands for “Twitch Messaging Interface”. It ends up being exactly what it sounds like, which is a mechanism to interface with, or interact with, Twitch’s messaging system.
The goal of the library is provide a way for developers to programmatically listen to Twitch events and when those events occur, perform some sort of action.
As we talked about earlier, there are a variety of ways you can use this type of utility, but in our case, we’ll be using it to build a simple chat bot.
What are we going to build?
We’ll be building a chat bot that listens to messages on a Twitch channel and upon receiving a command, responds with a custom message.
Particularly, we’ll build our bot to recognize the exclamation point pattern (ex: !command), parse the particular command being sent, and using it to map to a list of available commands.
We’ll be doing all of this by spinning up a new Node.js app from scratch, using tmi.js to listen in on Twitch, and deploying it all to Heroku for production.
Step 0: Creating a new Node.js app using npm init
To get started, we’ll need a new node.js app. We can do this by running npm init inside of a new directory:
mkdir my-twitch-bot
cd my-twitch-bot
npm init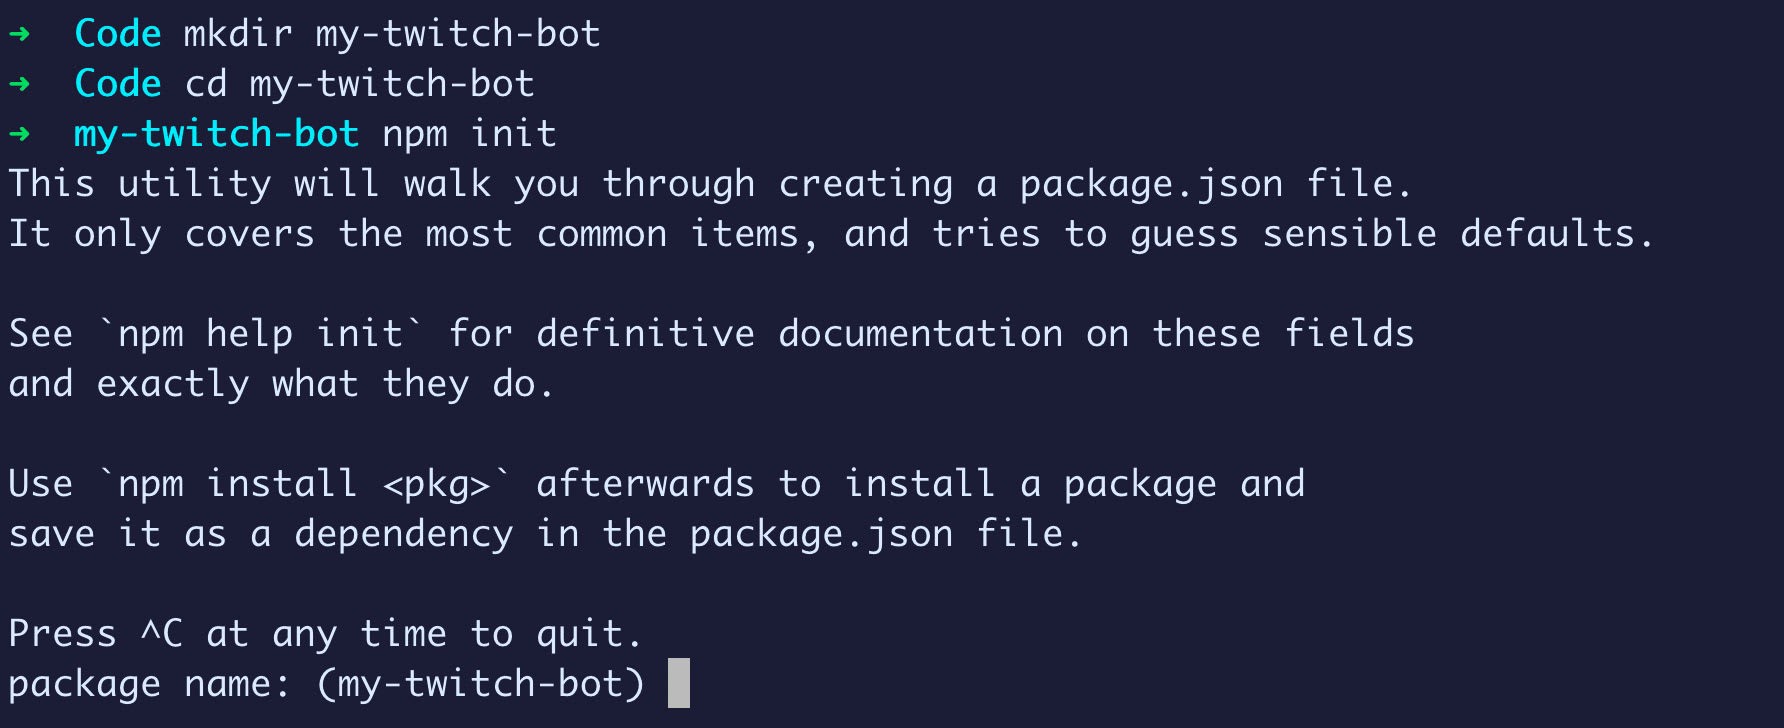
Once npm prompts you, feel free to customize each response or hit Enter a few times to accept all of the defaults. You can change the values later in package.json if you decide you don’t like your original response.
We can also create a simple entry-point into the script that will run our chat bot by creating a new file called server.js.
For now, you can add a log statement inside just to see that it works, like:
console.log('Hello, Twitch!');We can test this out by running the following command inside of our project directory:
node server.jsOnce complete, you should see our “hello” message right in the terminal.
Finally, we want to add this as an npm script in our project. Inside our package.json file, inside of the scripts property, add:
"scripts": {
  "start": "node server.js"
},
And now if you run npm start, you should see the log statement in the terminal just like before!
Step 1: Installing and configuring tmi.js
Now that we have a basic node.js app, we can use npm to install tmi.js, which we’ll use to listen in to our Twitch chat.
Inside of your project directory, run:
npm install tmi.jsThis will install tmi.js into our project.
Next, inside of our server.js file, we can import tmi.js by adding the following to the top:
const tmi = require('tmi.js');With tmi.js imported into our project, we can now use it to start listening to messages inside of a Twitch channel.
To start off, we need to initialize a new tmi client and configure it to connect to the channel we want to listen to.
Add the following to server.js:
const client = new tmi.Client({
  connection: {
    reconnect: true
  },
  channels: [
    'twitch_channel_name'
  ]
});

client.connect();
Here’s what we’re doing:
- Create a new instance of tmi client
- Configure the client to try to reconnect if disconnected
- List the channel(s) you want the bot to listen to
- Invoke the connect action for the new client
You’ll want to replace twitch_channel_name with your Twitch channel’s name (or username) or you can go find someone who is actively streaming that we can use to test things out.
Note: later we’ll want to create a new Twitch account to use for our bot. This can also be a great option to use for setting up a stream to test with.
Finally, we can actually start listening to messages.
Add the following below the new tmi client instance:
client.on('message', async (channel, context, message) => {
  console.log('channel', {
    channel,
    user: context.username,
    message
  });
});
In this snippet, we’re:
- Creating a new event listener on our client for the event
message - When that event occurs, we’re invoking a new function
- That function has a few arguments including the channel name, the context (including the user), and the actual message
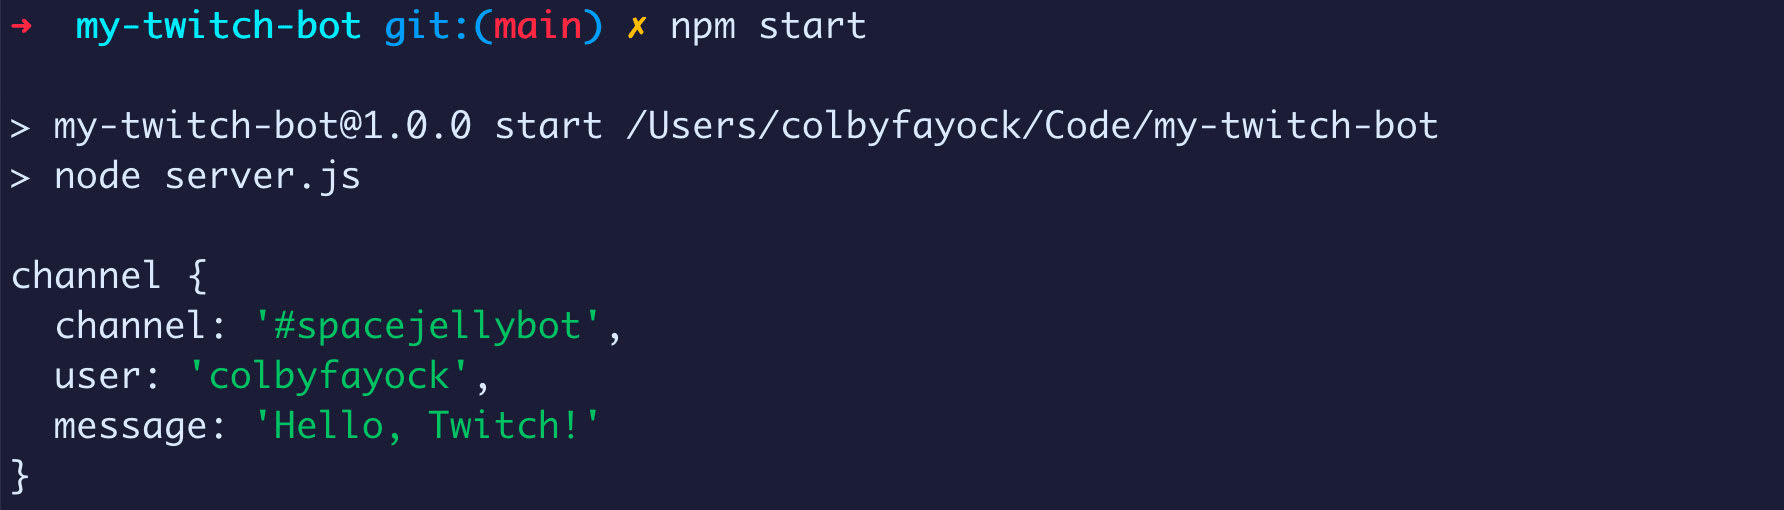
- We then log all of that information into a new object so we can see it in the terminal
At this point, we can start back up our server by running npm start.
And as soon as a new message is sent in Twitch, we should see a new log in our terminal!
Step 2: Responding to Twitch chat commands with tmi.js
Now that we’re able to read new messages, we want to actually be able to respond to those messages.
As mentioned in the previous step, we’ll be using a new Twitch account that will serve as our “bot” account for our Twitch chat bot. If you haven’t created that new account, take a moment to go do that now.
Alternatively, you can use your primary account to do this, but typically audience members prefer to see automated messages come from a bot account that they know is dedicated to that action, rather than sending automated messages directly from the streamer’s account.
To set our chat bot up to be able to send messages, we’ll need to pass tmi.js two things:
- Twitch bot username
- oAuth Token for our Twitch bot
We have our username as we noted above, but we need to obtain an oAuth token.
You can obtain your oAuth token by visiting twitchtokengenerator.com and following these steps:
- Visit https://twitchtokengenerator.com/
- When prompted, select Bot Chat Token
- Authorize your chat bot Twitch account (important to use the right account)
- Verify you’re not a robot
- Copy and save your Access Token for later
Now that we have our access information, we need to add these values to our client configuration. We can do this by adding a new property to our client config:
identity: {
  username: `[Bot Username]`,
  password: `[Bot oAuth Token]`
}
However, it’s not a great idea to pass the oAuth token in as plain text directly inside of your application, as given that’s a sensitive value, committing that to GitHub or generally exposing that value can compromise your account.
Instead, we’re going to use dotenv, which will allow us to store our details as environment variables.
Inside of your terminal, install dotenv with:
npm install dotenvThen at the top of your server.js file, import the library:
require('dotenv').config();Next, create a new file called .env in the root of your chat bot project (next to package.json) and include:
TWITCH_BOT_USERNAME="[Chat bot Twitch username]"
TWITCH_OAUTH_TOKEN="[Chat bot Twitch oAuth token]"
Make sure to replace the values with your username and oAuth token from earlier.
Back inside of server.js, we can now use these values inside of our identity property:
identity: {
  username: process.env.TWITCH_BOT_USERNAME,
  password: process.env.TWITCH_OAUTH_TOKEN
}
What’s happening here is when we use the dotenv library, it automatically loads our .env file into the node process, where we grab our environment variables and pass them into our configuration.
Finally, let’s make our chat bot actually respond to a message.
Inside of our event handler for message, add:
client.on('message', async (channel, context, message) => {
const isNotBot = context.username.toLowerCase() !== process.env.TWITCH_BOT_USERNAME.toLowerCase();
if ( isNotBot ) {
client.say(channel, `Responding to ${context.username} message: ${message}`);
}
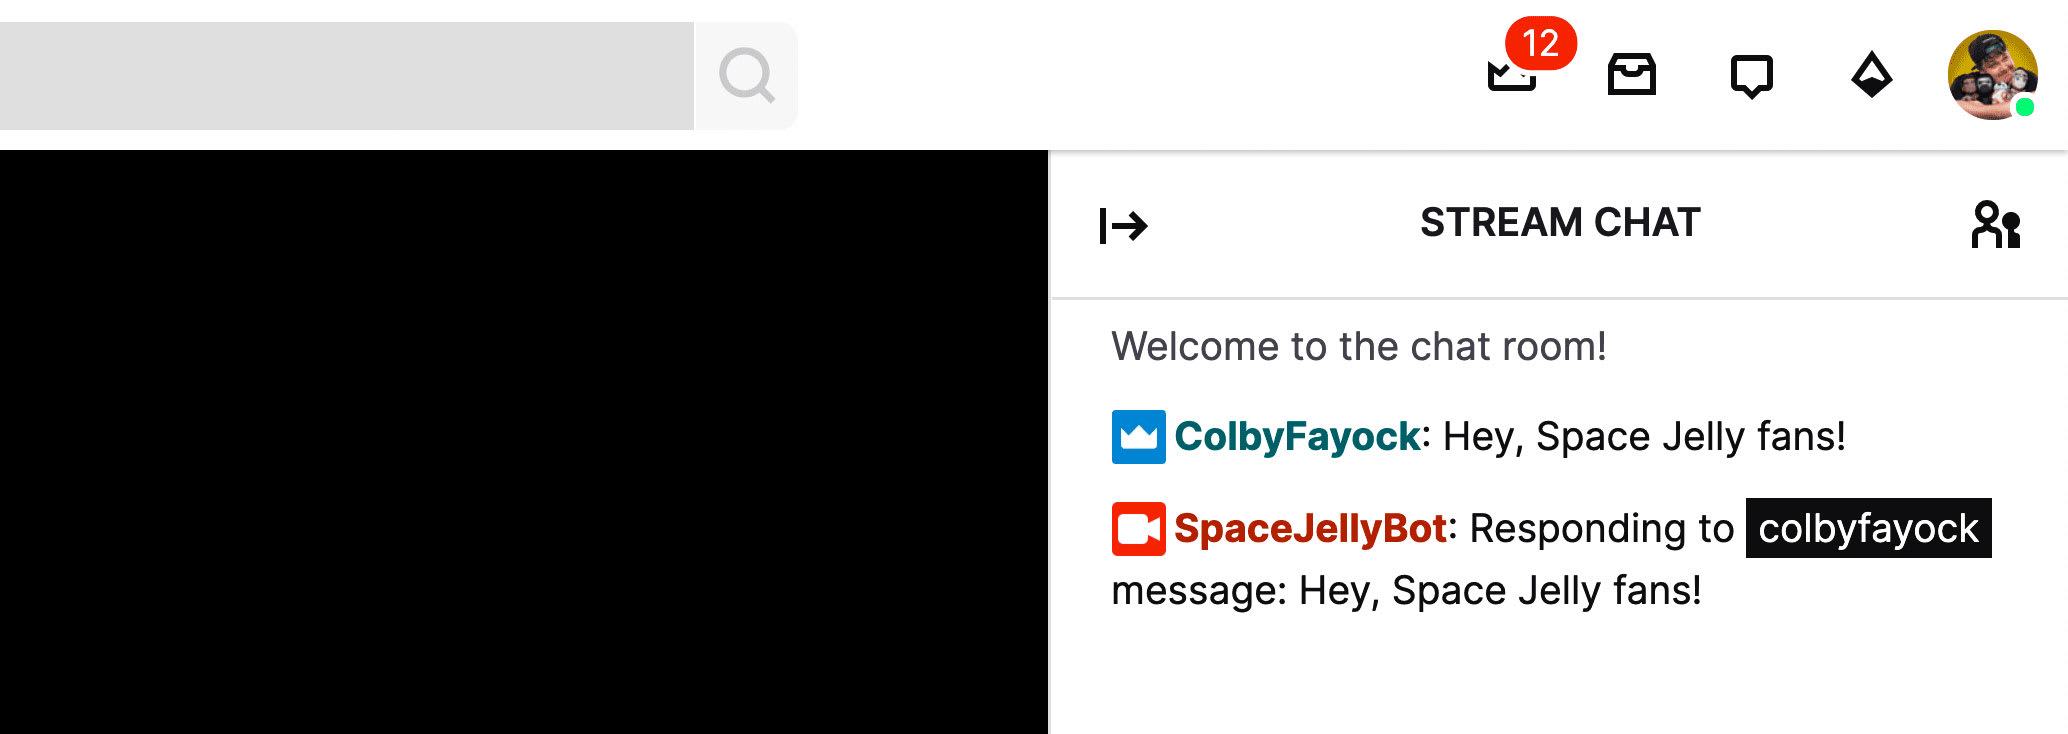
});In the above, we’re:
- First making sure that the user sending a message isn’t our own bot (preventing an infinite loop of messages)
- Then we use our tmi.js client to “say” a message targeting the channel the message was sent to, along with the username and message sent
And once our server is started (make sure to restart your server), we should now be able to send a message in our chat and get a response!
As one last part to Step 2, while we’re protecting our Twitch oAuth token inside of our .env file, we also want to make sure that we’re not adding that file to git and exposing it.
Be sure to create a file called .gitignore and include that .env file. It’s also a good idea to include node_modules as well, looking like:
node_modules
.envStep 3: Listening for Twitch chat commands with tmi.js
Now that we successfully have our bot not only listening to message, but it’s also able to reply, we want to make sure that we’re able to explicitly recognize commands and if it is a command, respond appropriately.
To do this, we’re going to use a Regular Expression via RegExp to search the message for the command pattern.
At the top of server.js but below the imported dependencies, let’s create a new Regular Expression:
const regexpCommand = new RegExp(/^!([a-zA-Z0-9]+)(?:\W+)?(.*)?/);Breaking down the expression:
^specifies that we want to capture the beginning of the string!simply matches an exclamation point([a-zA-Z0-9]+)states that we want to find an alphanumeric string that can contains 1 or more characters and capture that value so we can use it later(?:\W+)?creates a non-matching group (?:makes it non-matching) that contains some whitespace(.*)?optionally captures any character, which if exists, we’ll be able to use later
So if we have an incoming message that looks like:
!command argumentWe’re going to both be able to capture the value of command and separately argument.
Next, we can actually use this expression to capture those values from our message.
Inside our message event handler, let’s update it to look like the following:
client.on('message', async (channel, context, message) => {
  const isNotBot = context.username.toLowerCase() !== process.env.TWITCH_BOT_USERNAME.toLowerCase();

  if ( !isNotBot ) return;

  const [raw, command, argument] = message.match(regexpCommand);

  if ( command ) {
    client.say(channel, `Command "${command}" found with argument "${argument}"`);
  }
});
In the above, we’re:
- If the message is from our bot user, simply return and exit out of the script
- We use the
matchmethod on ourmessagestring where we pass in our RegExp as an argument - That
matchmethod will return an array of values, where the index 0 will be the raw string, index 1 will be the first matching group, and index 2 will be the second matching group - If we discover that we have a command, we tell our bot user to send a message acknowledging it to the Twitch chat
Note: when using match, your array might include more values if you have more matching groups, but because we have 2 matching groups, we get 2 values in addition to the raw string.

Success! We’ve successfully sent a command message, now as one last step, let’s make our commands a little bit easier to manage.
First, at the top of the page, under our regexpCommand constant, let’s add a new object that maps to some responses:
const commands = {
website: {
response: 'https://spacejelly.dev'
},
upvote: {
response: (argument) => `Successfully upvoted ${argument}`
}
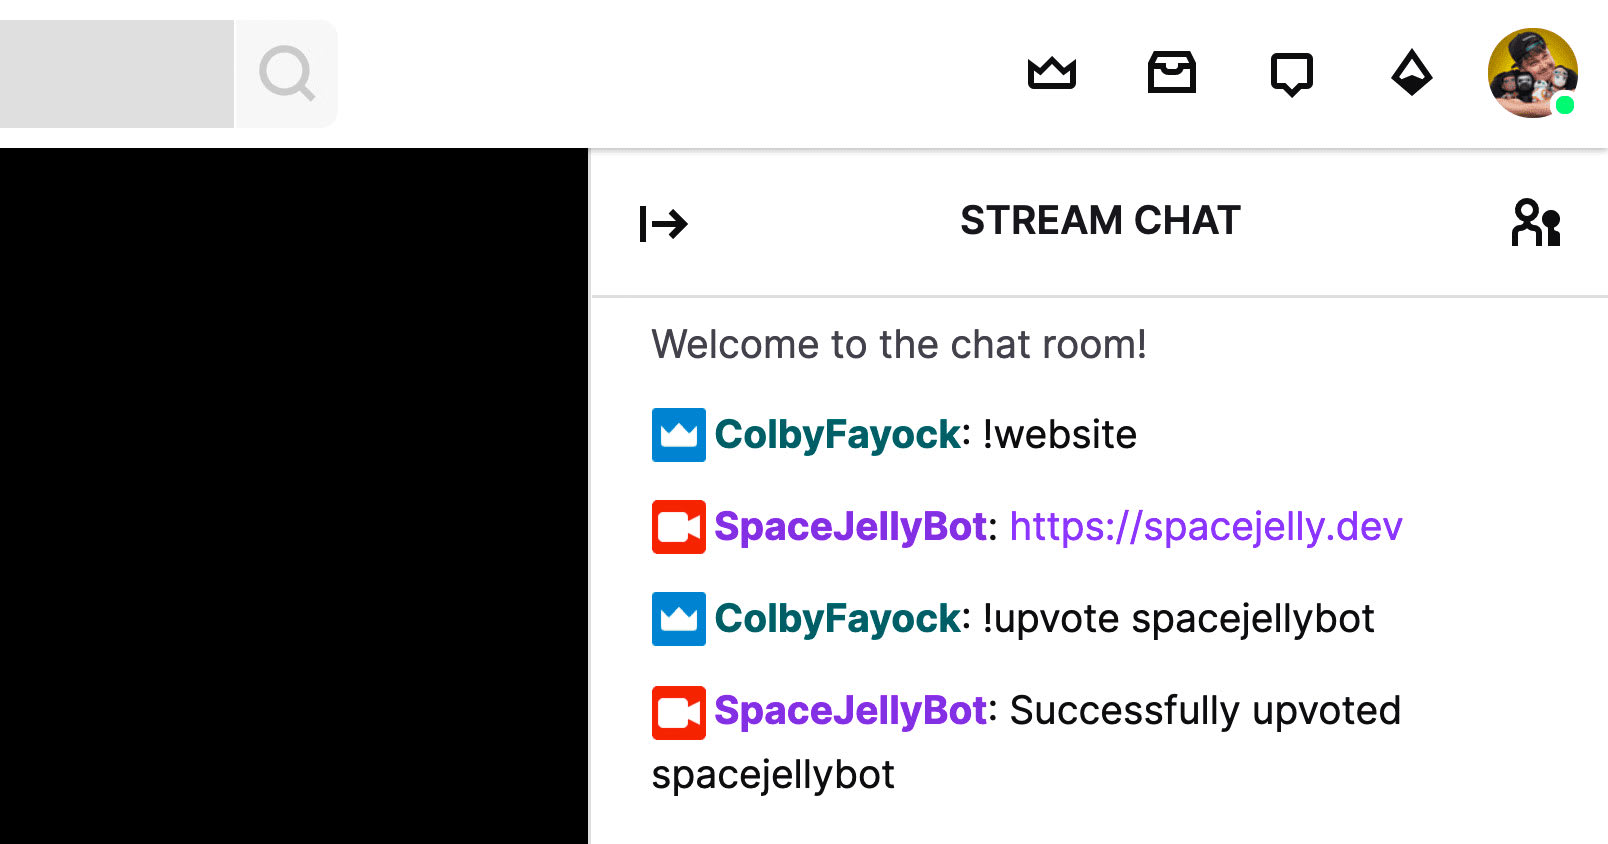
}Feel free to tweak these to your liking, but the goal here is to represent at least two commands where one has a property with a response of a string and the other has a response of a function, which is how we can set up dynamic commands.
Next, let’s update our message handler again:
client.on('message', async (channel, context, message) => {
  const isNotBot = context.username.toLowerCase() !== process.env.TWITCH_BOT_USERNAME.toLowerCase();

  if ( !isNotBot ) return;

  const [raw, command, argument] = message.match(regexpCommand);

  const { response } = commands[command] || {};

  if ( typeof response === 'function' ) {
    client.say(channel, response(argument));
  } else if ( typeof response === 'string' ) {
    client.say(channel, response);
  }
});
In the above, we’re:
- Using our
commandvalue to try to look up that command in ourcommandsobject. We add a backup of an empty object simply to prevent an error when destructuring - We destructure
responsefrom our command - We check if our response is a function and if it is, we fire that function as our chat message
- If it’s not a function, we check if it’s a string and if it is, we return that string as our chat message
And now if we restart our server and test out our new commands, we should see that we both have a static response and a dynamic one!
Step 4: Deploying a Twitch chat bot to Heroku
Finally, let’s deploy our new Twitch bot!
For this next section, we’ll be using a GitHub repository to integrate directly with Heroku to deploy. While we won’t cover that process, you can learn how to create a new repository on GitHub and add your project by checking out GitHub’s guide: Adding an existing project to GitHub using the command line.
You’ll also need a Heroku account to deploy the application. It’s free to signup, though the free tier is limited by default and wouldn’t support a year-round Twitch bot running 24/7. The good news, is if you register your billing information, you’ll receive a little bit more to your free tier, which would be enough to cover the Twitch bot running 24/7.
Note: you can really deploy this anywhere that you can deploy a Node app. The only real requirement is it needs to be able to stay up and running while you’re using it as a server process so that it can listen in to the chat. Heroku is just one of the more popular ones.
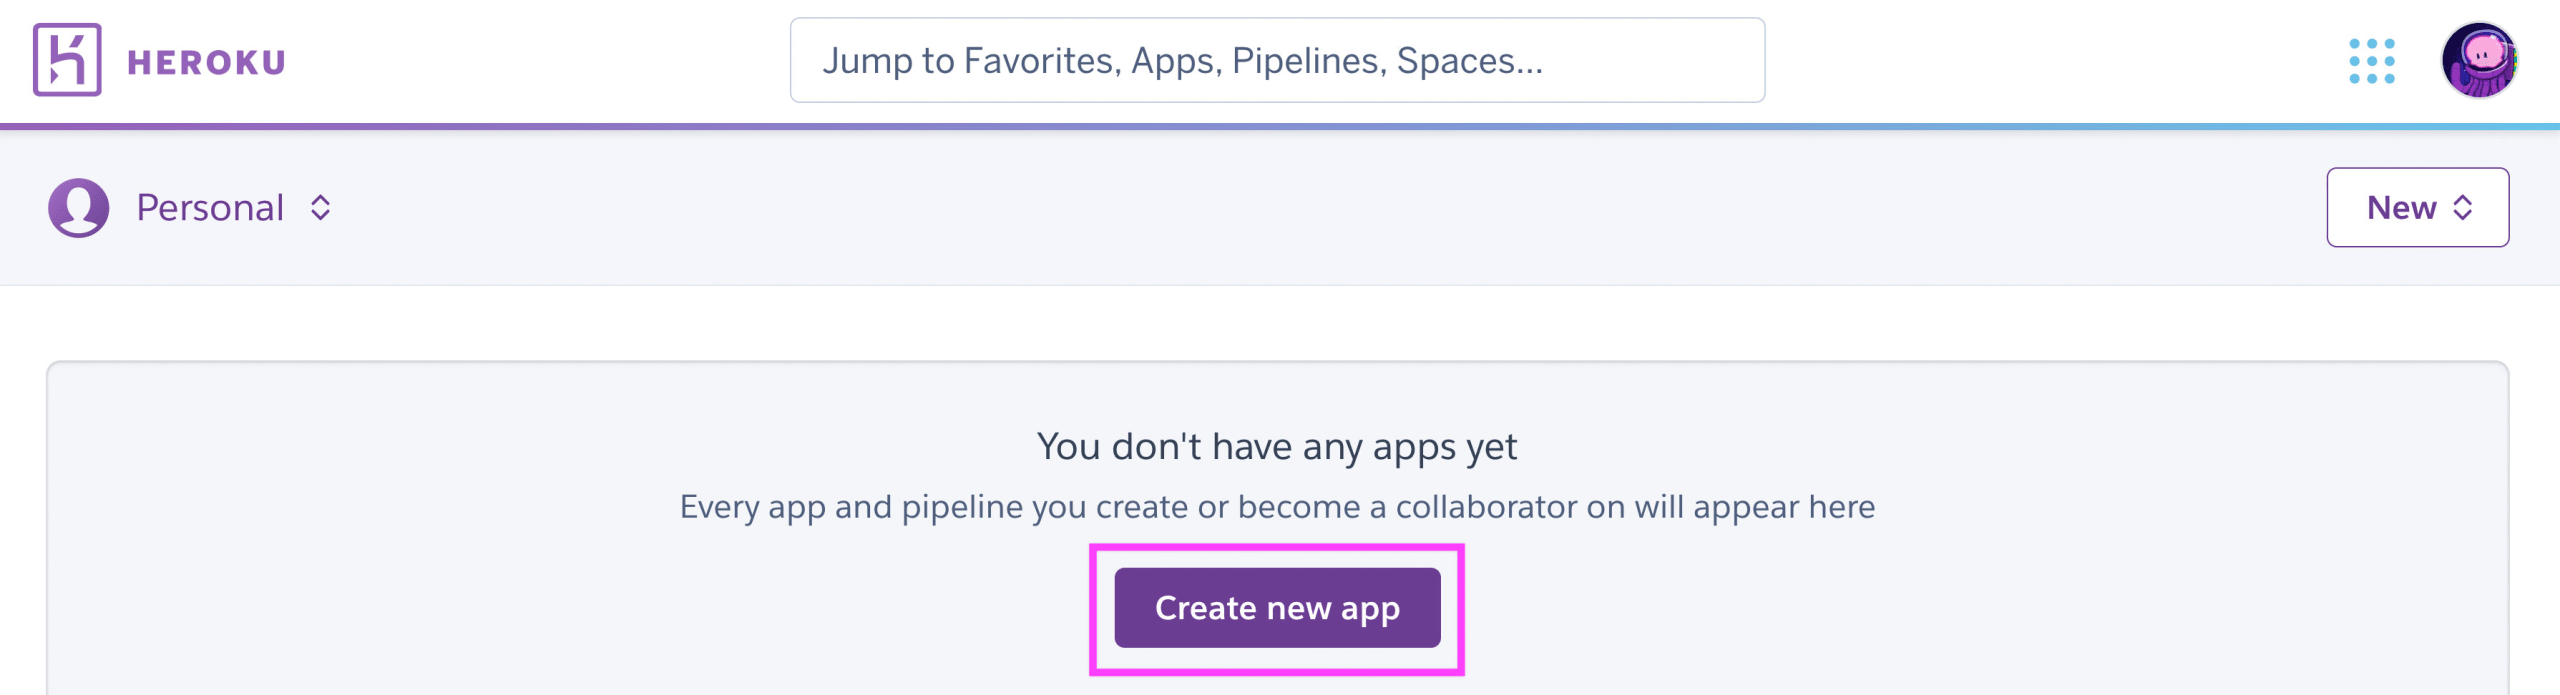
So once you have your app uploaded to GitHub and you’re signed into your Heroku account, we can get started creating a new app.
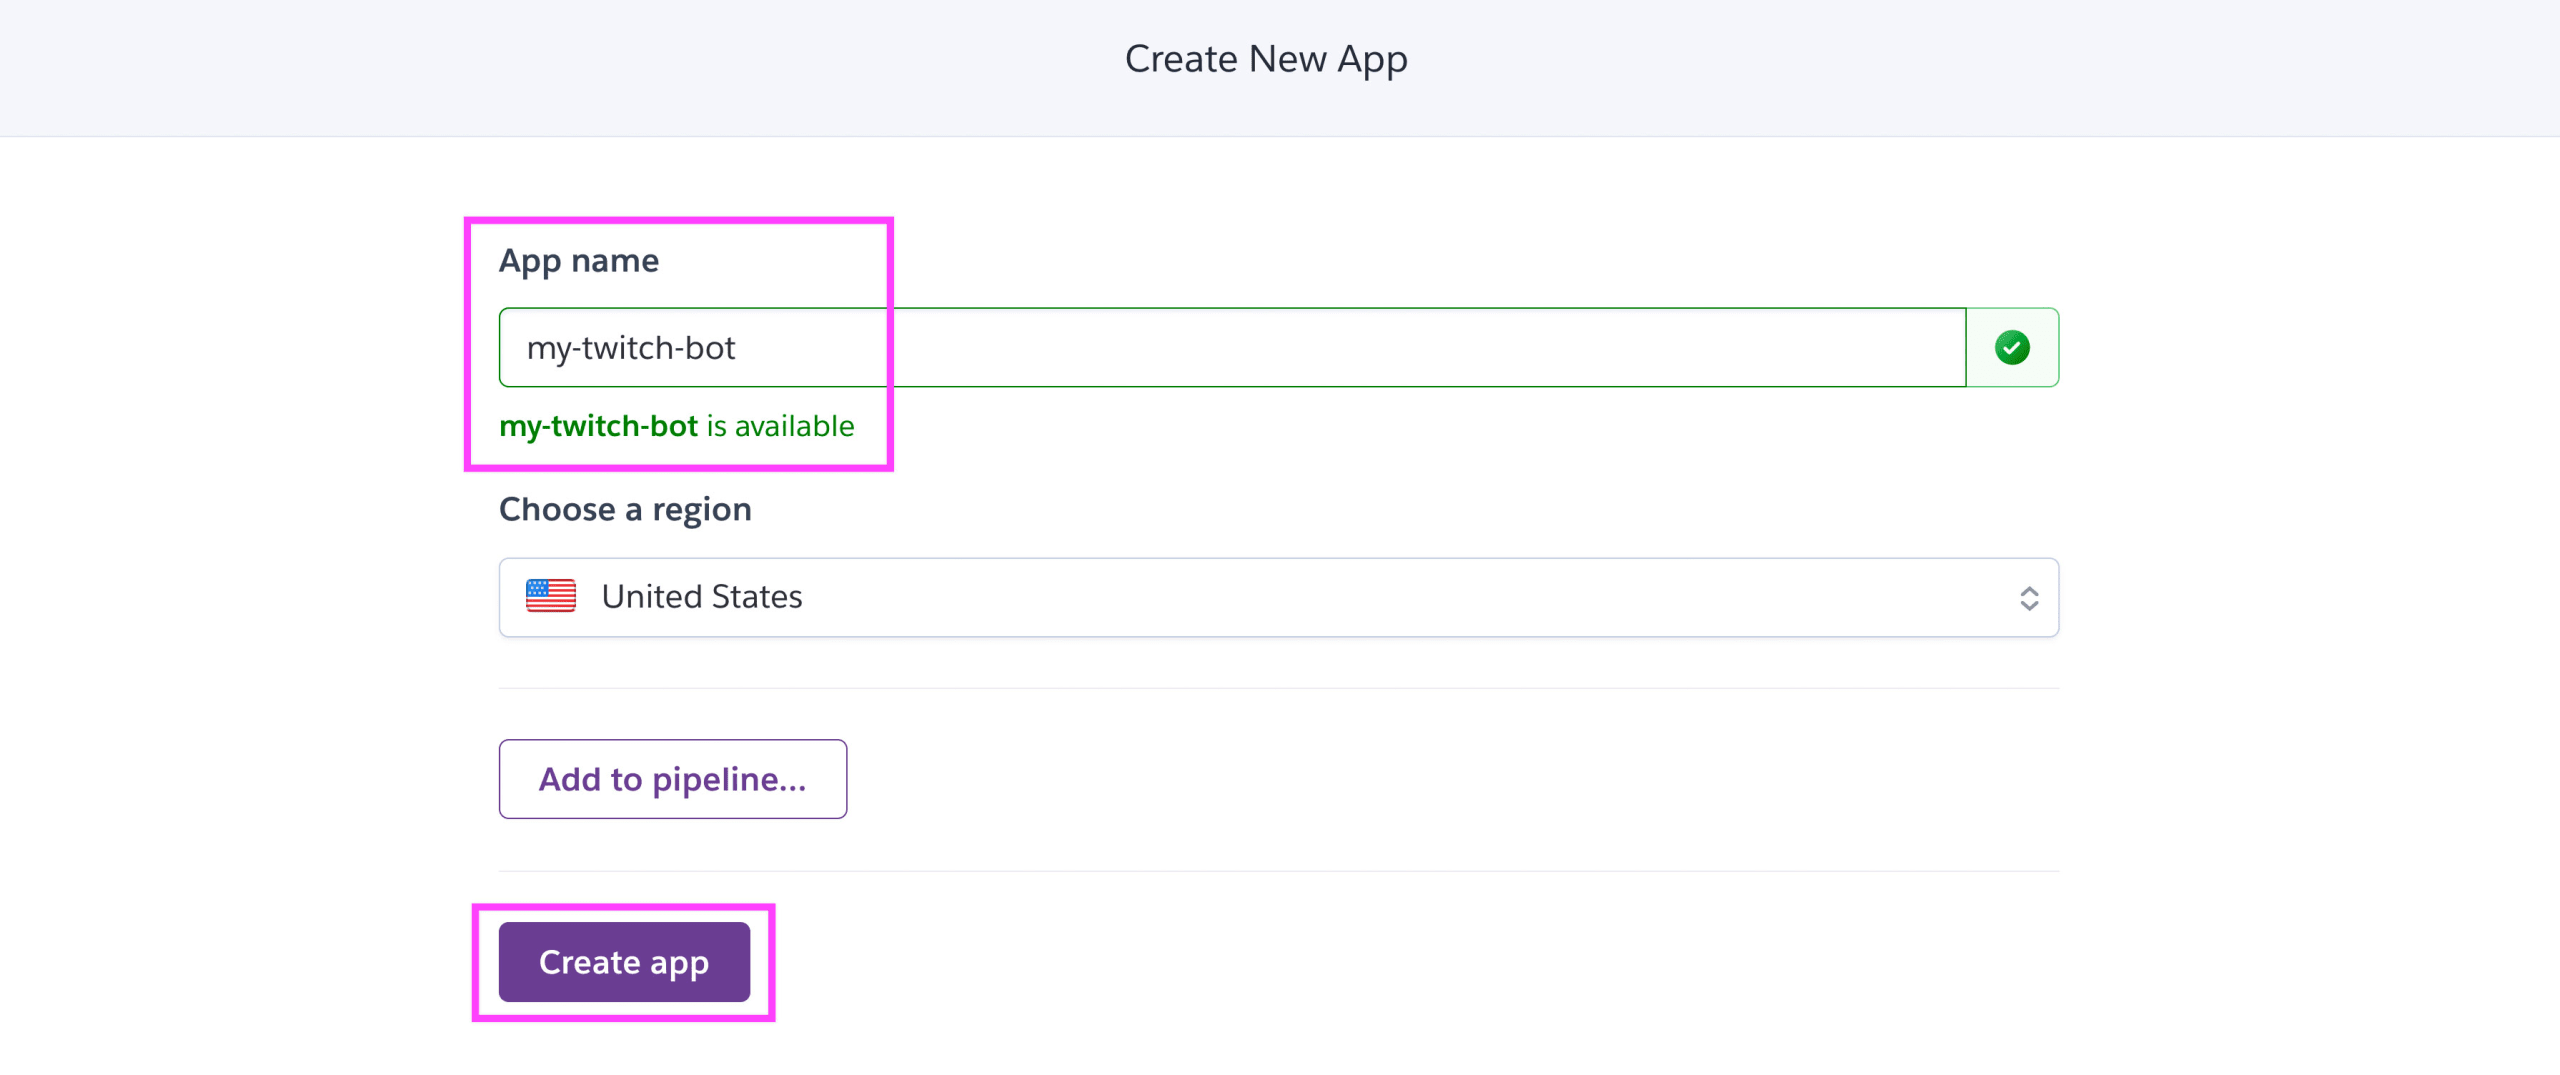
The next screen will ask you to choose an app name. Feel free to name this whatever you’d like, but I like to use the same name as my GitHub repo so it’s easy to find.
It also asks you to select a region, which really should be whatever you’d like that Heroku supports.
Finally, you have the option to add a pipeline, which we’ll skip for now.
So finally, go ahead and click Create app.
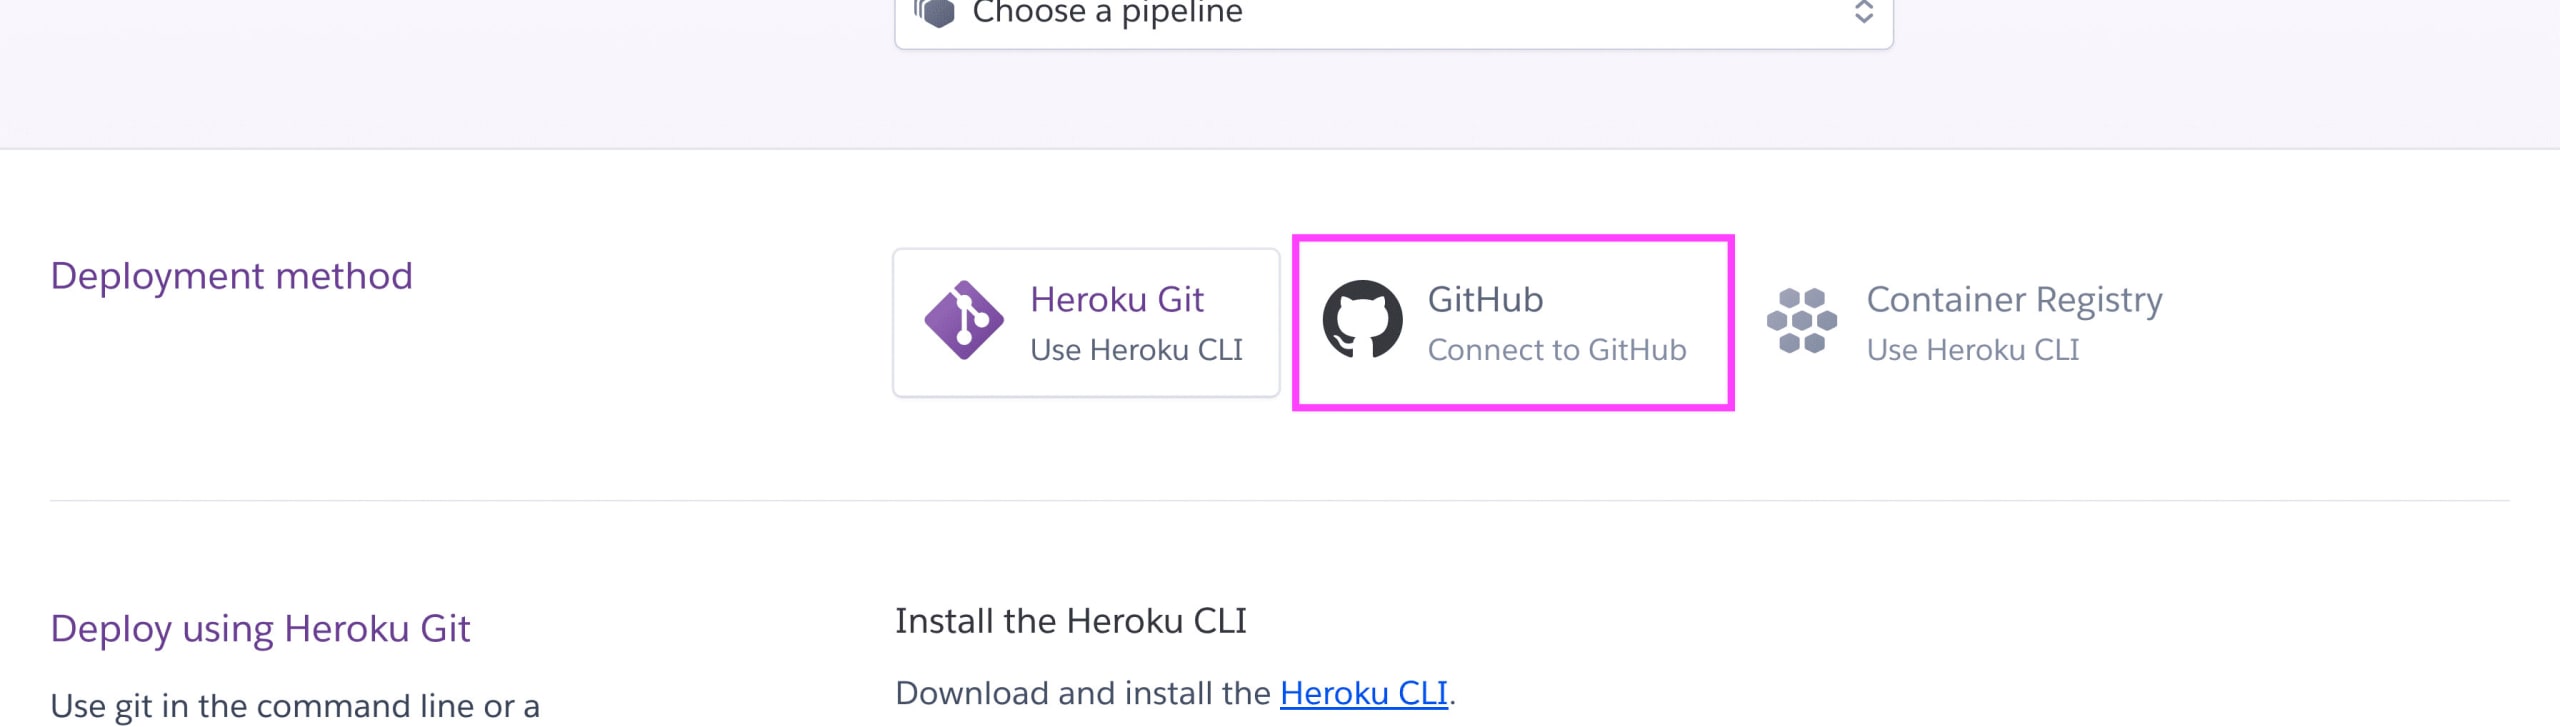
At this point, Heroku will create your application and you should be dropped into the Deploy tab of your new app.
We want to scroll down to the Deployment method section and click GitHub.
This should change the UI, where you should now be able to see Connect to GitHub at the bottom of the page.
Click Connect to GitHub.
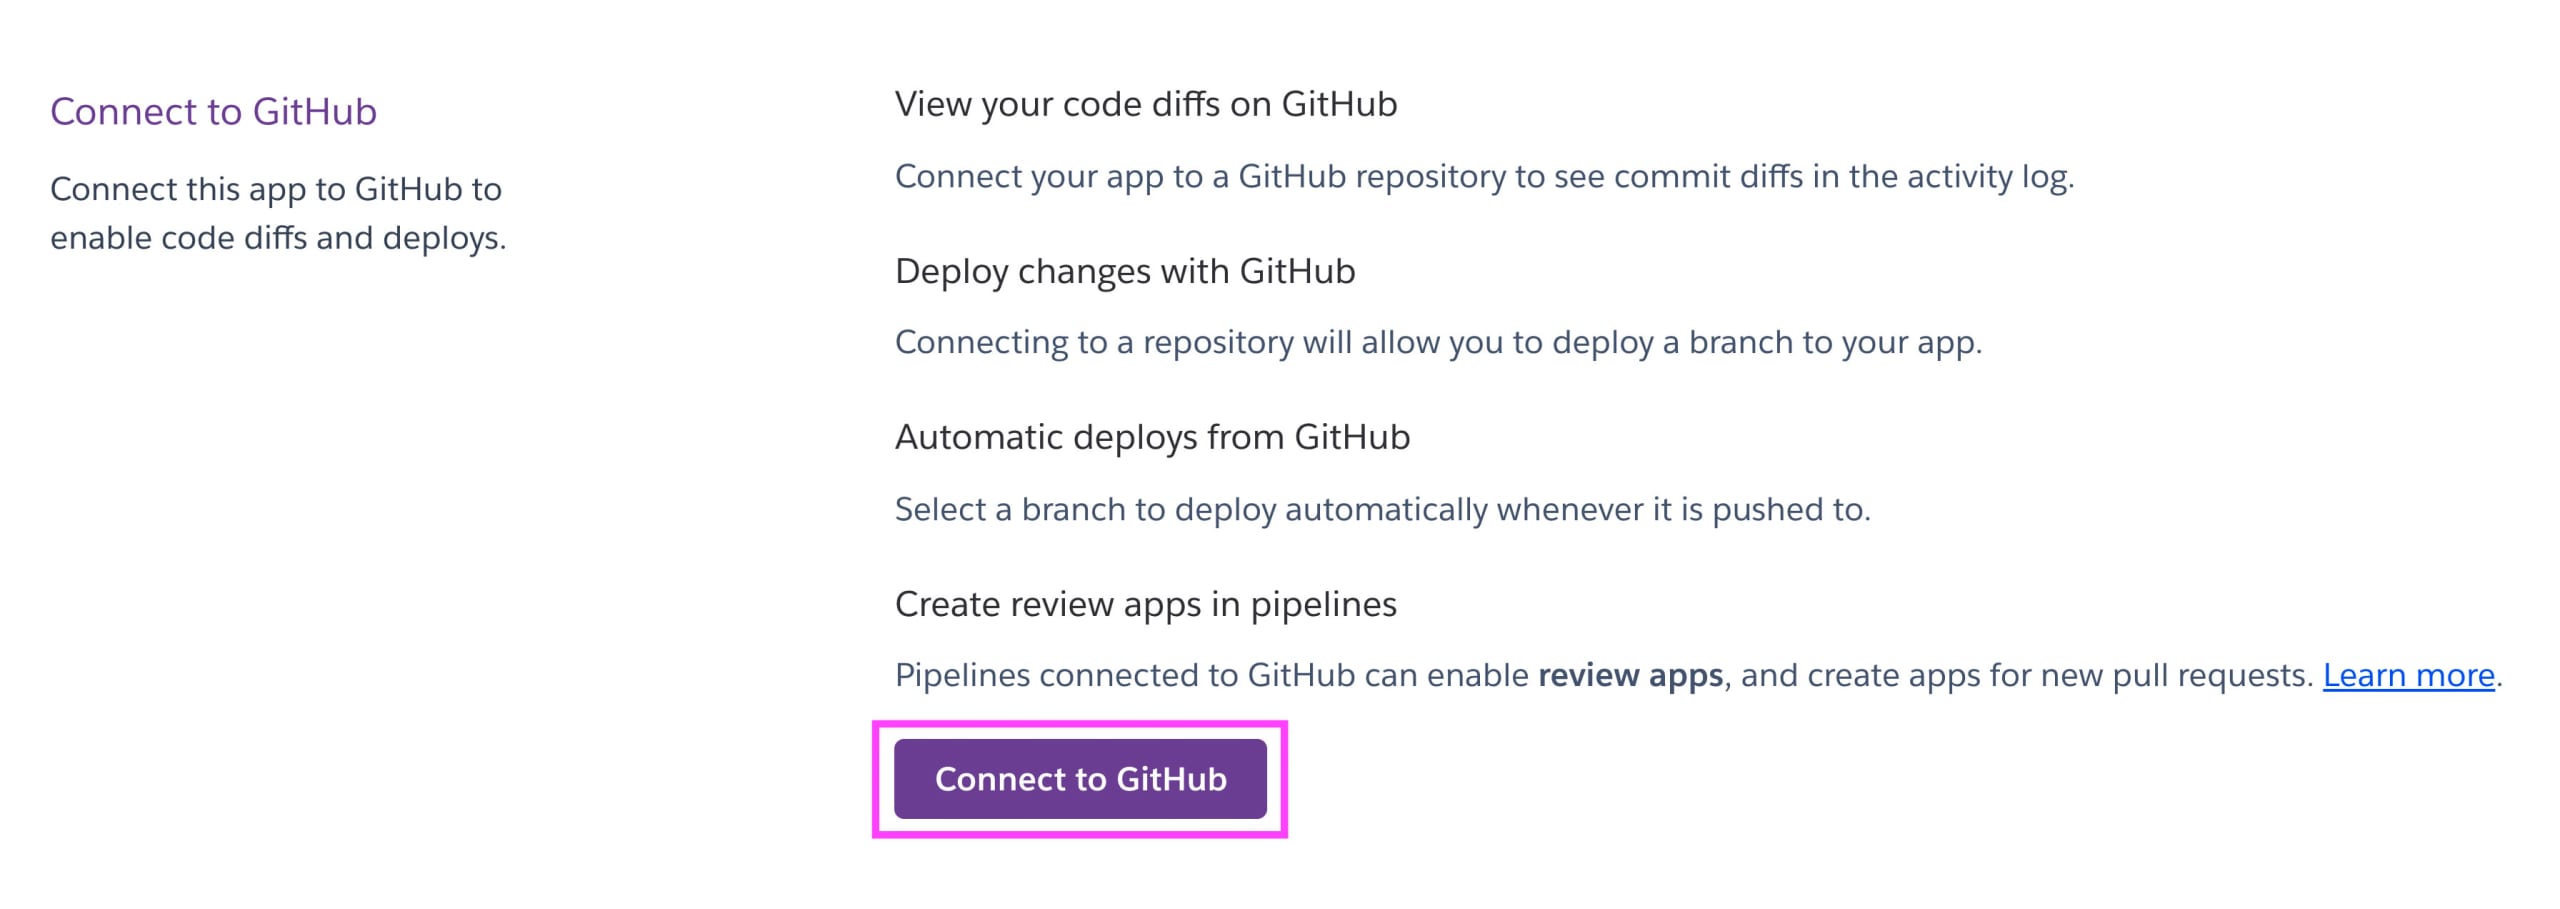
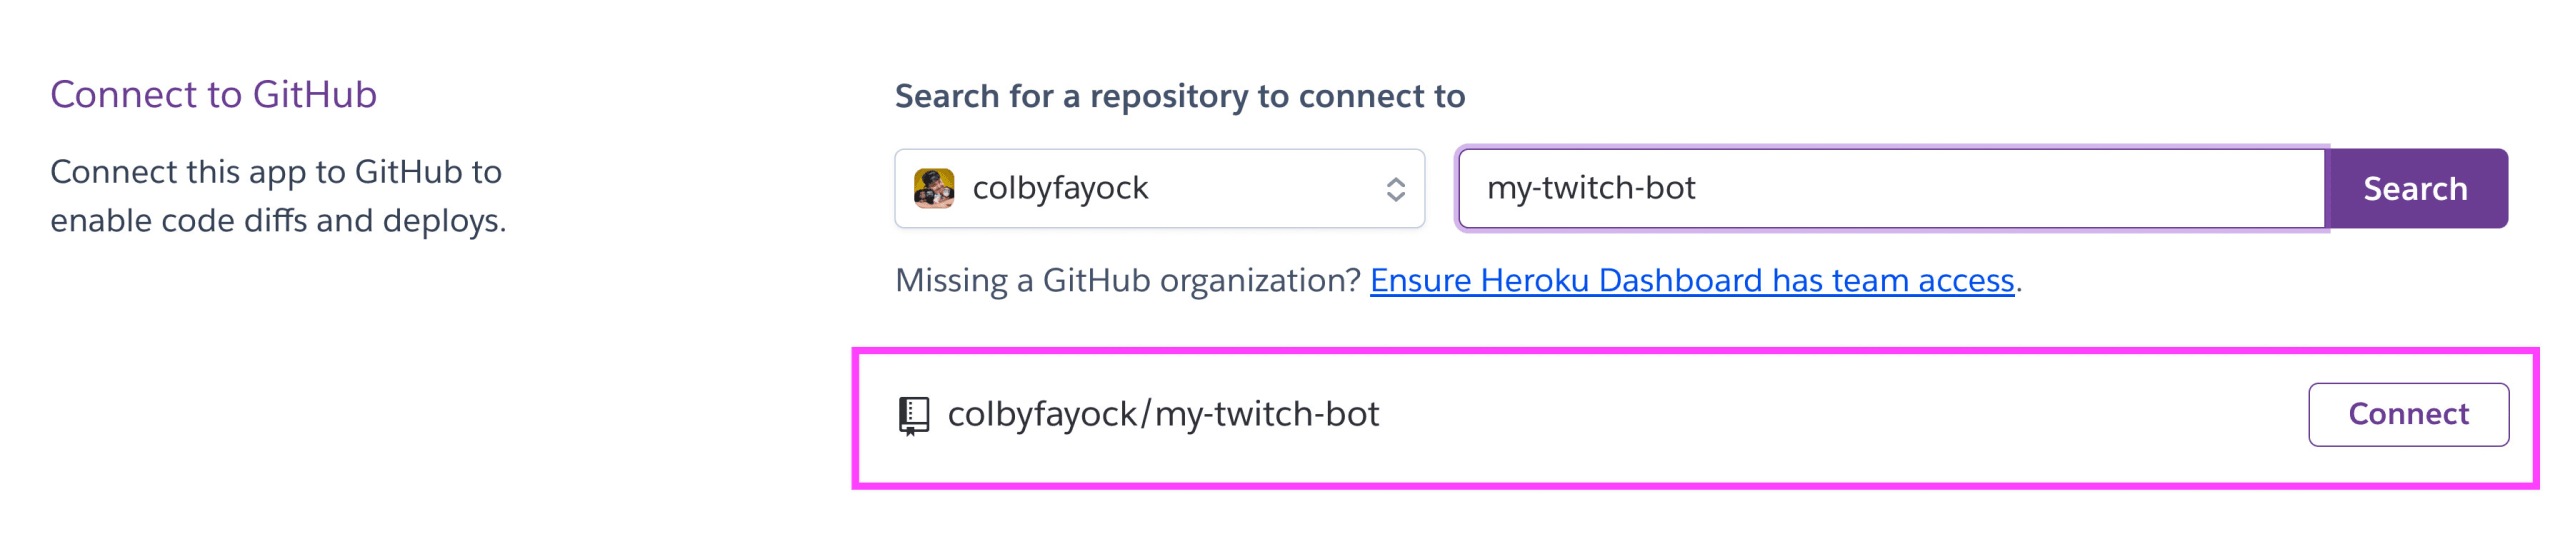
This will open up an oAuth flow which will ask you if you’d like to connect GitHub to Heroku. It will also ask you which repositories you’d like to connect. You’ll need to at least connect your Twitch chat bot repository for this to work, but once you do, you should be sent back to Heroku, where you can now search for that repository, and click Connect.
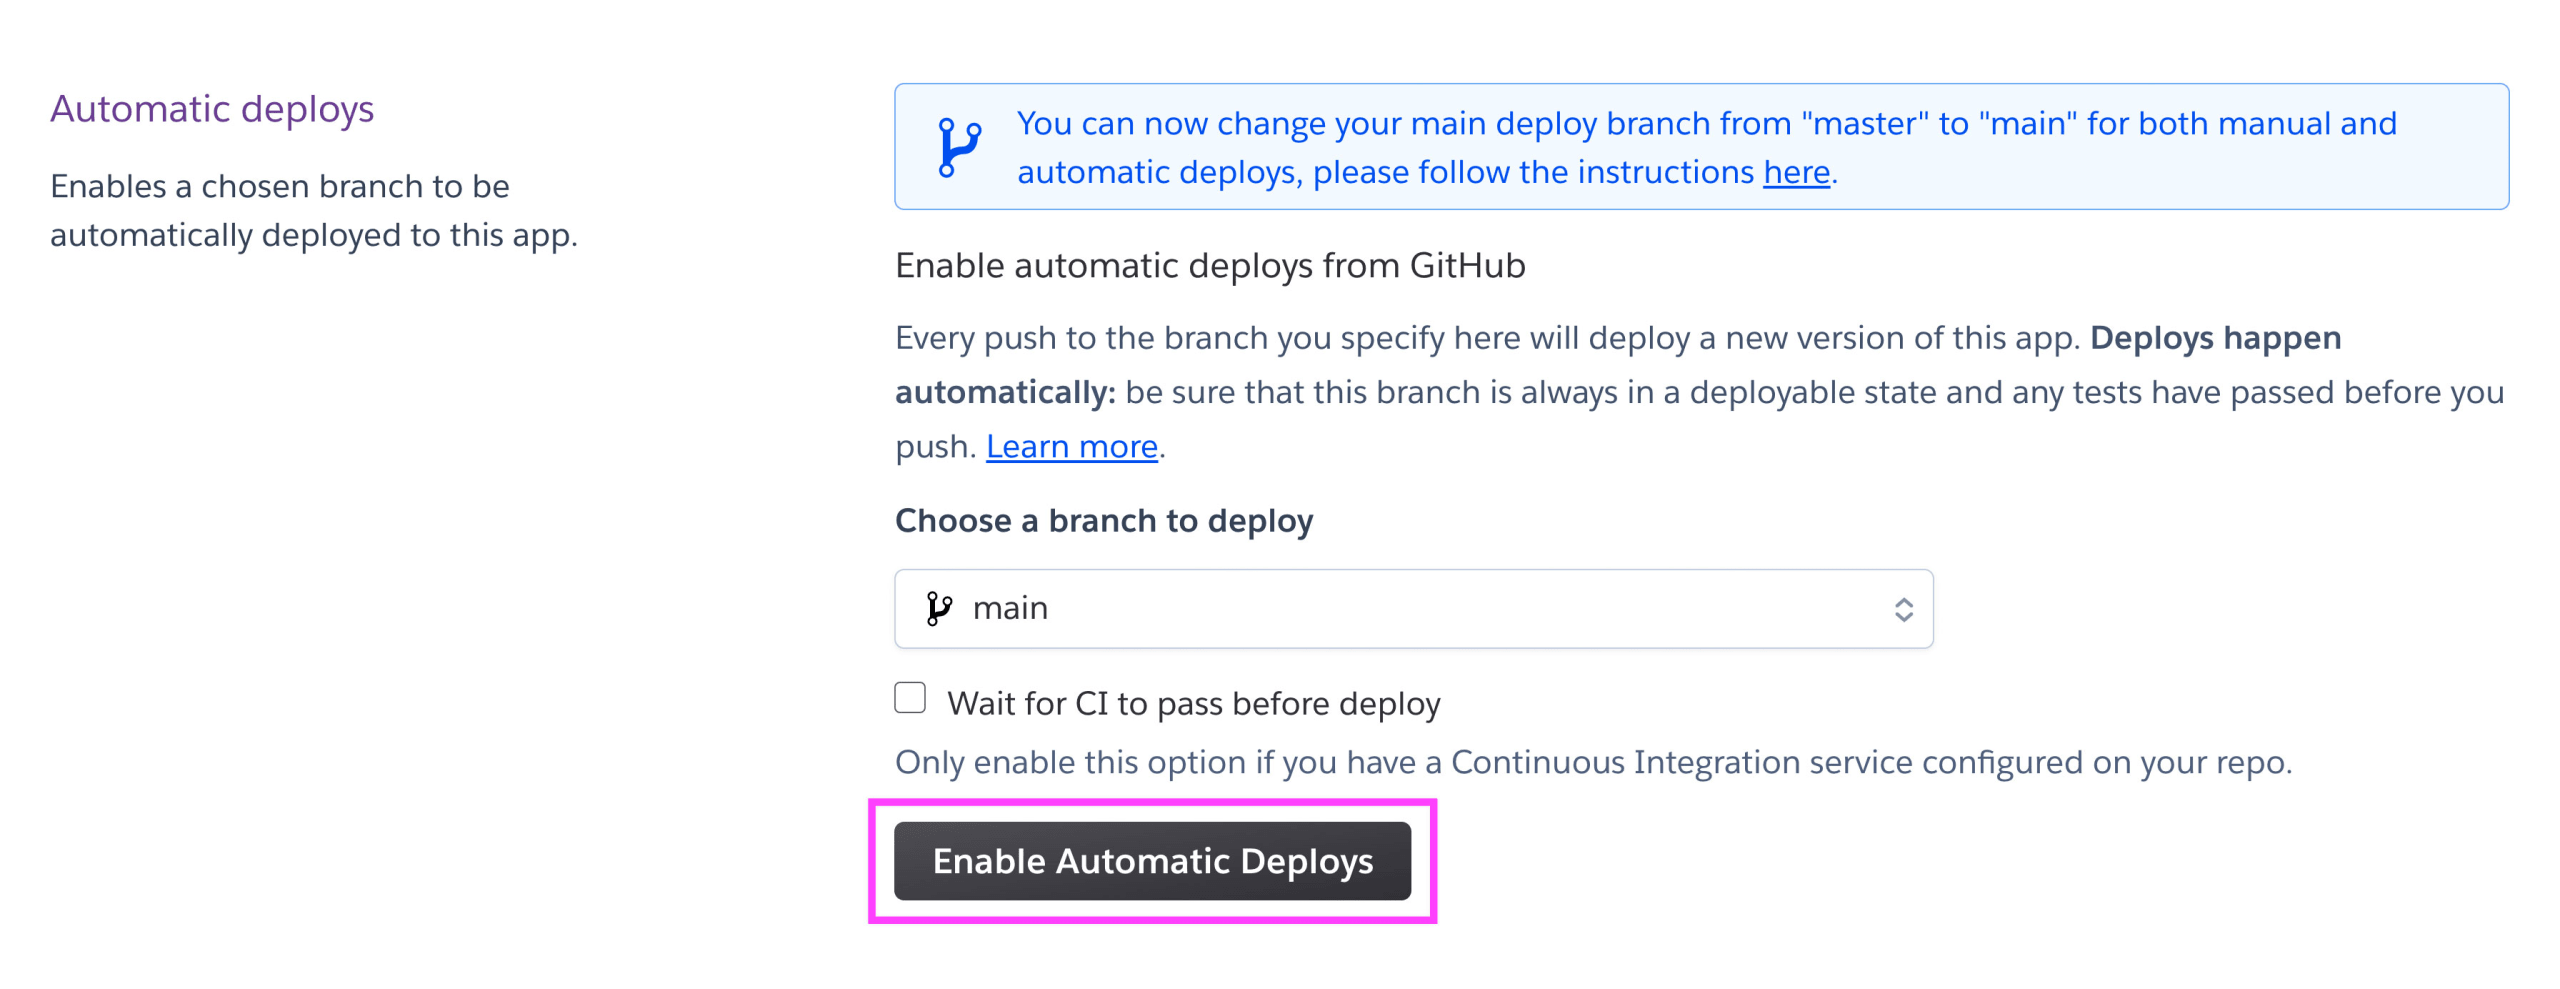
Optionally, but recommended, you can also set up Heroku to automatically deploy your application any time a change is made to your main branch by scrolling down to Automatic deployments and clicking Enable Automatic Deploys.
Now that our code is connected, we need to tell Heroku how to deploy it.
Head over to the Settings tab where we’ll need to do two things:
- Configure out environment variables
- Add a Buildpack to tell Heroku it’s a Node project
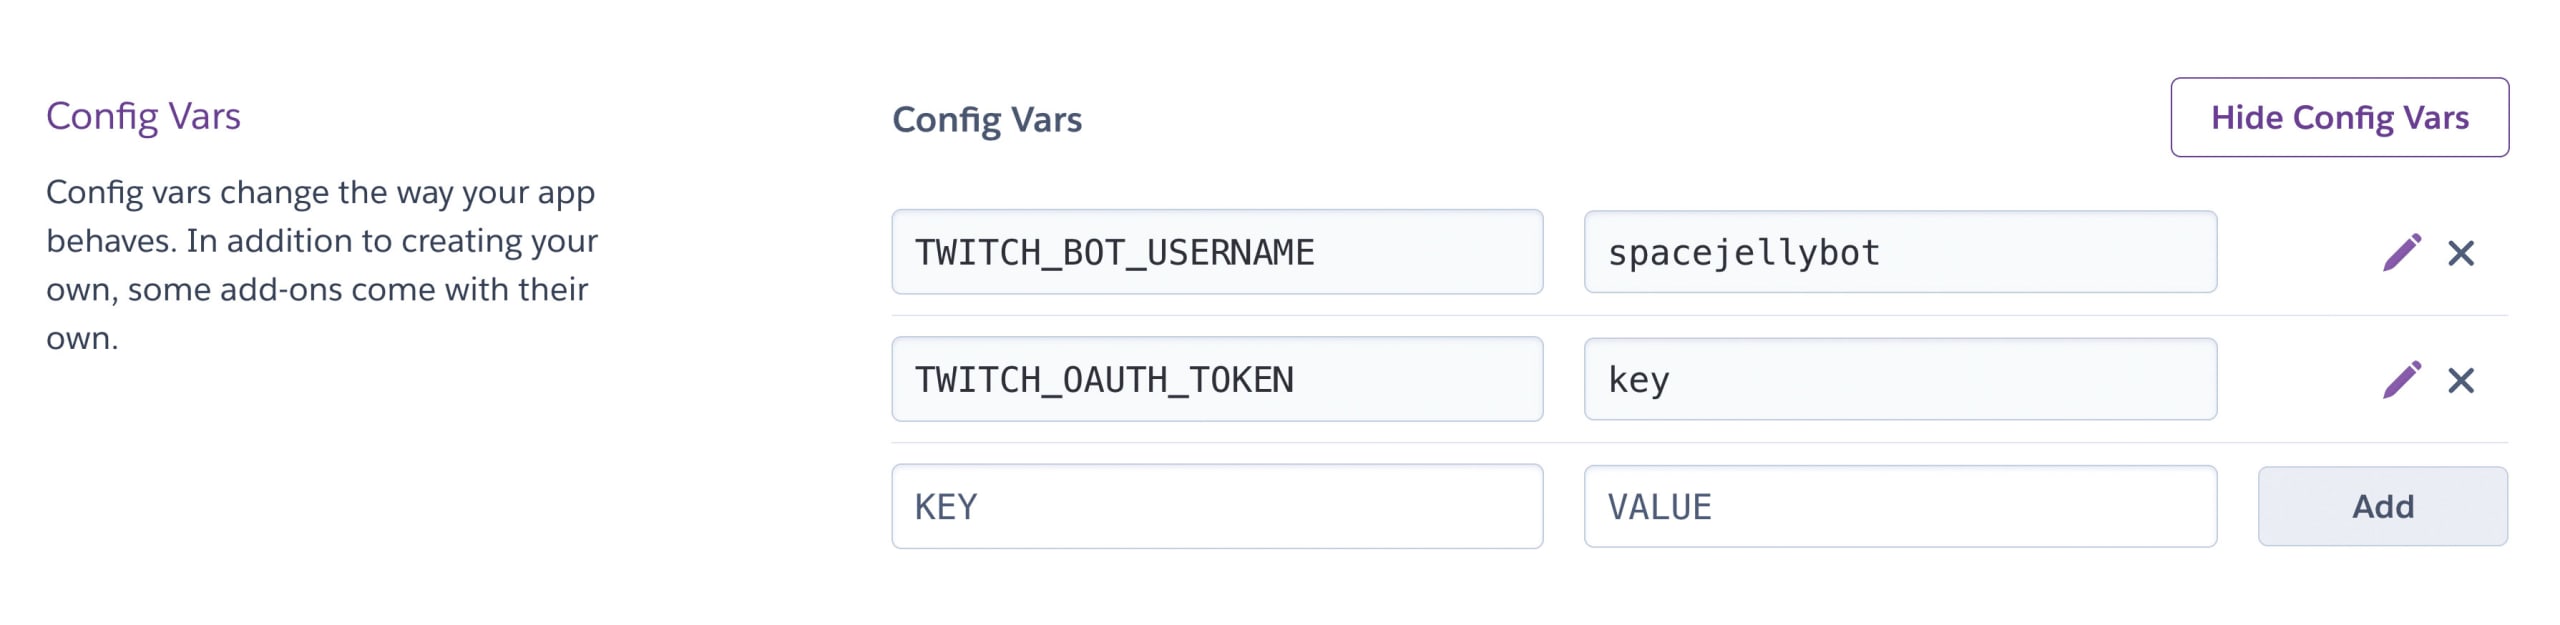
When on the settings tab, scroll down to Config Vars and click Reveal Config Vars.
Here you’ll want to add both of your environment variables as a key along with their values.
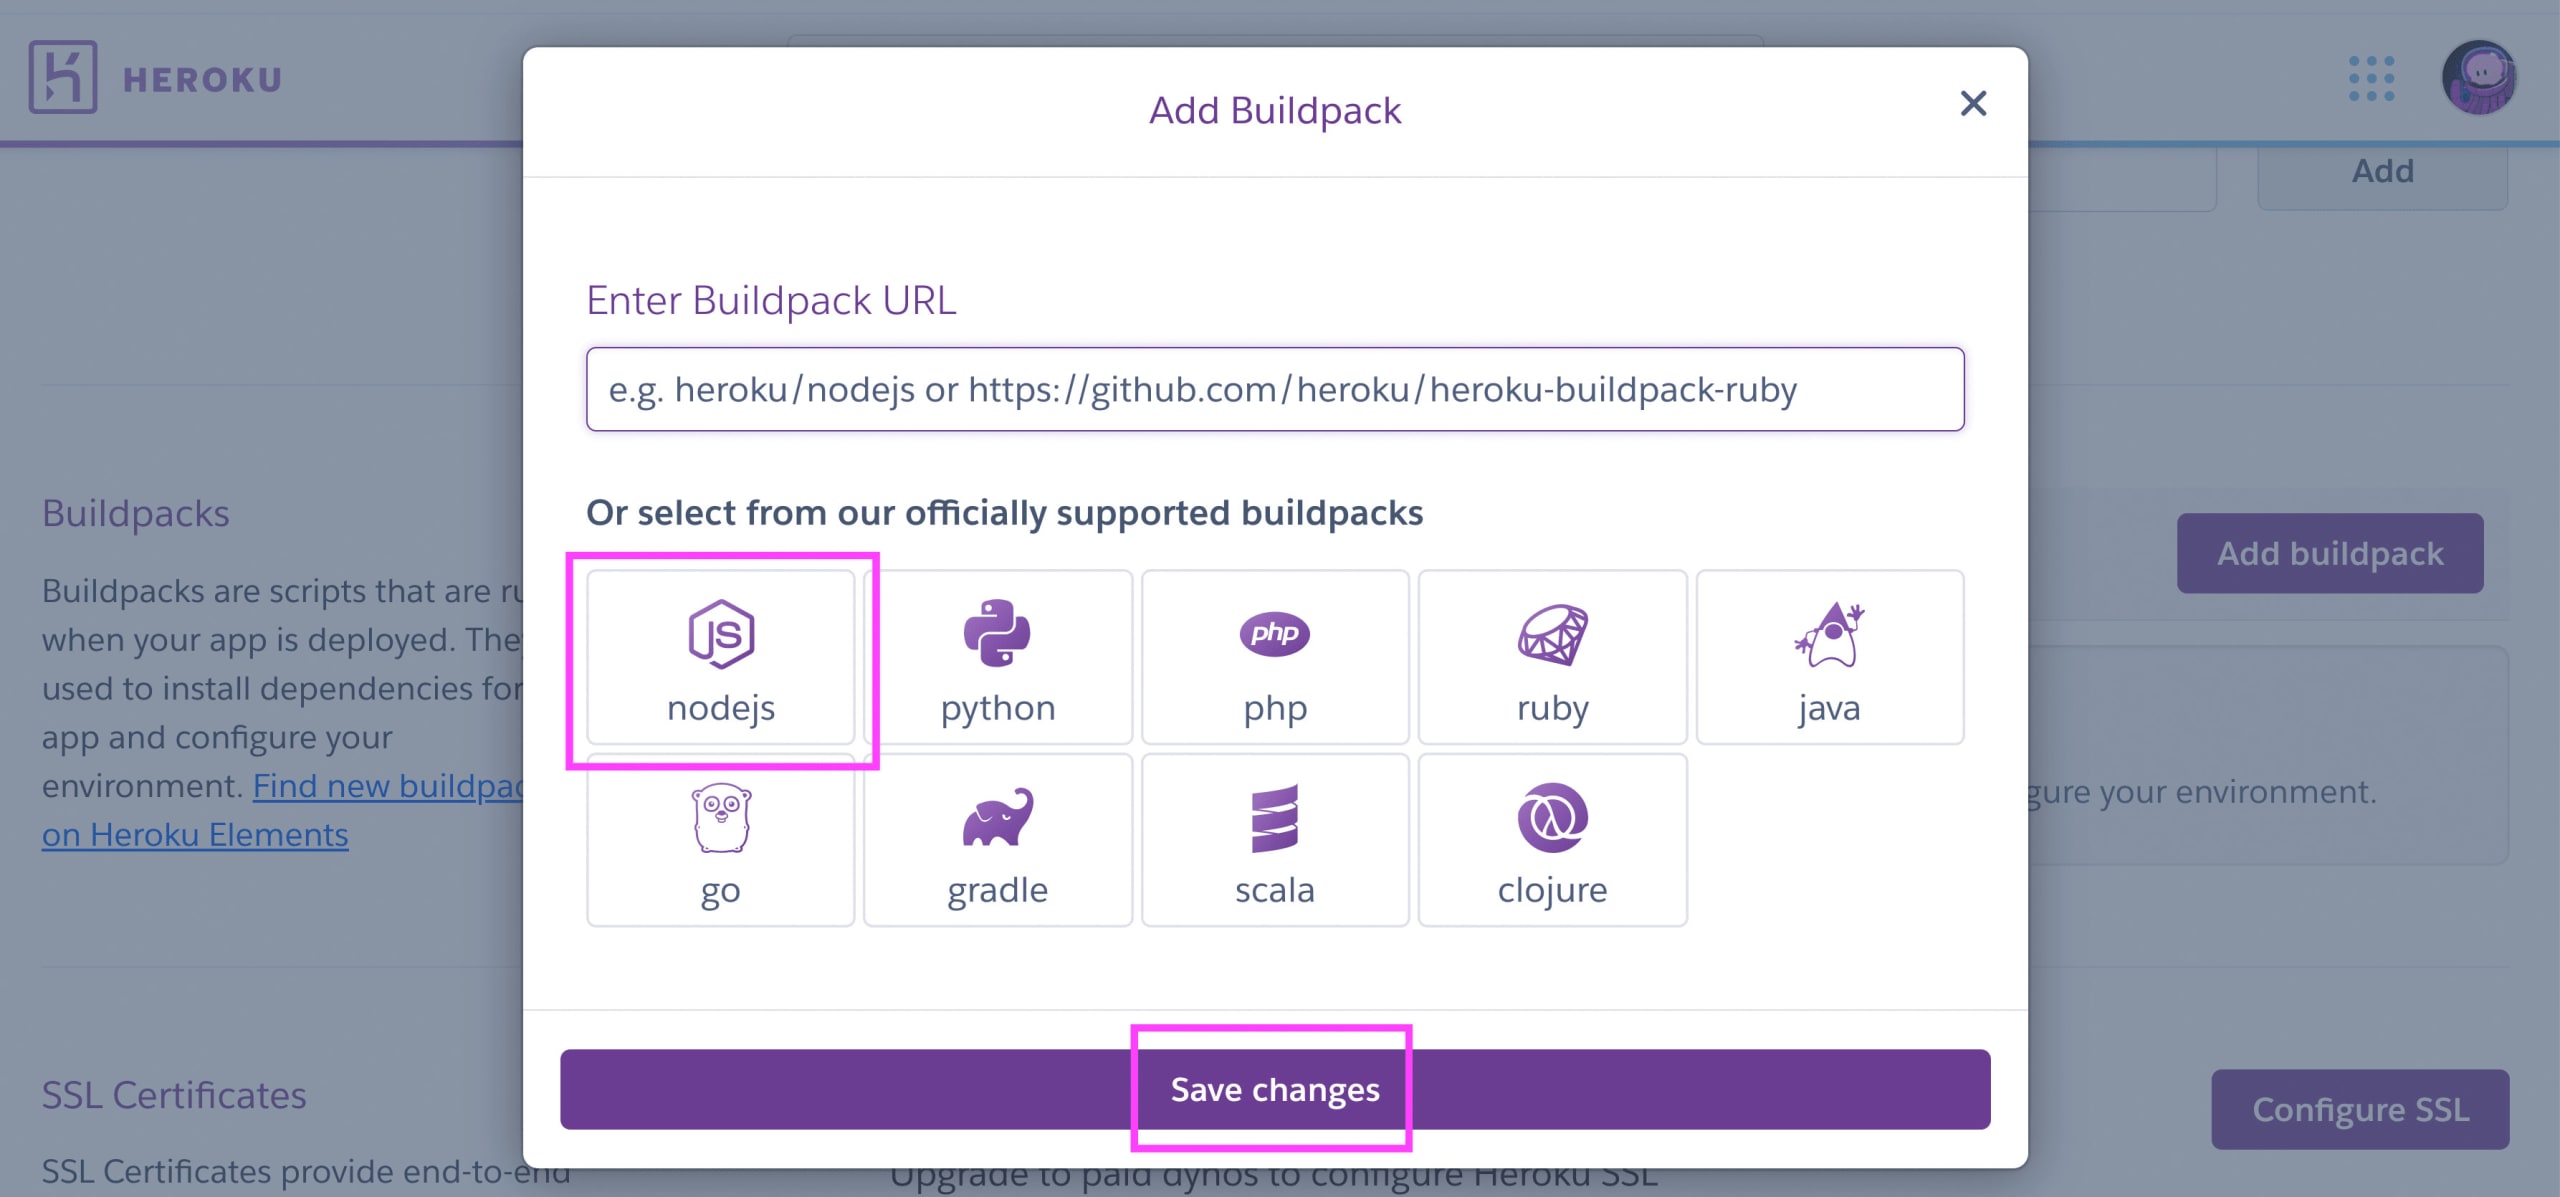
Then, scroll down to Buildpacks and click Add buildpack.
Once you do, it will pop up a modal where it will ask you which Buildpack you’d like to use, where you’ll want to click nodejs and his Save changes.
Now before we finally deploy our application, we’ll want to do one more thing.
Heroku supports two different types of dynos that we can use here, “web” and “worker”.
If we were accepting outside requests, we’d likely want to use a web dyno, but because we’re just running a process manually listening to something from our server, we can use a worker, which is a bit simpler to manage for our use case.
To set our project up as a worker, we’ll first need to add a file to our project.
In the root of the app, add a new file called Procfile and inside add the following:
worker: npm startHere we’re configuring a dyno option to use npm start to spin up our project.
Now, commit and push that change up to GitHub.
At this point, Heroku will notice the change in GitHub and try to deploy, but we’re still not done yet.
Inside of your Heroku dashboard, head over to the Resources tab. It might take a few minutes to show up after the deploy from the Procfile addition, but you should now see two types of Free Dyno options, “web” and “worker”.
We’ll want to first disable the web dyno then enable the worker dyno.
Click the pencil edit button on the web dyno, click the toggle button (to turn it off), and click Confirm.

Next, do the same thing with the worker dyno, except this time, turn it on.
At this point, you should now be successfully running your new Twitch chat bot on Heroku as a worker dyno!
You can test this out again by heading back to your Twitch stream and running your commands again.

You can even add a bit of logging to your bot by adding console.log which will show up right in the Heroku logs!

Follow along with this commit!
Also follow along with how to add logging!
What else can we do?
Add authentication
Maybe you want to only allow certain users or mods to run certain commands. You can use authentication where you can statically check the user’s name before issuing the command or use a service to look up their identity.
Add dynamic commands
Because we added function-based responses, we can easily turn those into async functions, allowing us to return a promise, and make requests to make those responses dynamic.
To see how I added authentication and dynamic commands to my Space Jelly Twitch chat bot, check out my repo at:
https://github.com/colbyfayock/space-jelly-twitch-bot/tree/main/server