
What is the Web Speech API
The Web Speech API sounds like what it implies, it allows you to interface with the browser’s speech capabilities.
We’ll be focusing on two aspects of this, SpeechRecognition and SpeechSynthesis, or the ability to transform speech-to-text and then text-to-speech.
Where does translation come in?
Our goal is to build a translator and while we’re not going to literally translate our own voice, we can use the text that we get from our voice and feed it into a translator on-the-fly.
Specifically, we’ll be using the OpenAI Chat Completion API, which allows us to feed in some text that we want translated along with a prompt (including to what language), and get back the translated result.
What are we going to build?
We’re going to build a translator app that takes an input of someone speaking in a primary language (defaulting to English, but you can customize this), converts that to text, translates that text to another language, and ultimately uses the browser to speak that translated text in another language.
To accomplish this we’ll use browser APIs including SpeechRecognition and speechSynthesis as well as OpenAI to do the translation. You can really use any translation service instead of OpenAI, but we’ll use that for our demo.
Before we dig in, it’s important to note that browser support is pretty limited for the APIs we’ll use, where desktop Chrome has the best support. Desktop Safari and iOS Safari have limited support and from what I’ve ready, so does Android Chrome, but I haven’t been able to test that.
Step 0: Creating a new React app
I’ll be working in Next.js but you can pretty much work in whatever framework you’d like, as we’re using primarily clientside capabilities when it comes to React, meaning, you could even simply use Vite!
The one caveat here is that in order to use OpenAI, we’ll be creating an API endpoint, which creating endpoints is commonly supported in other frameworks where you can use React, such as Astro.
Step 1: Converting Speech-to-Text with SpeechRecognition
The first step in creating our Translation app is turning spoken words into text.
To do that, we’re going to use the browser’s SpeechRecognition API which is part of the Web Speech API.
The SpeechRecognition API allows us to tap into our device’s microphone, listen for some audio (with permission), and if speech is detected, get a text version of that audio sample.
The tricky thing is this differs between the different browsers, not only in support, but the service used to take the voice audio data and convert it into text.
As far as browser support goes though, it’s pretty limited, where Chrome has the best support, seemingly followed by Safari. So be sure as we’re working through this to use a supported browser. Basically I encourage you to test this out in Chrome.
Note: It’s important as a general rule of thumb not to build apps that only work in specific browsers, but when working with web APIs early in their lifecycle, you’ll often hit situations where browser support just isn’t where it should be. Consider creating alternative solutions in your app for other browsers to have a similar experience.
The way SpeechRecognition works is we create a new SpeechRecognition instance and on that instance, we set up some event handlers in order to listen to different events, such as when audio starts to get picked up but importantly, once we get a result.
We’ll use a button to trigger this chain of events, which is an important distinction for later, as we’ll require a user action in order to use the text to speech API.
Note: Given we’ll be working clientside, be sure that the component that you’re working from has the “use client” directive if you’re using Next.js App Router.
But for now, let’s create a new button that has a click handler that creates our new SpeechRecognition instance:
function handleOnRecord() {
  const SpeechRecognition = window.SpeechRecognition || window.webkitSpeechRecognition;
  const recognition = new SpeechRecognition();

  recognition.start();
}

<button onClick={handleOnRecord}>Record</button>
Here we create our new SpeechRecognition instance, but importantly, we’re creating a new SpeechRecognition constant before that instance that looks for both a non-prefixed and prefixed version of the browser API.
Safari currently requires a browser prefix of webkit so we can see that if the initial SpeechRecognition doesn’t exist, we try to fall back to the webkit version.
Once we initialize our recognition instance, we then run the start method, which tells the browser to start listening.
Tip: If you’re using Typescript, you might notice you’re getting some squiggly lines under SpeechRecognition. You can add the types to your project by installing the
@types/dom-speech-recognitionpackage!
And if you hit the Record button, you should notice something important happen.
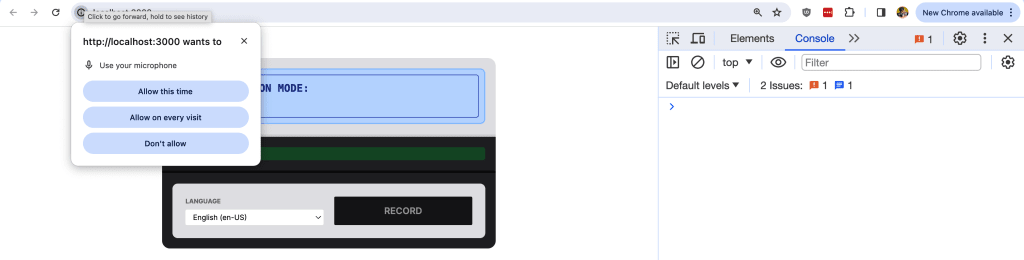
The browser requests permission to use the microphone!
This means it’s working and it doesn’t really matter how you respond yet (don’t block it) as it won’t do anything yet. But let’s try to listen for some results.
Before we run the start method, we want to define an event handler so that we can grab our results.
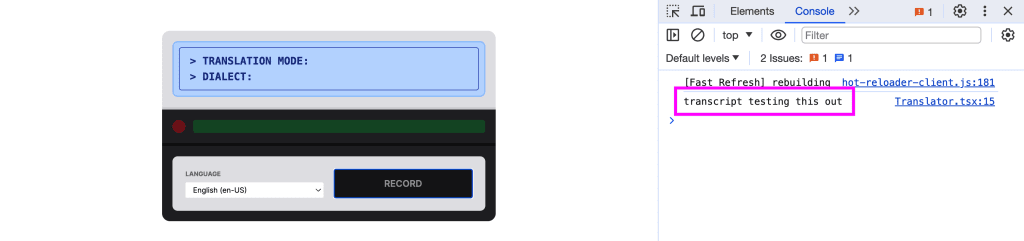
recognition.onresult = async function(event) {
  const transcript = event.results[0][0].transcript;
  console.log('transcript', transcript)
}
Here we create an async function (we’ll use the async part later), where we use the event argument to grab the resulting transcript, or the text, and log it out to our web console.
This time if I hit Record again and start to say something, we should notice after a second or two that we now see that text logged!
We were just able to easily get our voice converted into text with that simple web API, but let’s not stop there.
I want to be able to use that text in order to translate it, so we need to store it somewhere.
Let’s use React’s useState hook to store that value.
First import useState with:
import { useState } from 'react';Then we can create our new state instance:
const [text, setText] = useState<string>();And for now, let’s add that to the page so we can see it displayed without having our console.log.
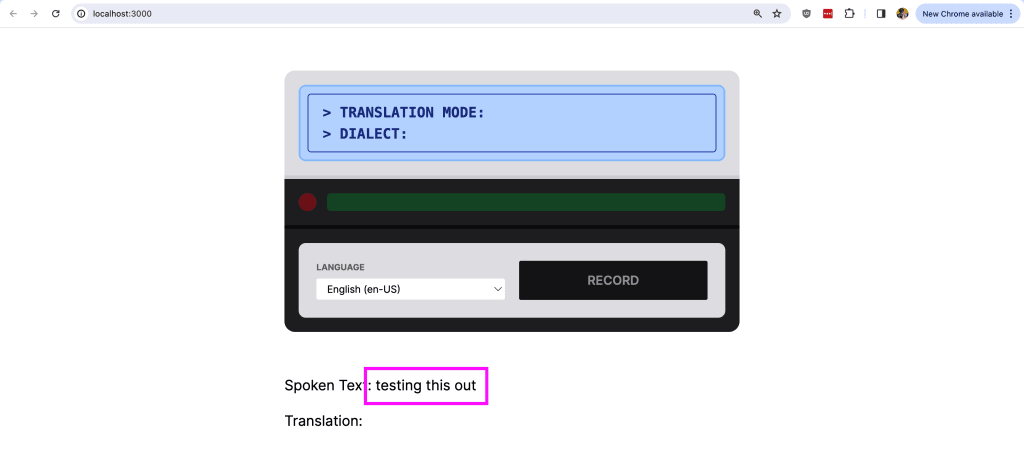
So inside onresult, let’s first store our result:
recognition.onresult = async function(event) {
  const transcript = event.results[0][0].transcript;
  setText(transcript);
}
Then add our text to the page:
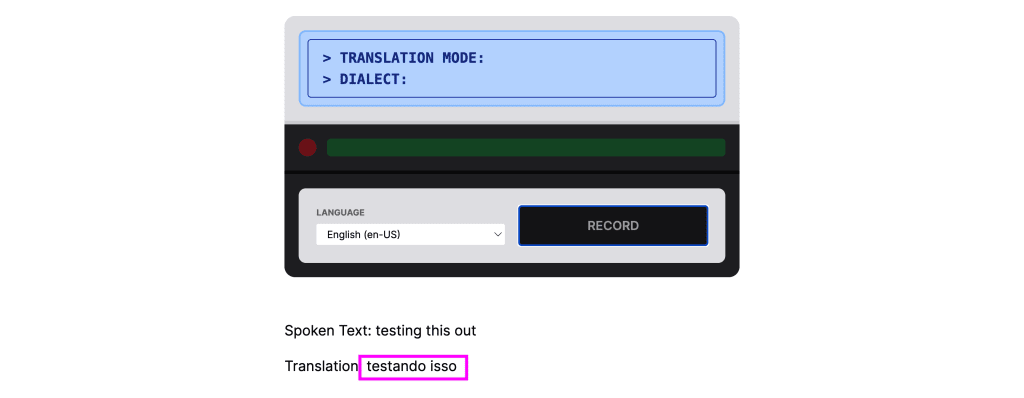
<p>
  Spoken Text: { text }
</p>
And now when we try to record again and talk, we should see the text displayed on the page!
Next up, let’s translate that text into a new language.
Step 2: Translating Text to Another Language with OpenAI
While you can really use any service to translate text to another language, OpenAI is a pretty solid bet and commonly used for this sort of thing.
In order to use OpenAI, you’ll need to have an account set up and access to an API key, otherwise feel free to substitute OpenAI in this section to something else.
To make this work, we’ll create a new API endpoint and inside use the OpenAI SDK, so to start let’s install the SDK:
npm install openaiNext, let’s create our new endpoint.
If you’re using the Next.js App Router, let’s create a new directory inside of the app directory called api, inside create a new folder called translate, and inside that create a new file called route.ts.
Inside app/api/translate/route.ts we can scaffold our new endpoint with:
import { NextResponse } from 'next/server'

export async function POST(request: Request) {
  return NextResponse.json({});
}
Here we’re defining a POST endpoint that will ultimately respond with JSON.
Next, we can import and configure the OpenAI SDK:
import OpenAI from 'openai';

const openai = new OpenAI({
  apiKey: process.env.OPENAI_API_KEY
})
Tip: Be sure to use an environment variable to store and configure your API key to avoid it being leaked!
And then, we can use the chat completions method in order to translate our text:
const text = 'Test';
const language = 'pt-BR';

const response = await openai.chat.completions.create({
  model: "gpt-4",
  messages: [
    {
      "role": "system",
      "content": `
        You will be provided with a sentence. Your tasks are to:
        - Detect what language the sentence is in
        - Translate the sentence into ${language}
        Do not return anything other than the translated sentence.
      `
    },
    {
      "role": "user",
      "content": text
    }
  ],
  temperature: 0.7,
  max_tokens: 64,
  top_p: 1,
});
Here we’re creating a dynamic prompt where we define a text input and the language we want to translate to.
We’re configuring this using the gpt-4 model, where we pass in a system prompt that helps define how we want our assistant to respond and ultimately our text as a user message.
The other settings are from an example OpenAI provides for translation, but you can configure those to your liking.
The prompt is the important bit here though, where we first ask it to detect the language that’s passed in, as it’s hard for us to know exactly what language it would be, then translate it to the language we provide.
Now we don’t want those values to be static, we’re going to read them from the POST body. So first remove the text and language constants then at the top of the endpoint function add:
const { text, language } = await request.json();We’ll be POSTing to our endpoint with JSON, so we can easily read those values dynamically.
Finally, we want to respond with our result, so we can update our response with:
return NextResponse.json({
  text: response.choices[0].message.content
});
And now, we can move to the client of the application to use our endpoint to translate our text!
If you remember earlier, we defined our onresult callback as an async function, where now we’ll run our translation right inside of that callback.
Update onresult to set our transcript to our new API endpoint:
recognition.onresult = async function(event) {
  const transcript = event.results[0][0].transcript;
  setText(transcript);

  const results = await fetch('/api/translate', {
    method: 'POST',
    body: JSON.stringify({
      text: transcript,
      language: 'pt-BR'
    })
  }).then(r => r.json());
}
Here we’re making a POST request to /api/translate where we pass our text and the language that we want it translated to. We then grab our response as JSON.
Note: We’ll later make the language being passed in dynamic!
In order to see our translated text, let’s set up a new state instance:
const [translation, setTranslation] = useState<string>();Then store our new translatedText after our POST request:
setTranslation(results.text);And then display it on the page:
<p>
  Translation: { translation }
</p>
Now this time when we try to record ourselves, if we wait a few seconds after our text comes in, we should then see a translation arrive!
This is pretty great in itself, but let’s take this a step further.
Next, let’s see how we can now use the browser to speak this text.
Step 3: Using SpeechSynthesis to Convert Text-to-Speech
Now that we have the translated text, we can hook into the browser’s SpeechSynthesis capabilities which are also part of the Web Speech API, using its available “voices” and speak the text in another language!
The primary APIs that we’ll be using are speechSynthesis itself as well as SpeechSynthesisUtterance, which is basically the APIs way of creating an instance of what will actually be spoken.
Starting with a simple example, after our translation code where we use setTranslation to store our translation value, add:
const utterance = new SpeechSynthesisUtterance('Hello, world!');
window.speechSynthesis.speak(utterance);
If we head to the browser (a supported one) and try to test our app again, after we record, speak, and get our translation, we should hear “hello, world!”
All that’s left now is to update the text to use our dynamically generated translation:
const utterance = new SpeechSynthesisUtterance(results.text);And if we head to the browser and try it out again, we should hear our text!
Though… it likely sounds a little bit awkward. Because we want to speak another language, it ends up just sounding unnatural (aside from it being a robot) when spoken from another language’s voice.
So next, let’s customize that voice!
Step 4: Customizing the SpeechSynthesis voice based on language and name
One of the nice things about the SpeechSynthesis API is we can customize the voice.
Now the tricky thing is, we’re at the mercy of the different voices that are available to the browser. While that’s solved by the getVoices method, if we fire that method too early, we get an empty array, meaning no voices.
Luckily we can configure an event handler on speechSynthesis so that when the voices are ready, we can get the voices securely, but yet another plot twist, this event handler isn’t supported in all browsers that support SpeechSynthesis!
So we’ll do a mix of this, where we’ll try to get the voices right after the page loads, but if we don’t find any, we’ll set the event listener to try to get it that way.
Tip: You can also do something like set an interval to check for them to exist, but if you’re in a browser that it doesn’t support it, you’ll be stuck with an infinite interval unless you have a static timeout.
First off, we need somewhere to store those voices, so let’s set up a new state instance.
At the top of the file under our existing state, add:
const [voices, setVoices] = useState<Array<SpeechSynthesisVoice>>();Then we’ll use a useEffect hook to run some code once the component mounts in the browser, so first import useEffect:
import { useState, useEffect } from 'react';Then add:
useEffect(() => {
  const voices = window.speechSynthesis.getVoices();
  if ( Array.isArray(voices) && voices.length > 0 ) {
    setVoices(voices);
    return;
  }
  if ( 'onvoiceschanged' in window.speechSynthesis ) {
    window.speechSynthesis.onvoiceschanged = function() {
      const voices = window.speechSynthesis.getVoices();
      setVoices(voices);
    }
  }
}, []);
As noted earlier, once our code runs, we first check to see if we can grab the voices. If they don’t exist, we try to add an event listener for when the voices are available.
Now that we have our voices, let’s start off by just adding the first one, just to make sure we know it’s working.
Let’s update our speechSynthesis example to:
const utterance = new SpeechSynthesisUtterance(results.text);
if ( voices?.[0] ) {
  utterance.voice = voices[0];
};
window.speechSynthesis.speak(utterance);
Here we’re checking for the existence of the first voice and if it exists, we set the voice property of our utterance to that voice.
If we try it out again, we should hear our text spoken!
Taking a moment to inspect our voice though, the first voice ends up being Samantha, which isn’t important in our context, but we can see some of the attributes available on this voice instance.
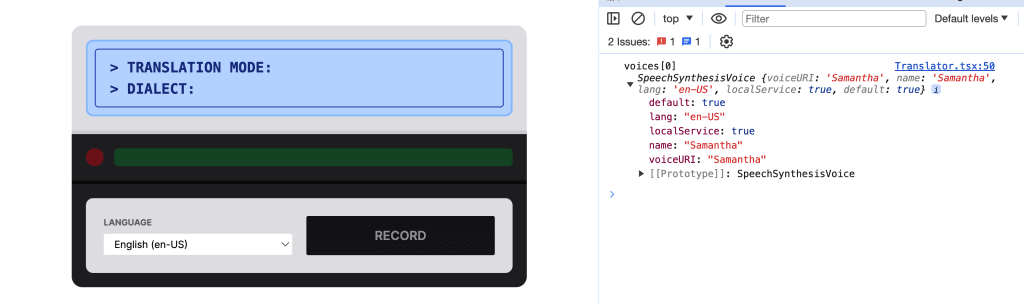
Importantly, we see a lang attribute, representing the language, and the name is helpful as well if you have a favorite you like to use, where I like Google and Luciana.
So instead of just grabbing the first voice, we can choose what our active voice will be based on some dynamic information, first being the selected language and the second being if we have a name preference.
At the top of our file, we can first create an array of all the languages that are available out of our voices:
const availableLanguages = Array.from(new Set(voices?.map(({ lang }) => lang))).sort();That code might seem intimidating, but working from the inside out, we’re first mapping all of our voices so that we have an array of strings representing our languages. We then feed that into a new Set instance, basically giving us a set of unique values. We then create an array from that Set so we have our array of unique values. And finally, we sort it!
Now we can use these languages to determine what language we want our translator to speak in.
To do this, I’m going to create a Select element that lists all of the options and stores the language in state.
First, let’s create a new state instance:
const [language, setLanguage] = useState<string>('pt-BR');Here I’m using pt-BR or Portuguese from Brazil as the default.
Then we can create our Select:
<select name="language" value={language} onChange={(event) => {
  setLanguage(event.currentTarget.value);
}}>
  {availableLanguages.map((language) => {
    return (
      <option key={language} value={language}>
        { language }
      </option>
    )
  })}
</select>
Where here I’m creating a controlled Select element that takes the language value and on change, sets that language value. It also loops through all available languages and creates a new option for each.
If we look in the browser, we should have our Select element with all of our languages.

So now let’s use that voice!
Let’s start off by finding our voices at the top of the component:
const availableVoices = voices?.filter(({ lang }) => lang === language);
const activeVoice =
    availableVoices?.find(({ name }) => name.includes('Google'))
    || availableVoices?.find(({ name }) => name.includes('Luciana'))
    || availableVoices?.[0];
We first filter all voices to find only the ones that match the language. Then, I’m first looking for a language that matches Google if it exists (Chrome, my preferred voice), then looking for Luciana (my preferred backup), then defaulting to the first voice in the array.
Tip: You can play around with the different voices by name and see which one you like best!
Then, where we’re setting utterance.voice, let’s update that to use activeVoice:
if ( activeVoice ) {
  utterance.voice = activeVoice;
};
And if we head to the browser and test it out, we should notice that the voice that’s speaking our translated text sounds much more natural!
Whats next?
Setting Up Labels for Languages List
The language codes that we receive are pretty standard (in the world) so we can capitalize on those values, find a list of countries and language codes, and provide an easier-to-read list of countries.
See an example commit or watch the video at the top of the page!
Fixing Cross-Browser Kinks
As we mentioned earlier, browser support is limited, but we can help smooth out some of the issues.
Particularly with Safari in two instances, where on Safari Desktop, it won’t automatically detect when you’re finished talking, so you have to stop.
You can use SpeechRecognition event handlers and a Stop button to allow someone to manually stop when ready.
See an example commit or watch the video at the top of the page!
Tip: You’ll get best results by waiting around 3 seconds after you hit record to start talking on Desktop Safari.
On the other hand, Mobile Safari has stricter requirements for user engagement for it to work. While everything is based on a user click, because we’re in a callback, its not technically the same thing.
We can immediately fire an empty SpeechSynthesisUtterance which activates the session to allow us to later speak our real text:
const utterance = new SpeechSynthesisUtterance(' ');
window.speechSynthesis.speak(utterance);
See an example commit or watch the video at the top of the page!