

Note: if you’re currently experience Lazy Loading issues, 3.0.4 switches how Lazy Loading is enabled. Simply switch off Lazy Loading in the Cloudinary plugin settings!
What is Cloudinary?
Cloudinary is a media platform that allows teams and developers to both manage assets and deliver them from a high performance CDN.
In-between, there are a ton of transformations and optimizations available that gives developers a flexible API to build exactly the media they need and serve that media in as small of a file size as they can.
Why is media optimization important?
Media optimization in particular is important as when serving large raw media, file sizes can be incredibly huge.
This forces your visitors to waste precious bandwidth (especially important when limited or on slow networks) and can potentially hurt conversion rates due to slow loading pages.
Ultimately it helps provide a better user experience for your visitors which ends up helping them achieve their and your goals.
How does the Cloudinary plugin work with a headless CMS?
Cloudinary has a variety of different integration points when dealing with a headless CMS.
Whether clientside where you would be taking image URLs or Cloudinary IDs and constructing URLs in realtime, or serverside, where you build all of your transformations before the page even gets served, there are many tools for fitting in depending on the project needs.
In particular with the WordPress plugin which we’ll be looking at today, everything happens on the WordPress server, meaning when you request all of your content and data from WordPress, the URLs will already be constructed with default optimizations for performant delivery and ease of use.
What are we going to build?
We’re going to use the Cloudinary WordPress plugin to automatically optimize the media in our headless WordPress instance.
To do this, we’ll first install the plugin, at which point we’ll see how our images will automatically be optimized through Cloudinary through our GraphQL requests.
We’ll then take this a step further and plug in our WordPress instance to a Next.js app to see it work inside of the browser.
Disclaimer: I work for Cloudinary as a Developer Experience Engineer.
Before we get started
In order to work through this tutorial, we’ll assume that you have a WordPress instance already set up and that you’re already using WPGraphQL to query your WordPress data headlessly.
Note: If this is all new to you, you can additionally check out my tutorial How to Create a Headless WordPress Blog with Next.js WordPress Starter which will walk you through that process.
Additionally, given we’re working with media, we’ll assume that you have some images on your site. The easiest way to test this out is to simply add some inline images in page or post content, or alternatively, you can add feature images to your pages or posts.
Finally, you should already have a Cloudinary account which you can sign up for free.
Step 1: Installing the Cloudinary WordPress Plugin
Diving right in, we can first install the plugin right inside of our WordPress dashboard.
Note: you can also download it from the wordpress.org site if you prefer to upload it manually: https://wordpress.org/plugins/cloudinary-image-management-and-manipulation-in-the-cloud-cdn/
Navigate to the Plugins section and select Add New. Then type “cloudinary” in the search bar where we’ll see the Cloudinary plugin in the first slot.
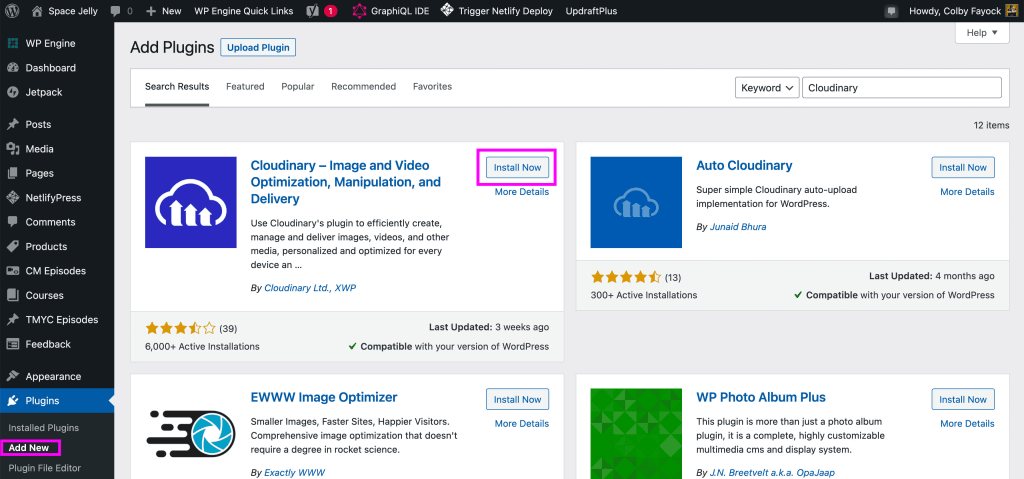
Click Install and once finished, click Activate.
Next we’ll learn how to set up the plugin with our Cloudinary account.
Step 2: Configuring the Cloudinary WordPress Plugin with a Cloudinary account
In your left sidebar, you should now have a new menu item of Cloudinary which might even have a red badge notification signifying we have a todo item.
Select Cloudinary in the left navigation and once you’re on the page, you’ll be presented with a welcome message for the setup wizard.
If at this point you don’t have an account, feel free to click Signup, otherwise click Next where we’ll land on the Connect Plugin step.
Here the plugin asks us to add our Cloudinary connection string.
To find your connection string, head over to your cloudinary.com console where right at the top of your Dashboard, you’ll see API Environment Variable, which we can hover over and copy using the on-page button.

Then we can paste this value right inside of our WordPress setup wizard.

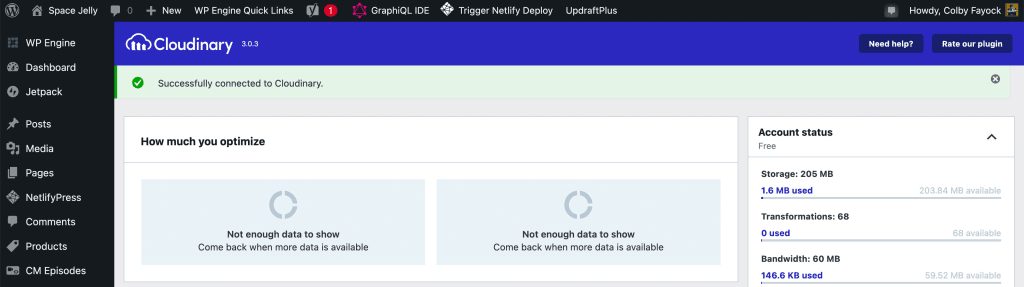
Cloudinary will then try to validate the connection string at which point if successful, you’ll see a green checkmark and success message!
Once ready, click Next which will take you to the Settings page of the wizard.
By default, Cloudinary pre-configures all of the settings to best optimize the media on your WordPress site. Unless you have specific needs, we can leave these settings “as is”, otherwise you can configure them to your liking.
Finally, click Next again, which when finished loading, will tell you you’re “all set” and ready click the button to Go to plugin dashboard.
Step 3: Syncing WordPress Media to Cloudinary
This isn’t really a step, but at this point, we can sit back and watch.
While at first, your Cloudinary dashboard won’t really have much to show.
But in the background, Cloudinary is now syncing all of your media to your cloud.
After a few minutes to get set up, we can even head over to our Media section and see indicators next to our media showing that they’re waiting to sync to Cloudinary.

Back on the Cloudinary Plugin Dashboard after a few seconds, we should also be able to see the status of our sync, including how many assets have been currently synced as well as the savings you got optimizing with Cloudinary.

Note: your optimization percentage will likely be higher as I previously installed the plugin before walking through this demo!
But once we hit 100%, or even before then, we’ll start to see the media assets that had been synced already start to show as delivered from Cloudinary in our browser!
Step 4: Previewing Cloudinary URLs in WPGraphQL requests
To confirm that this is working, we can head over to our WPGraphQL to see how our responses look and how our URLs changed.
Running a query such as:
query MyQuery {
  posts(first: 1) {
    edges {
      node {
        content
      }
    }
  }
}
We can see the results of any images that were updated.
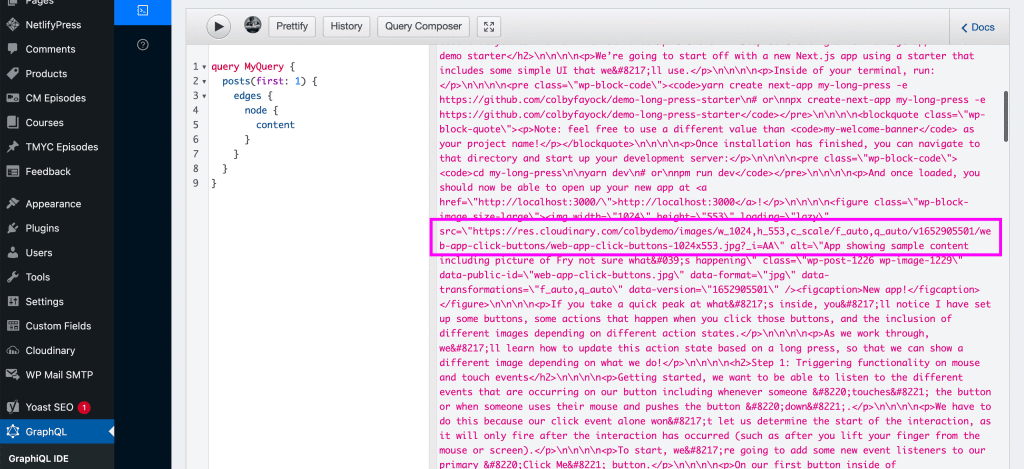
We can see all of our inline images were synced to Cloudinary and additionally delivered.
The plugin also applies Lazy Loading to help the browser load the images in a way that makes sense as well as on the Cloudinary URLs, we can see optimization parameters including:
- f_auto: automatically determining the best media format to deliver (JPG, WEBP, AVIF, etc)
- q_auto: automatically compressing the media up to a point that’s not going to produce human perceivable differences
We’re getting blanket optimization of all of our WordPress media right in our GraphQL response!
Step 5: Creating a new app with Next.js WordPress Starter
In addition to seeing this purely inside of our GraphQL request, we can also see how this works inside of a real-world application.
We’re going to use my Next.js WordPress Starter which allows you to easily plug in a WordPress GraphQL endpoint and spin up a new app.
Inside of your terminal, run:
yarn create next-app my-wp-media -e https://github.com/colbyfayock/next-wordpress-starter
# or
npx create-next-app my-wp-media -e https://github.com/colbyfayock/next-wordpress-starter
Note: feel free to use a different value than
my-wp-mediaas your project name!
Once installation has finished, you can navigate to that directory and start up your development server:
cd my-wp-mediaNext you’ll need to create an environment variable in your project with your endpoint.
Create a new file in the root of your project called .env.development and inside add:
WORDPRESS_GRAPHQL_ENDPOINT="<Your WPGraphQL Endpoint>"Finally you can start up your development server with:
yarn dev
# or
npm run dev
And once loaded, you should now be able to open up your new app at http://localhost:3000!

Now beyond this being pretty cool how easily we spun up a WordPress app in Next.js, we’re interested in the images.
If we check out the network requests, we can see that all of our images are now being delivered from Cloudinary.
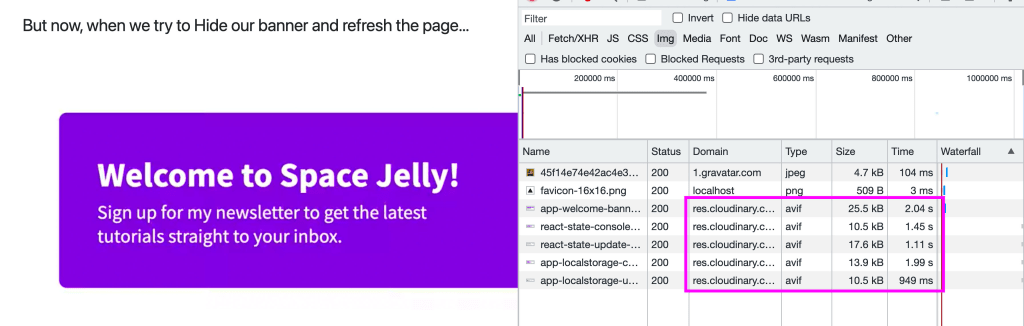
We’ll also see that they’re being served in modern formats and likely greatly reduced in size!
What else can we do?
Check out more plugin settings
If the default settings don’t work for you perfectly, poke around the available options in the plugin. There are a lot of things you can customize from how the media is delivered to how you’re serving media responsively.
Do more with your rendered HTML
While we’re just rendering all of our HTML “as is”, we can level up how we’re displaying our content by parsing that HTML and transforming it to our liking.
That includes taking our images and using the Cloudinary URLs with the clientside URL-Gen SDK to expand our use of Cloudinary tools and features.
Learn how to parse the HTML and transform it with How to Add a Dynamic Table of Contents to Static HTML in React with Rehype.