

What is a favicon?
If you haven’t heard of the term favicon, you’ve likely already seen one, just maybe never knew what it’s called.
Favicons are the little images (icons) that appears in the browser tab when you’re visiting a website.

It was originally added to IE5 by Microsoft, the idea being that whenever you bookmarked a page, it would include the icon.
The goal is to provide an easy way to distinguish a website from others. If you have a few bookmarks or tabs open, being able to see that big Google logo helps you to recognize and switch to it quicker.
But sites like Gmail in the screenshot above have taken that a step further, where not only can you use a favicon for a simple logo, but you can use it for easily identifiable information, such as how many messages are unread.
How does Next.js use favicons?
There’s really nothing “special” about using a favicon with Next.js.
Favicons are a web standard, so pertaining to Next.js, it’s really just about how to add it to the page using the standardized method and making sure it properly renders with the rest of the page’s HTML.
Step 0: Creating a new Next.js app with Create Next App
We’re going to start off with a new Next.js app using Create Next App.
Inside of your terminal, run:
yarn create next-app my-favicon-app
# or
npx create-next-app my-favicon-app
Note: feel free to use a different value than
my-favicon-appas your project name!
Once installation has finished, you can navigate to that directory and start up your development server:
cd my-favicon-app

yarn dev
# or
npm run dev
And once loaded, you should now be able to open up your new app at http://localhost:3000!
Step 1: Adding a custom favicon to a Next.js app with Favicon Generator
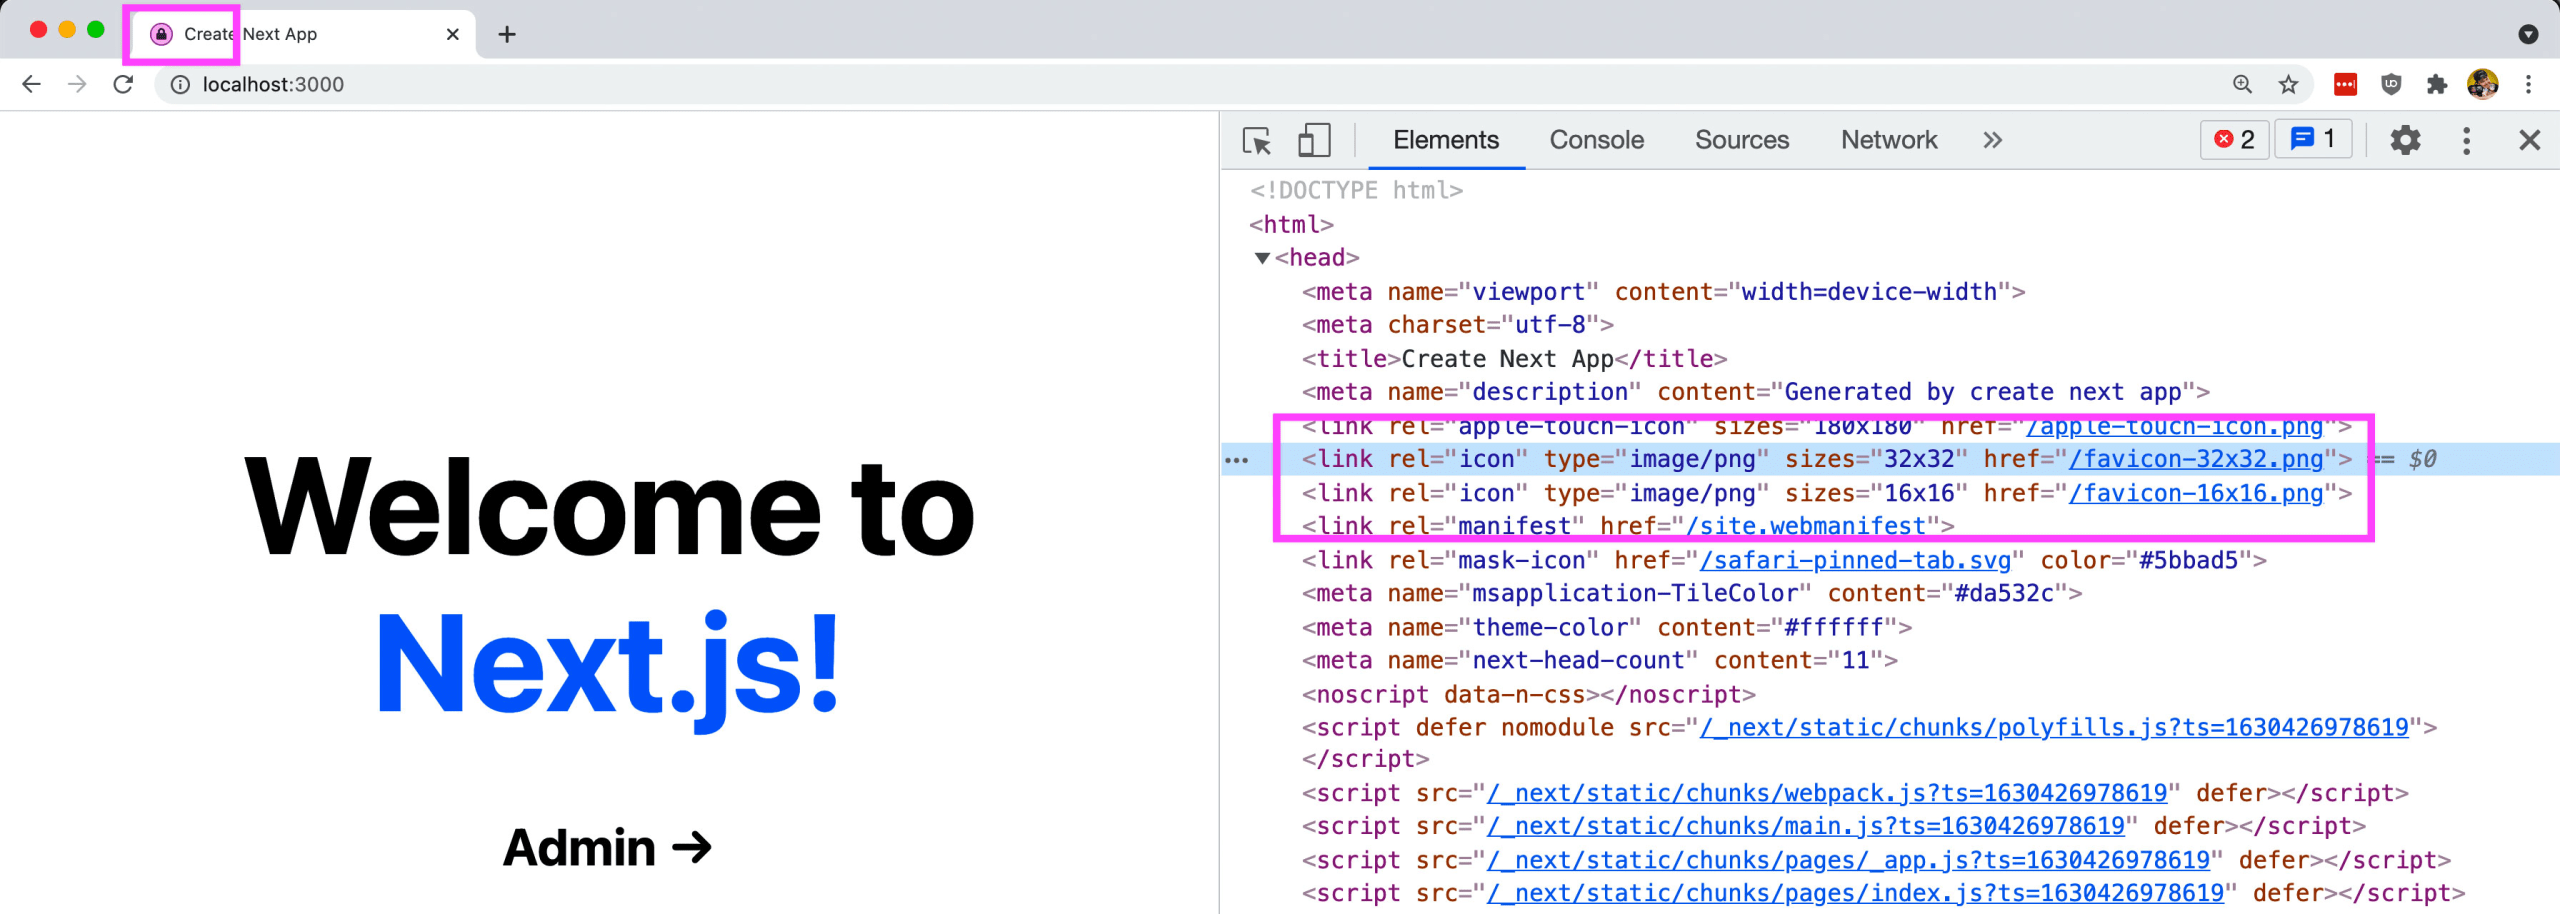
When we create a new Next.js application with Create Next App, we actually get a favicon by default.
The only issue, that’s the Vercel logo! But luckily, it shows that out of the box, favicons “just work” with Next.js.
If we look inside of pages/index.js our homepage, we can see that this is getting added using the Next.js Head component, which along with our favicons, can help manage other important SEO metadata.
<Head>
  <title>Create Next App</title>
  <meta name="description" content="Generated by create next app" />
  <link rel="icon" href="/favicon.ico" />
</Head>
So we’re already a good chunk of the way there.
Now the standard favicon file that’s been around for ages is the favicon.ico file. This isn’t a typical image file that we can just export from anywhere.
Luckily, there are a wide variety of options of how we can generate ICOs from images online. My favorite as of writing this is Favicon Generator.
To start, we need an image to use. We can really use any image we want with Favicon Generator, as it gives some options for how we can tweak it even if it’s not square, but the image should ideally be square and easily visible when tiny.
If you want to follow along, you can use my favicon from spacejelly.dev.

Download at https://spacejelly.dev/favicon-1024×1024.png
Notice I’m using a PNG with a circle in it. The cool thing is we can use transparency to avoid having to use square images (though square images are totally fine!).
Now heading over to Favicon Generator at realfavicongenerator.net, the first thing you’ll see at the top of the page is a button that says Select your Favicon Image.
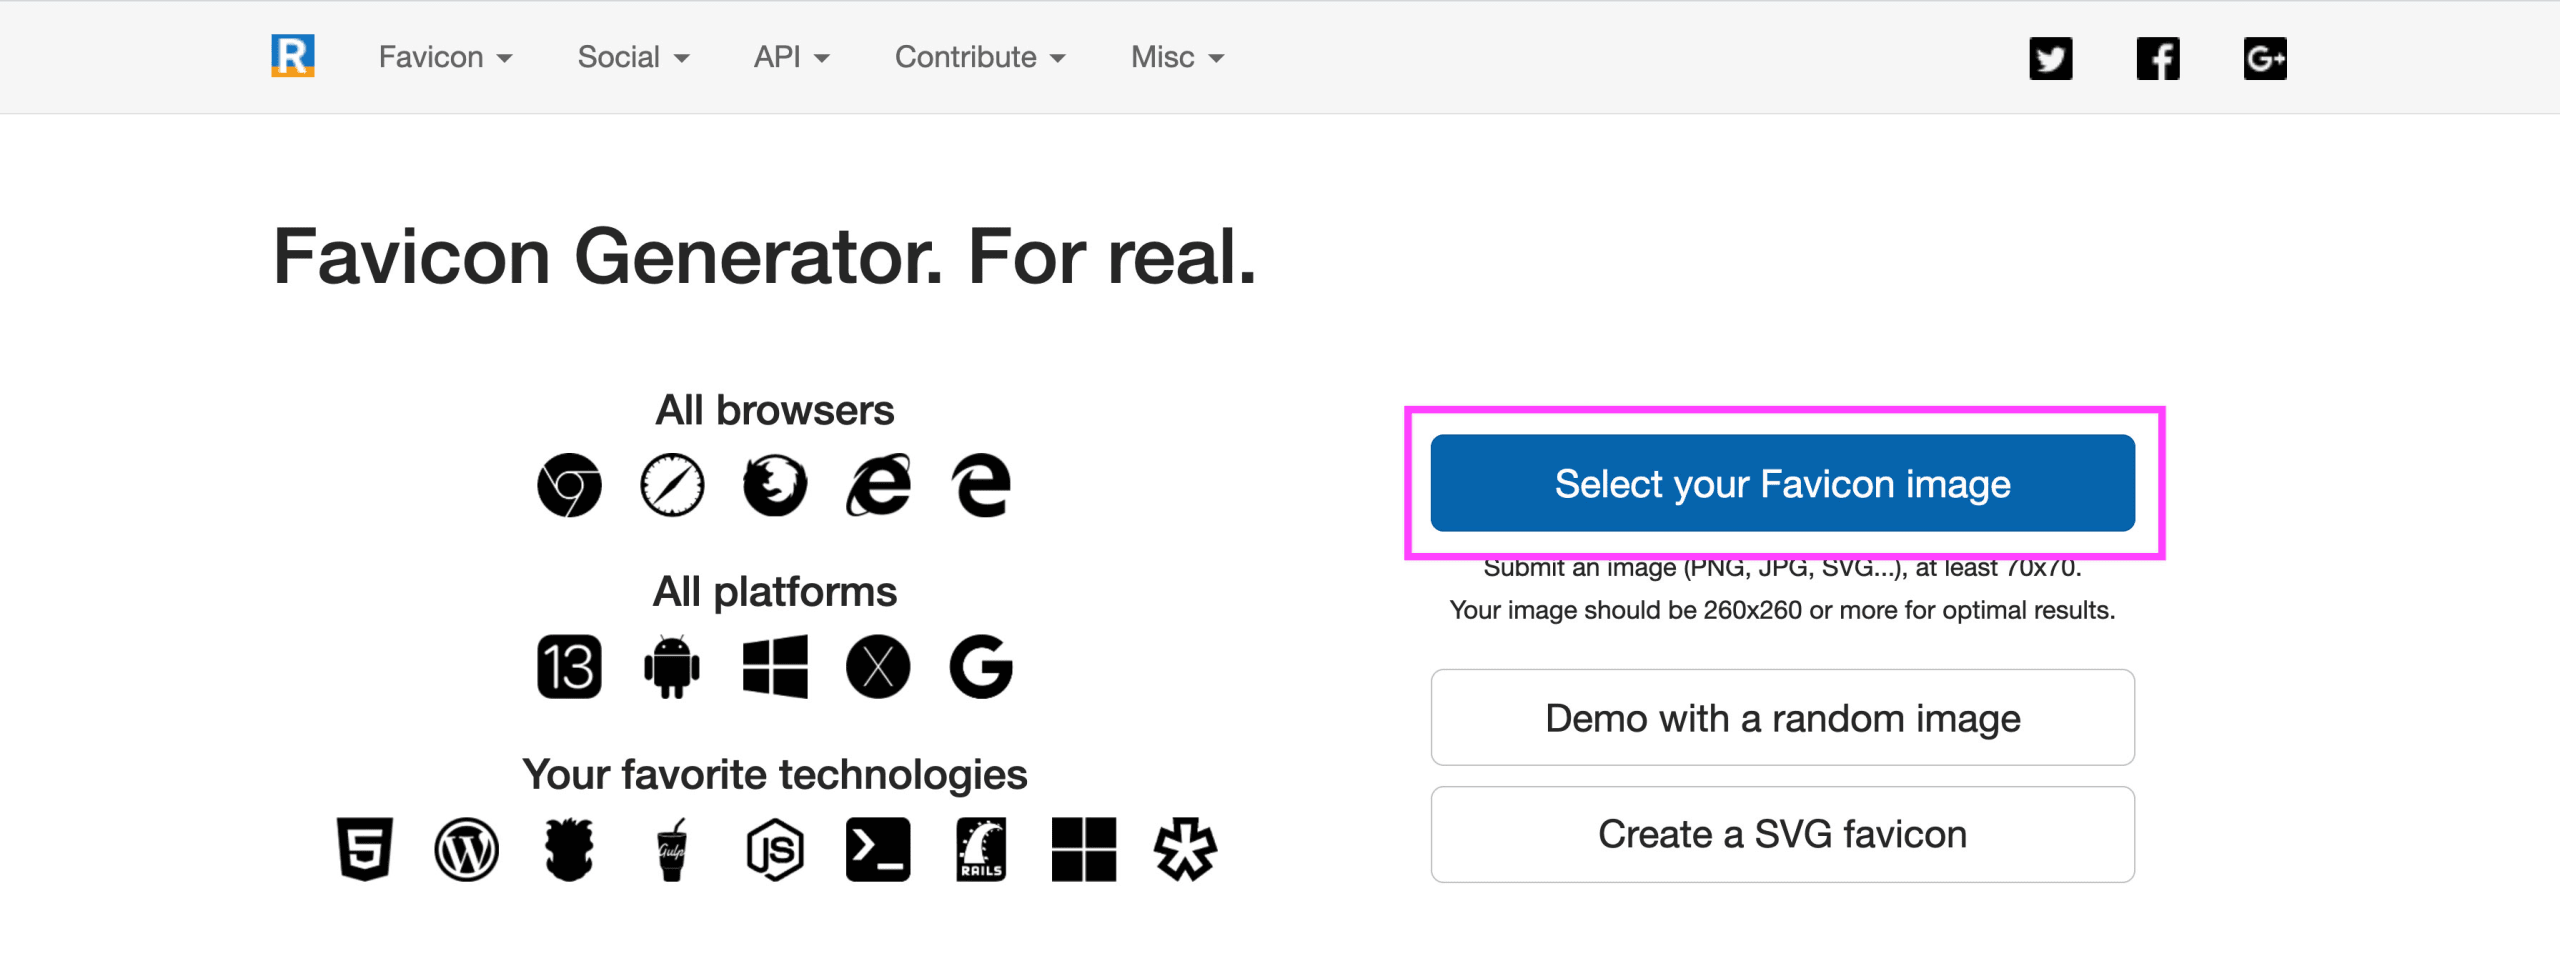
Once you do, Favicon Generator will load up a preview for how your favicon will look on your site with a few different examples. It even gives you options for how you can change how it looks, like adding a background or changing app settings.
Now as a quick aside here, different native devices allow you to specify settings for how your website or app will appear on the web.
Android Chrome for instance allows you to set a “theme” color, which changes how your website looks when someone opens it on their device.
Feel free to update these settings to your liking, but we’ll be focusing on the icon itself for now.
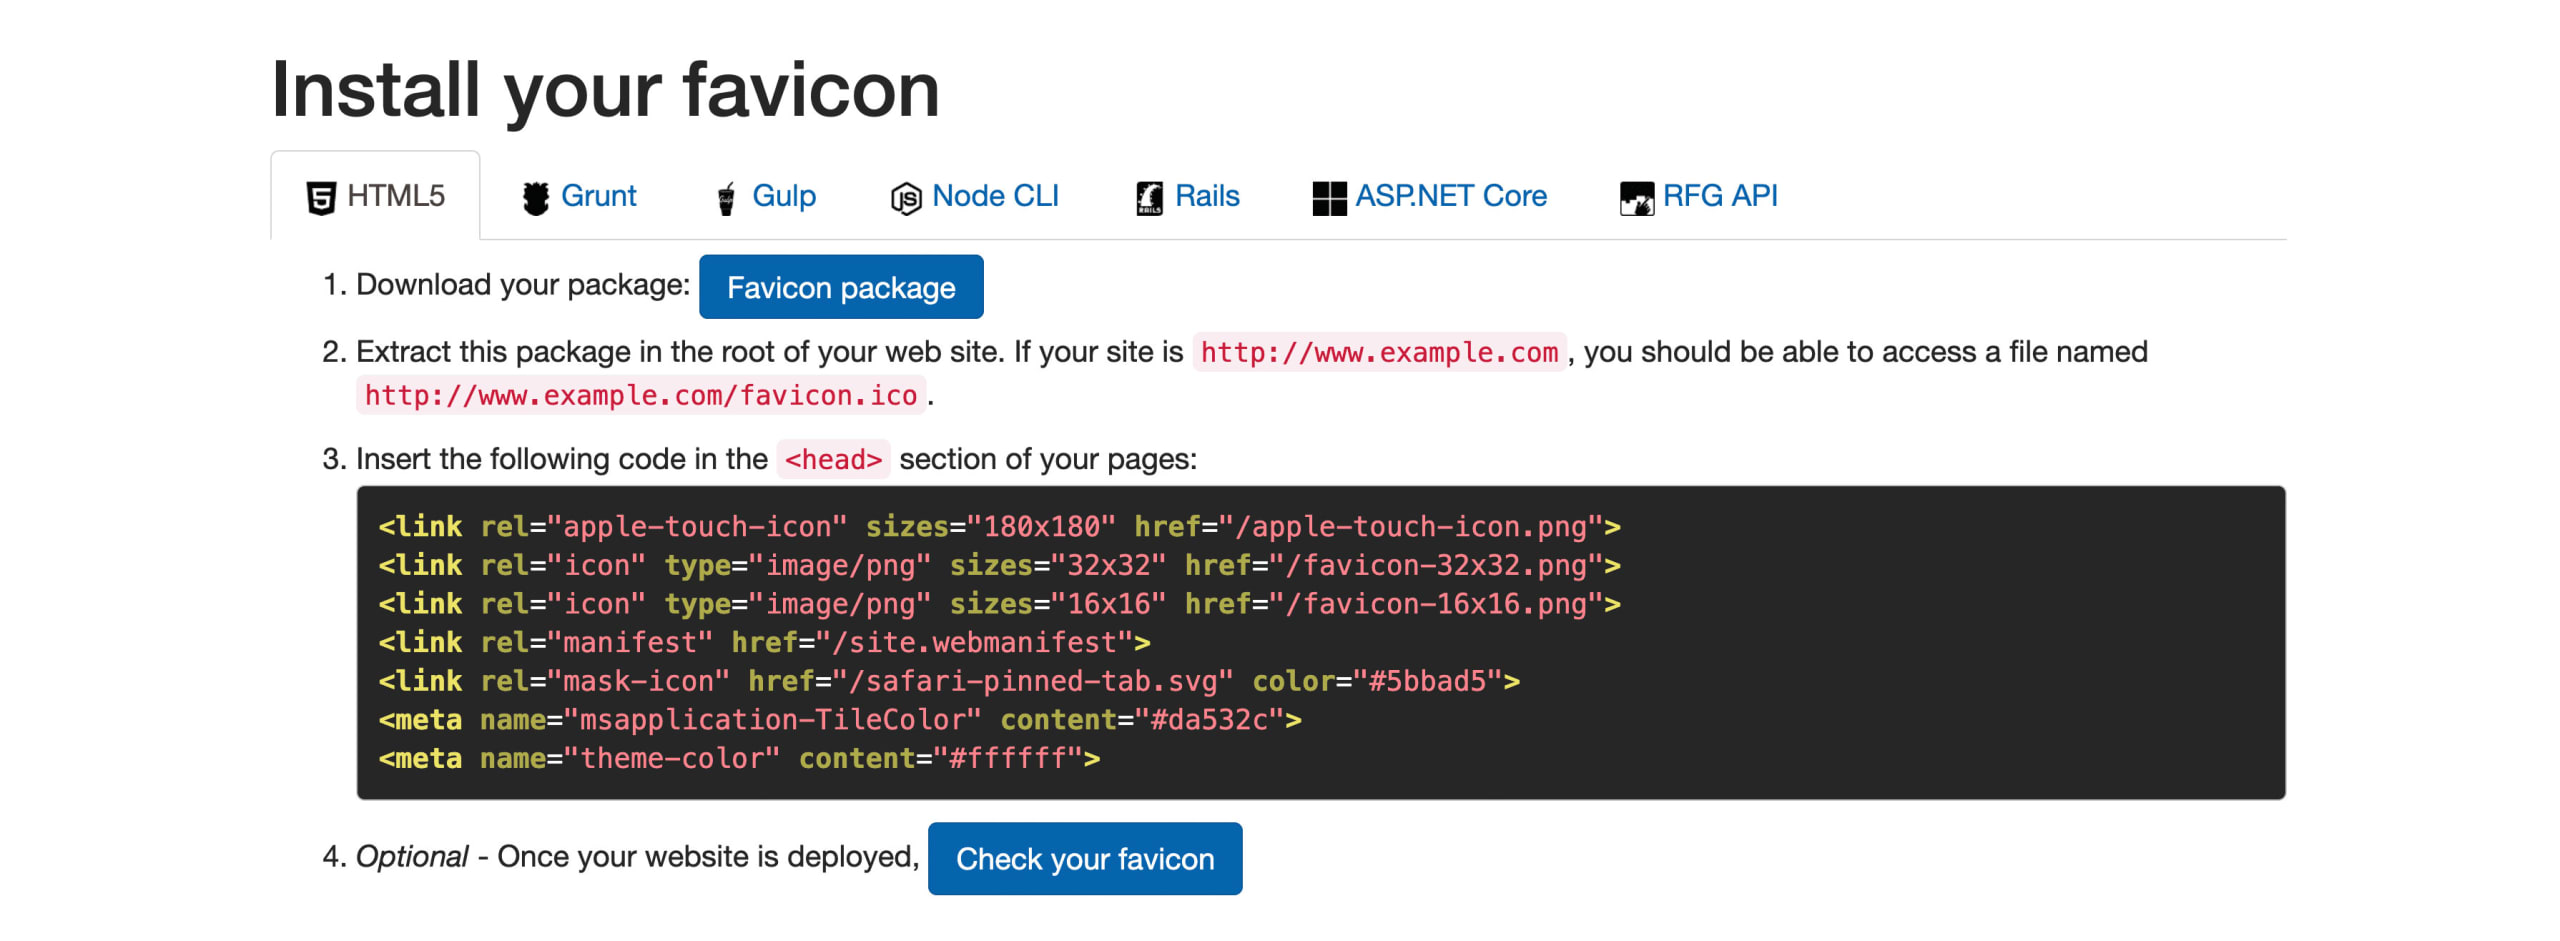
Once you’re ready, head down to the bottom of the page and click Generate your Favicons and HTML code.
Favicon Generator will build your icons to a ZIP that you can download and provide you with a snippet of HTML that you can add right into your app.
Go ahead and click Favicon package and unzip the file.
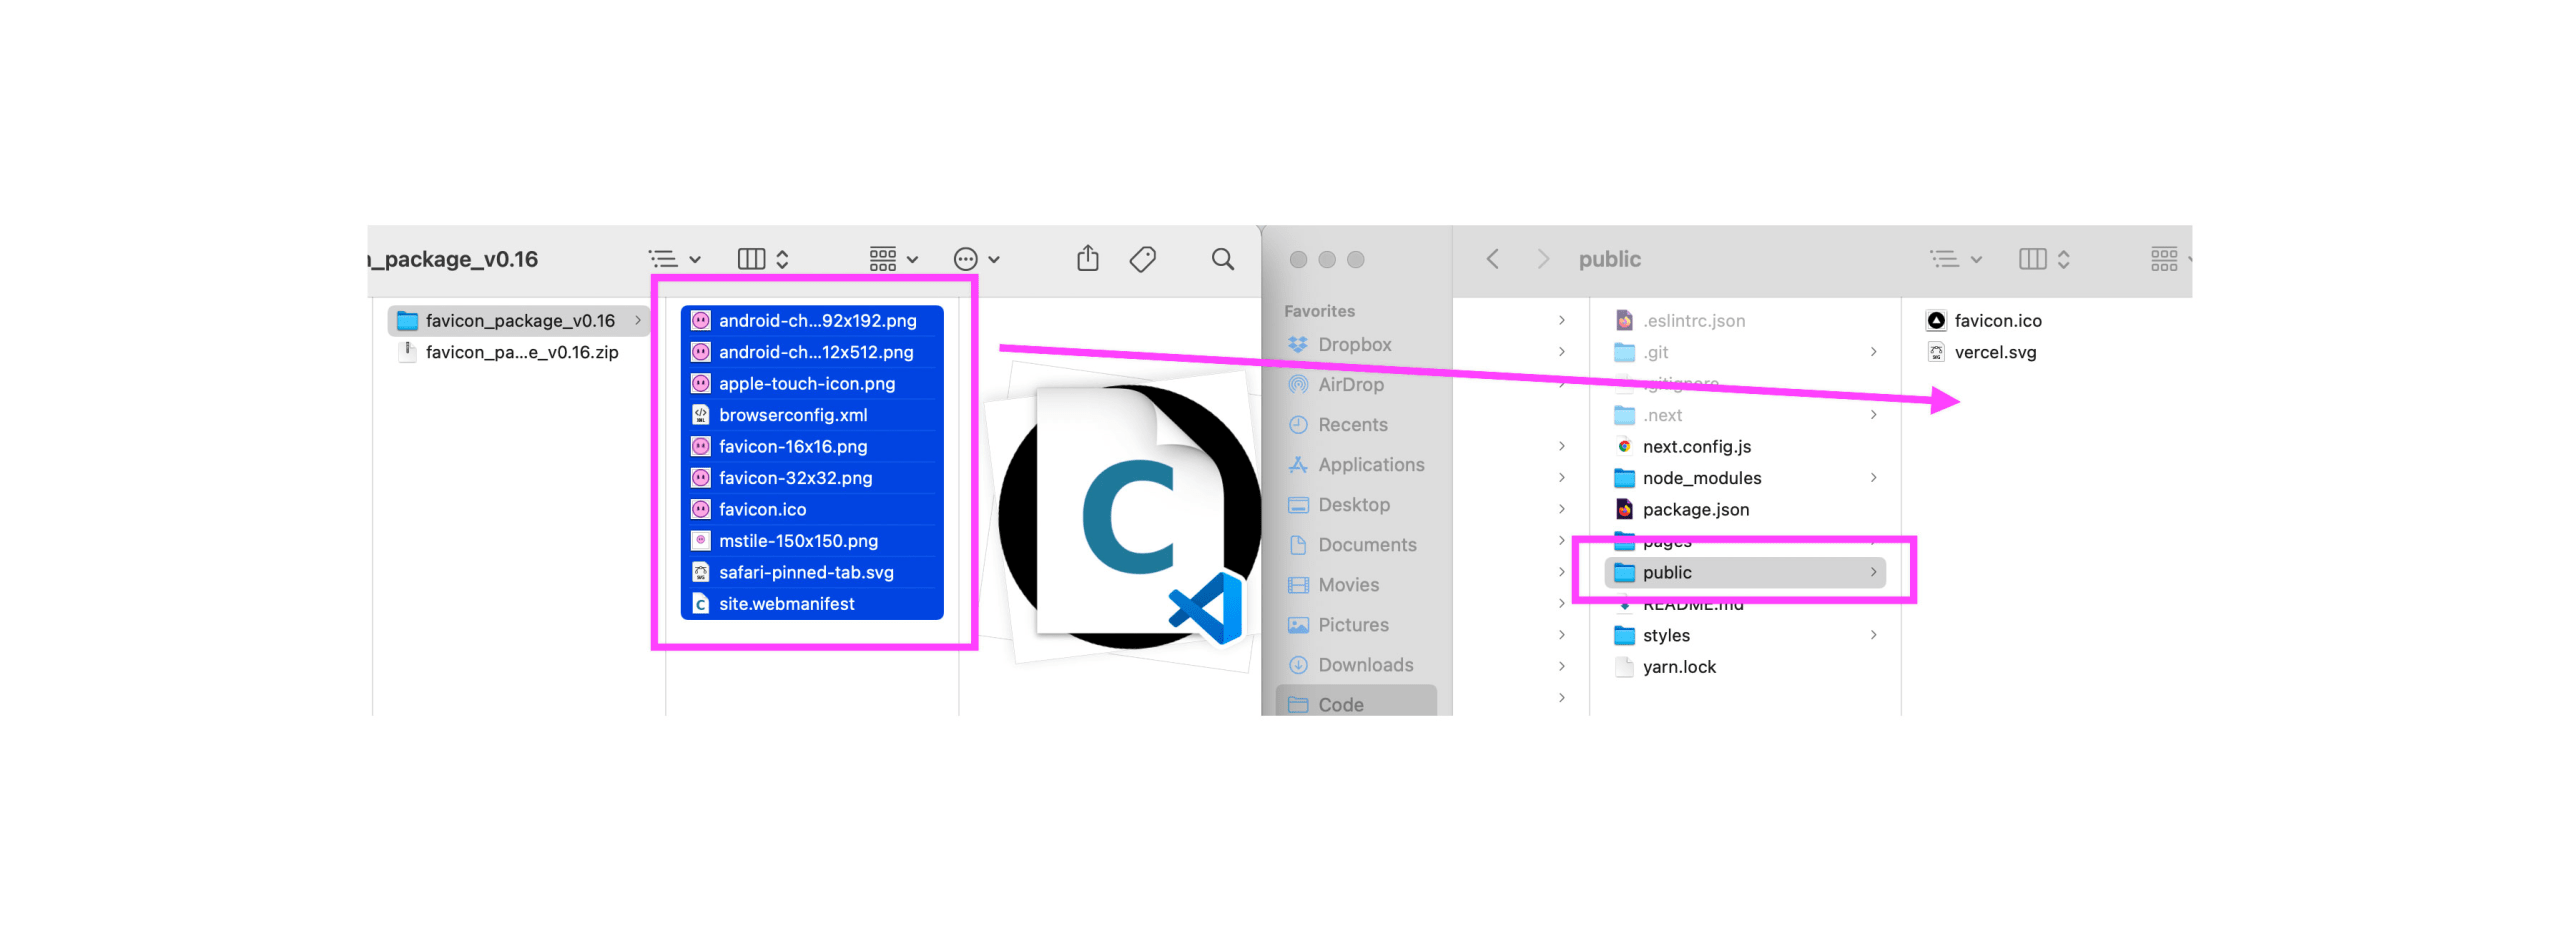
Then drag all of those files into your public directory including replacing the favicon.ico file with the new one.
Note: The public directory is used in Next.js to serve static files. For instance, dragging favicon.ico into public will make favicon.ico available at yourwebsite.com/favicon.ico.
Now that our image files are all ready, let’s head back to Favicon Generator and copy our code snippet and paste it into the Head component of our app.
After pasting, be sure to update the snippet to conform to JSX standards, meaning, adding a closing tag to all of the lines or self-closing each one.
<Head>
  <title>Create Next App</title>
  <meta name="description" content="Generated by create next app" />
  <link rel="apple-touch-icon" sizes="180x180" href="/apple-touch-icon.png" />
  <link rel="icon" type="image/png" sizes="32x32" href="/favicon-32x32.png" />
  <link rel="icon" type="image/png" sizes="16x16" href="/favicon-16x16.png" />
  <link rel="manifest" href="/site.webmanifest" />
  <link rel="mask-icon" href="/safari-pinned-tab.svg" color="#5bbad5" />
  <meta name="msapplication-TileColor" content="#da532c" />
  <meta name="theme-color" content="#ffffff" />
</Head>
You’ll also notice that the new snippet doesn’t include the favicon.io file. By default, browsers will look for a favicon.ico file in the root of the project. This means that we don’t necessarily need to include it.
But now, finally, if we open back up our app in our browser, we should now see our new favicon in our browser tab!

Now to dig into the additional tags we added, we can take a quick glance at what they’re doing.
The easiest way to check this out is in Chrome under the Application tab in the Developer Tools.
If we start from the top, we’ll see there’s not much info, but the reason for that is we didn’t fill any of that out in our site.webmanifest file, but if we scroll down, we can see all of the app icons that we’re referencing in that file.
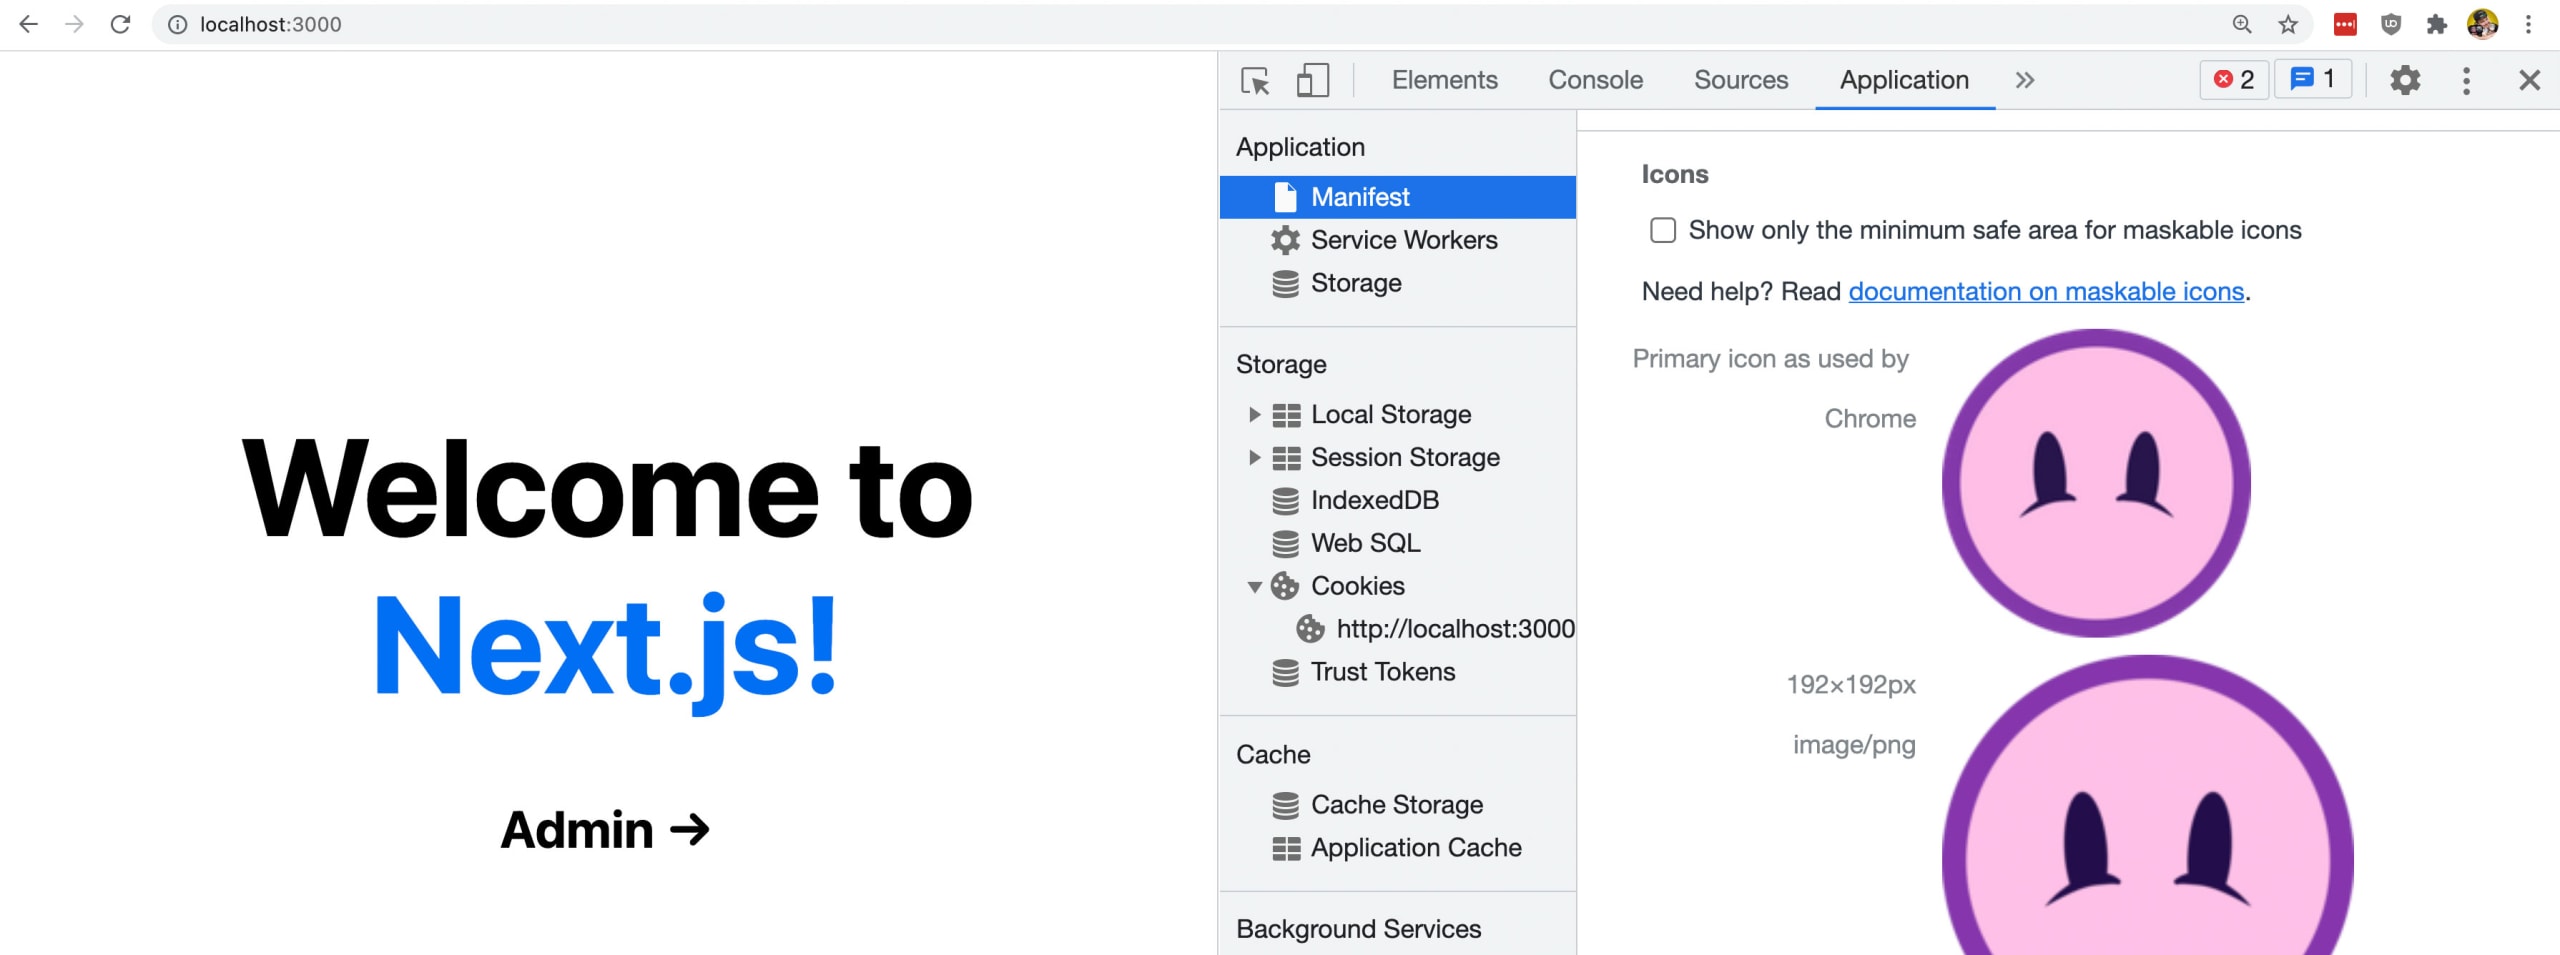
Tip: you can fill out the rest of
site.webmanifestwhich helps gives more context to your web app.
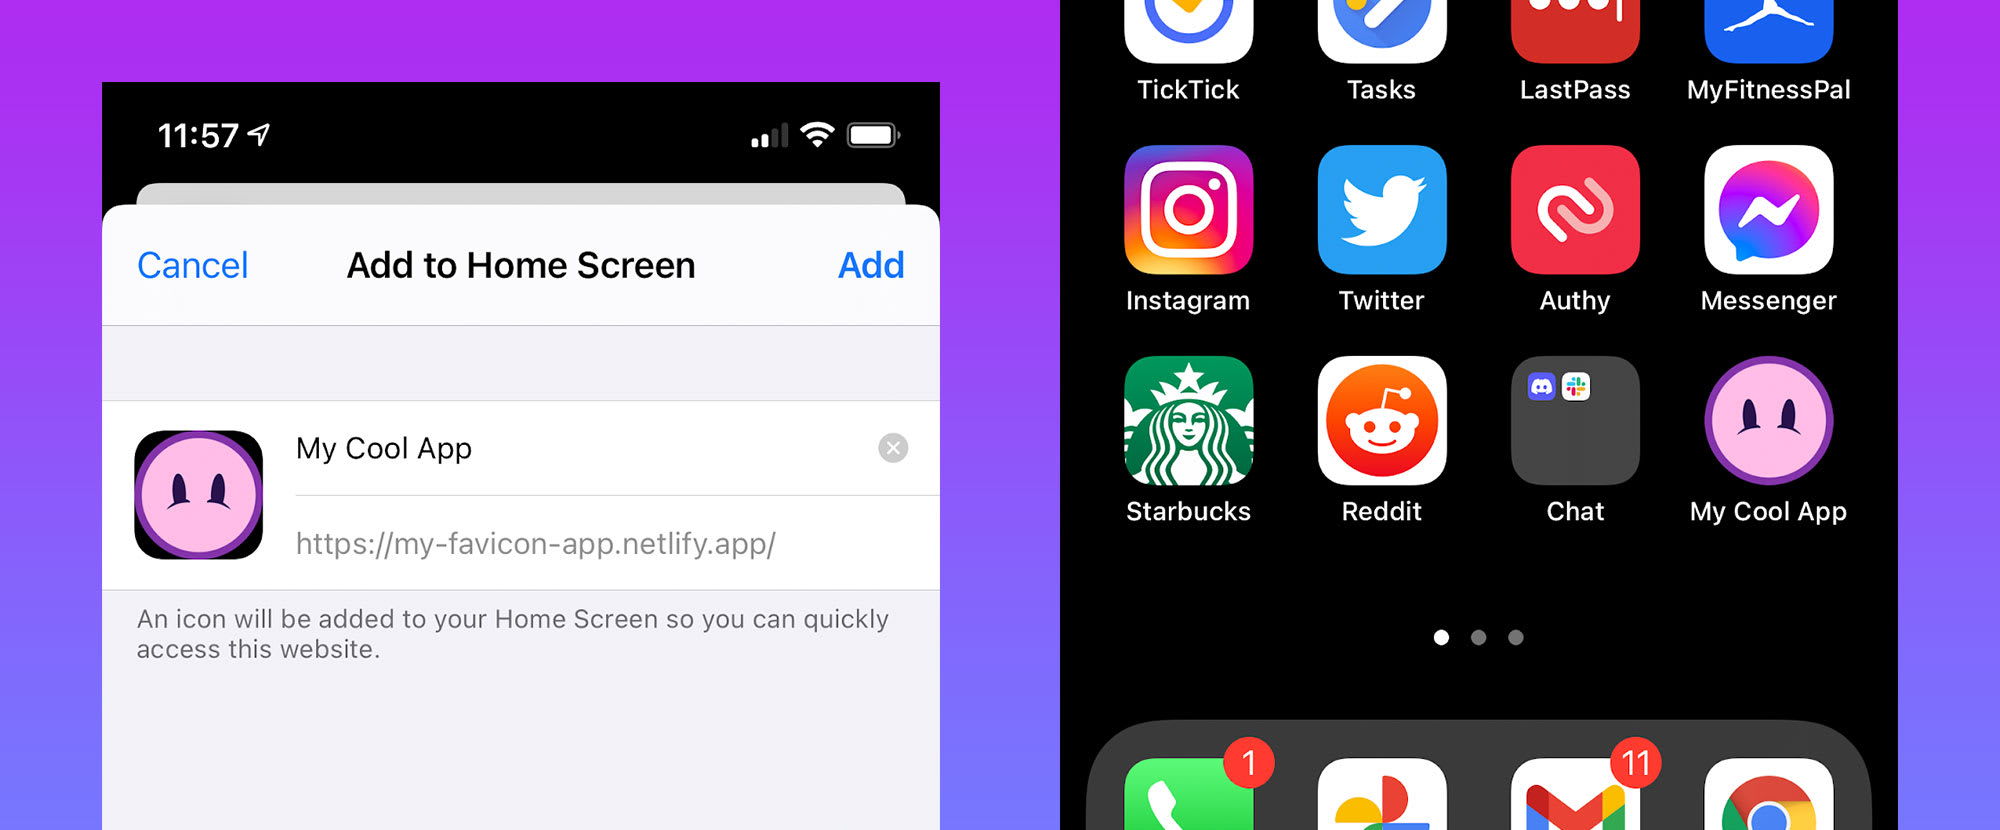
On top of that, if we navigate to our web app on our mobile devices that support adding bookmarks to the homescreen like iOS, we can see that we can now add it and our app icon shows up right on the homescreen for us!
Note: you likely can’t go to localhost:3000 directly on a mobile devices if the server isn’t running there. You can use tools like ngrok to test with a public address or simply test when the site is deployed.
Step 2: Using _app.js to set global favicon and app icons in Next.js
Our favicon and app icons are looking great, but we have one issue. It’s only applying to the homepage.
Now technically, as I mentioned in Step 1, because the file is in the root of our project, browsers will automatically see that favicon.ico and load it, so if we create a new page, it would still kind of work.
But we don’t necessarily want to use the ICO file, we want to load the PNG files, which are high resolution and will look nicer.
To move our favicon to a globally available spot, we can use the App file, which is a Next.js-specific file that wraps the component tree of all pages.
If we open up pages/_app.js, we won’t see much in there, but let’s move everything inside of our Head component in our homepage to that file.
To start, at the top of pages/_app.js import the Head component:
import Head from 'next/head';Then, we want to add our Head component and favicon tags to the component tree. We can do that by creating a React Fragment, which we can then put our Head.
function MyApp({ Component, pageProps }) {
  return (
    <>
      <Head>
        <title>Create Next App</title>
        <meta name="description" content="Generated by create next app" />
        <link rel="apple-touch-icon" sizes="180x180" href="/apple-touch-icon.png" />
        <link rel="icon" type="image/png" sizes="32x32" href="/favicon-32x32.png" />
        <link rel="icon" type="image/png" sizes="16x16" href="/favicon-16x16.png" />
        <link rel="manifest" href="/site.webmanifest" />
        <link rel="mask-icon" href="/safari-pinned-tab.svg" color="#5bbad5" />
        <meta name="msapplication-TileColor" content="#da532c" />
        <meta name="theme-color" content="#ffffff" />
      </Head>
      <Component {...pageProps} />
    </>
  );
}
You’ll notice I also moved the title and description to our App file. The added benefit here is that we can then have a global default value for our title and description, so that no matter what, we always have one set.
At this point, if you reload the homepage, nothing should be different, however to test this out, we can create a quick new page.
Let’s duplicate our pages/index.js file to something like pages/admin.js. Feel free to update it to however you’d like, but I added the title of Admin and I additionally added a link using the Next.js Link component back to the homepage.
On the homepage, we can similarly add a link to the Admin page (or the new page you created) so that we have a way to navigate to it.
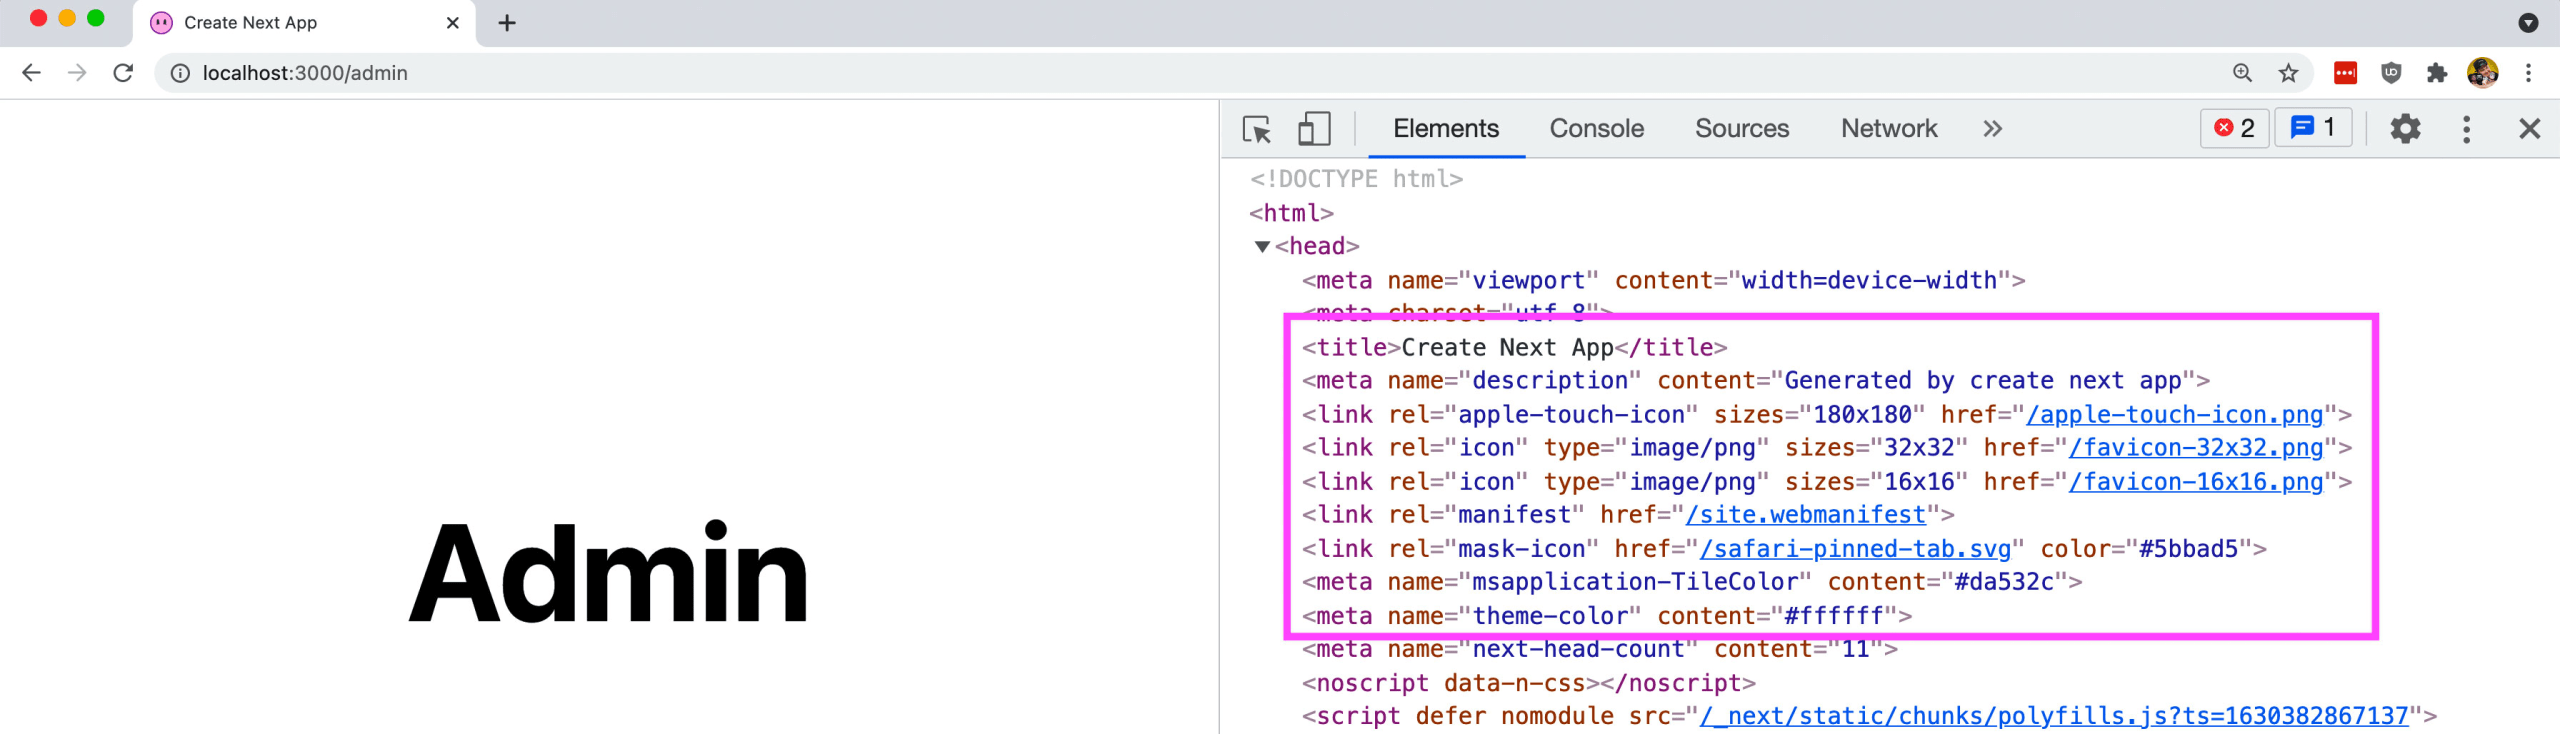
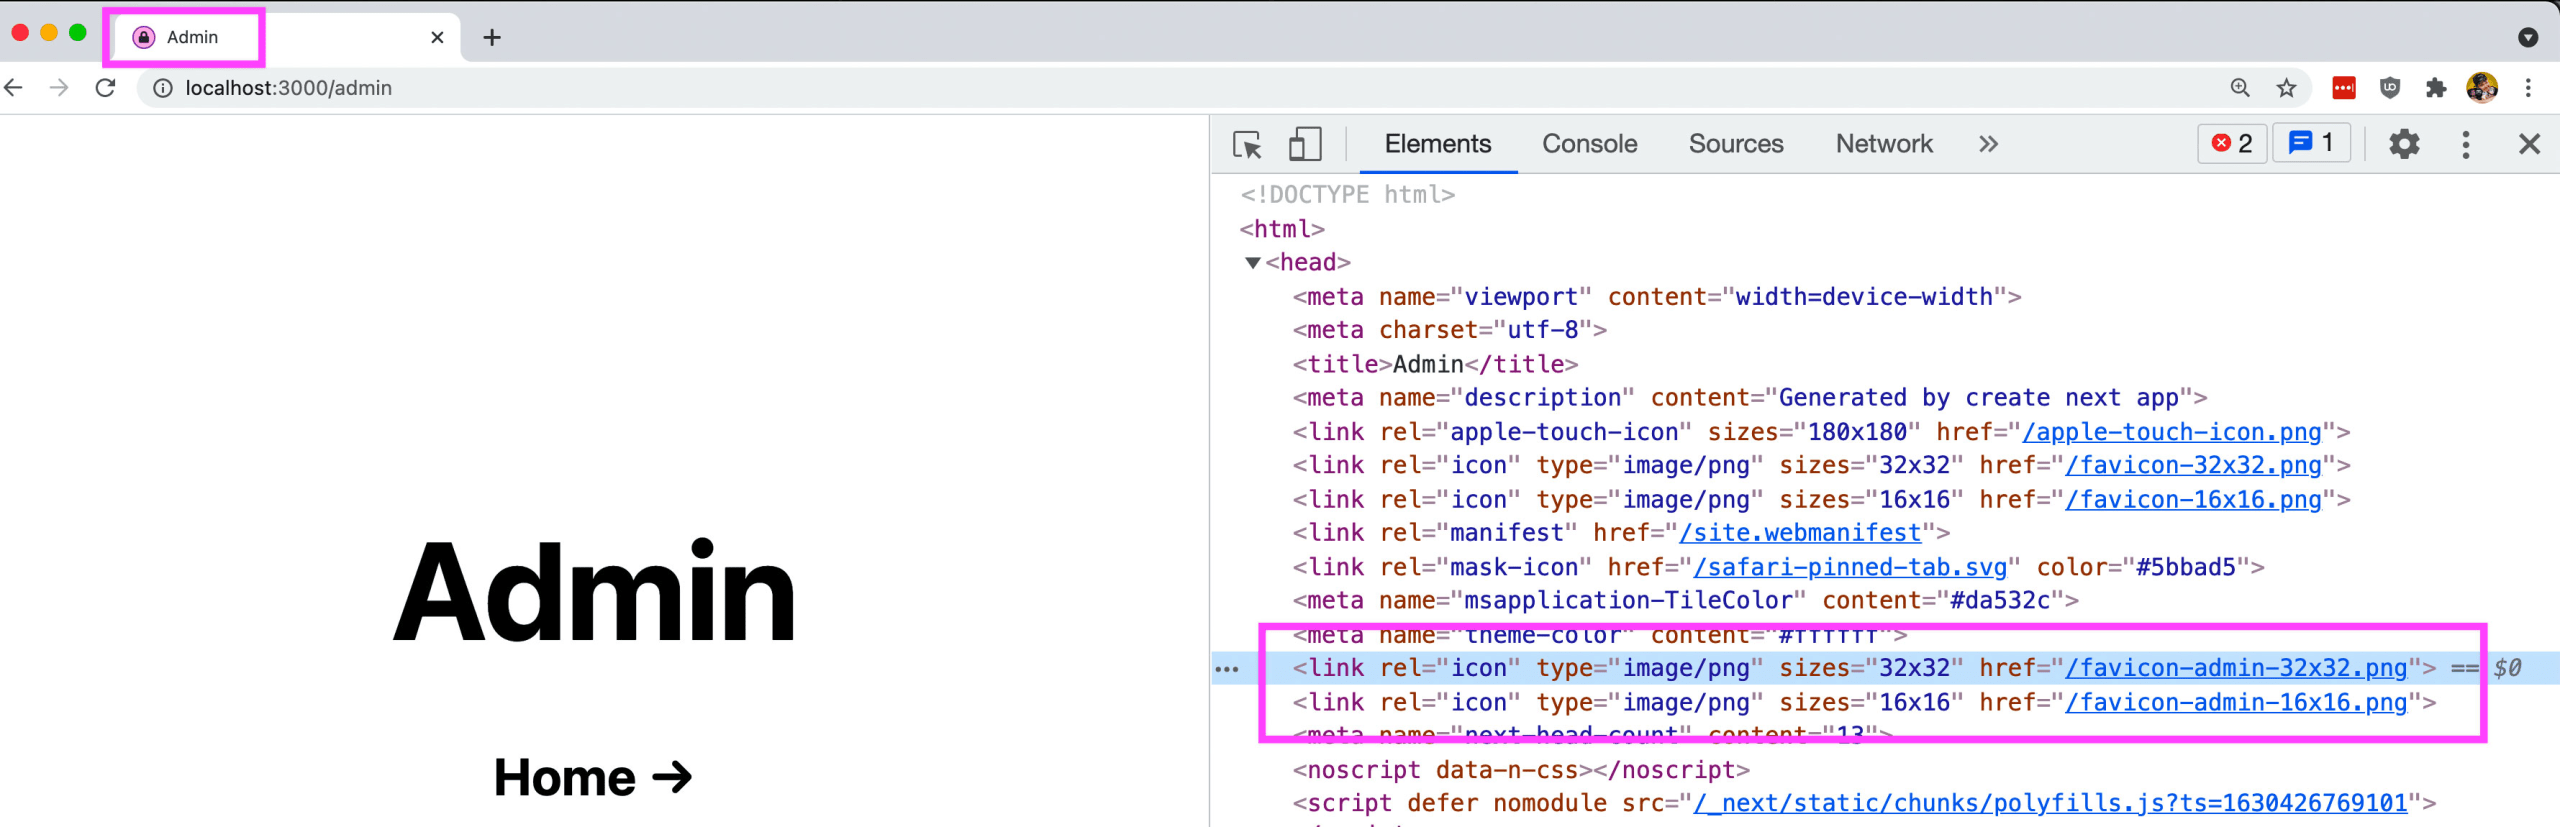
But now, if we navigate over to our Admin page, we can see the favicon working! And if we open up the developer tools to check the source, we can see that without adding the Head component and tags to our Admin page, we have our favicons!
Step 3: Adding unique favicons to different pages
We have global favicons working well, but what if we wanted to change our favicon depending on the page we’re on?
The nice thing about the Head component is we can use it anywhere in our application and override the global instance of it.
To test this out, I created a new icon that you can follow along with.
Download at https://github.com/colbyfayock/my-favicon-app/blob/main/public/favicon-admin-1024×1024.png
We’re going to use this icon for our admin page.
Like before, we can head over to our Favicon Generator and load this up, getting our variations.
This time however, when we unpack the files, the only 2 that we’re going to use in this example are:
- favicon-16×16.png
- favicon-32×32.png
Now we already have files named that way, so we can name them a different variation so that we can avoid conflicts when referencing them.
- favicon-admin-16×16.png
- favicon-admin-32×32.png
We’ll want to drop these in our public folder like earlier.
Now let’s head over to pages/admin.js and inside, we should already have the Head component imported at the top.
That means we can add our head component right at the top of the component:
<Head>
  <title>Admin</title>
  <link rel="icon" type="image/png" sizes="32x32" href="/favicon-admin-32x32.png" />
  <link rel="icon" type="image/png" sizes="16x16" href="/favicon-admin-16x16.png" />
</Head>
If we open up our app then navigate to our Admin page, we should now see the updated favicon!
Now we have one problem though. If we click back to the homepage, we notice that the favicon actually doesn’t revert back to the original! ????
I don’t know this for a fact, but my guess is that when the favicon is added to the page, it updates, but removing it, doesn’t “update” the page, causing it to stay to the Admin variation.
To fix this, since we’re only updating those two specific icons, we can simply re-add those back to the homepage.
Inside of pages/index.js add:
<Head>
  <title>Home</title>
  <link rel="icon" type="image/png" sizes="32x32" href="/favicon-32x32.png" />
  <link rel="icon" type="image/png" sizes="16x16" href="/favicon-16x16.png" />
</Head>
And now if we refresh the page and navigate back and forth, we can see we’re back to our original favicon.
Now part of the reason this is happening is due to us using the _app.js file to add the global favicons. That “component” isn’t going to refresh on page change, meaning, the favicons in that file are going to be stale as we navigate around.
This is totally okay if we only plan on having a single favicon across the site, but we we saw here, it can lead to troubles if we need that to be dynamically updated.
We’re not going to cover this here, but if you plan on using dynamic icons, I recommend alternatively using a Layout component that wraps the content of each page along the lines of:
const Layout = ({ children }) => {
  return (
    <>
      <Head>
        <link rel="icon" type="image/png" sizes="32x32" href="/favicon-32x32.png" />
        <link rel="icon" type="image/png" sizes="16x16" href="/favicon-16x16.png" />
      </Head>
      { children }
    </>
  )
}

<Layout>
  <Head>
    <title>Admin</title>
    <link rel="icon" type="image/png" sizes="32x32" href="/favicon-admin-32x32.png" />
    <link rel="icon" type="image/png" sizes="16x16" href="/favicon-admin-16x16.png" />
  </Head>
  <h1>Admin</h1>
</Layout>
It lends itself a bit better to managing dynamic page content like in our use case here or if you need to handle other dynamic bits when composing your global page layout.
But in the meantime, we successfully set up our favicon to change when navigating to different pages of our web app!
Step 4: Dynamically updating favicons based on user interaction
Changing the favicon on page change is one thing, but how about dynamically updating that icon on the same page?
Given we’re in React-land and the way the Head component works, we can apply the exact same concepts we would to any other React component.
To test this out, we’re going to use React state along with a button to trigger an update.
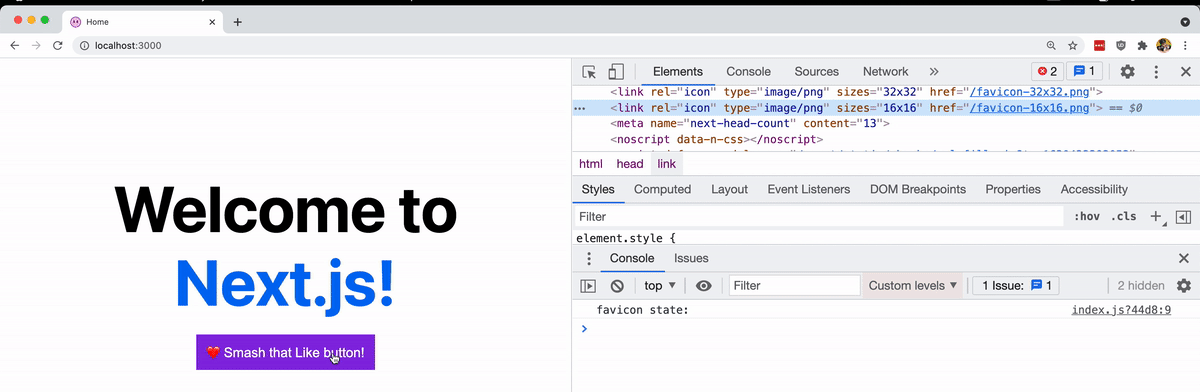
First, at the top of pages/index.js , let’s import useState:
import { useState } from 'react';Next, let’s define a new instance of state along with a function that we’ll use to update that state when we click our button:
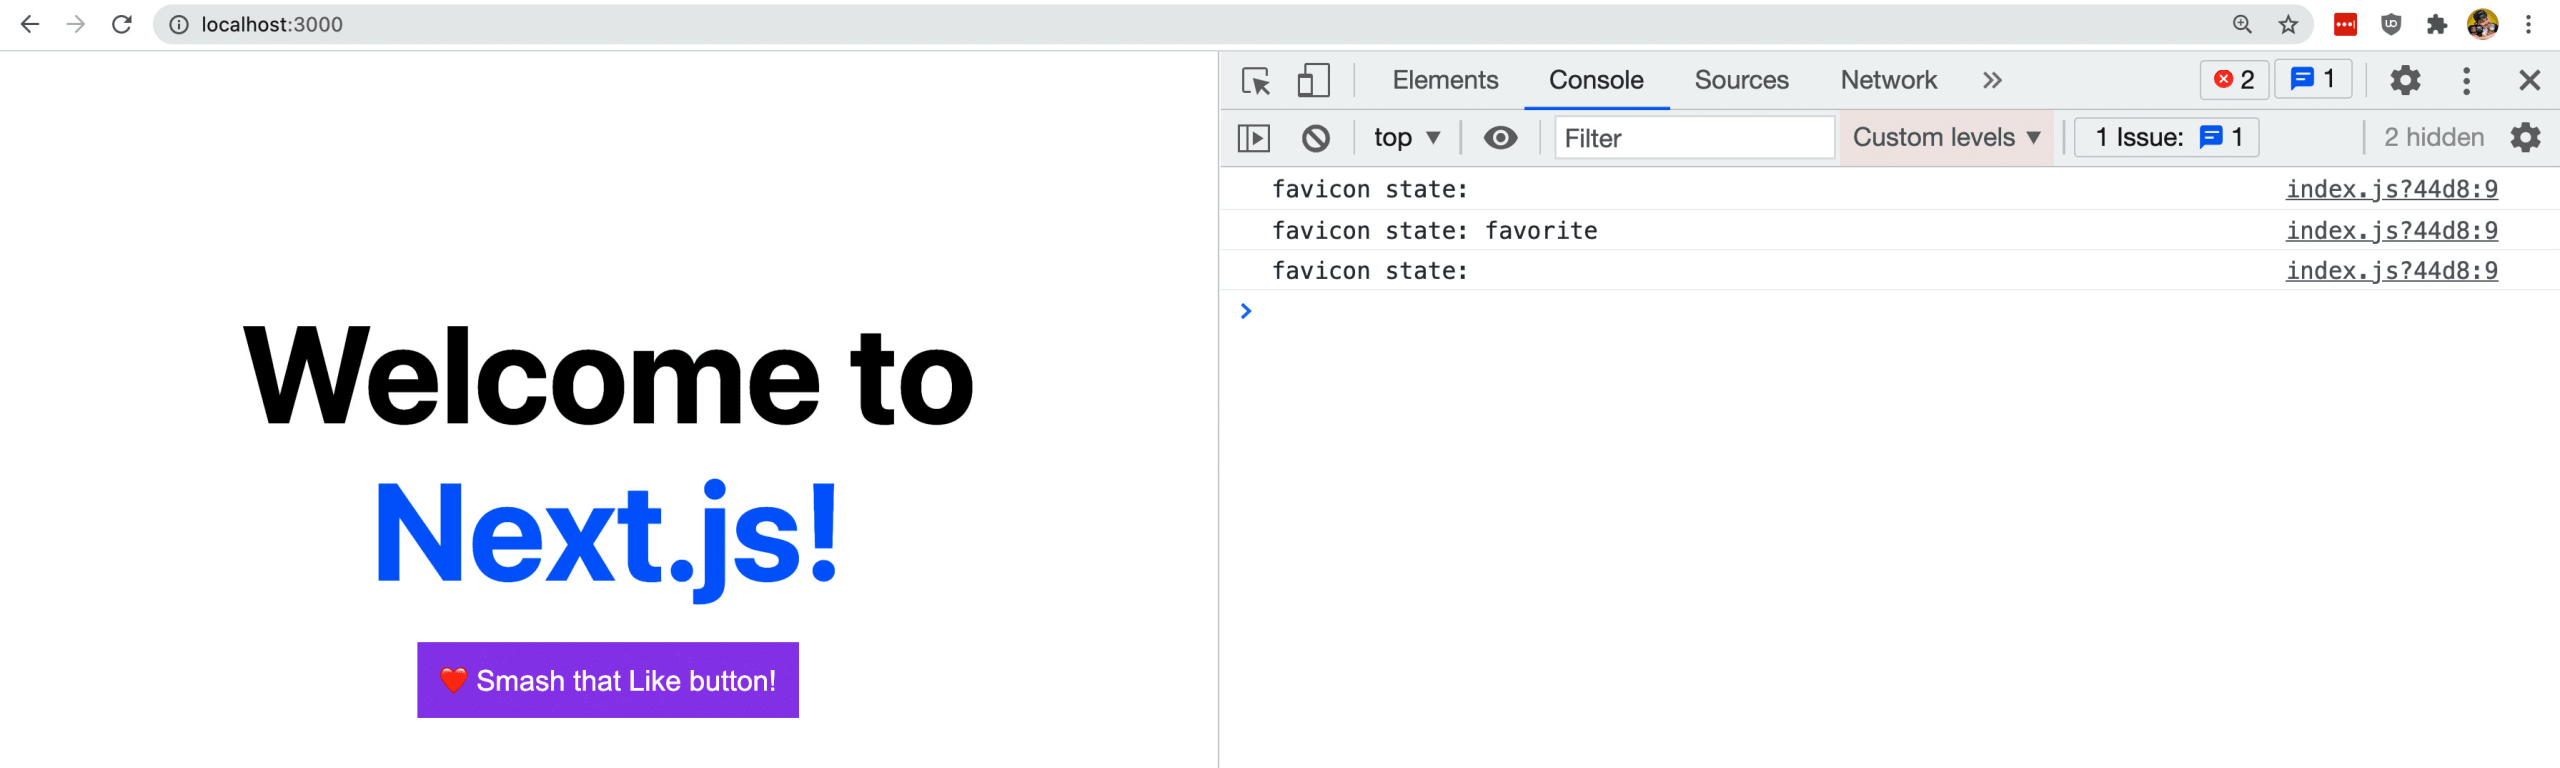
const [favicon, setFavicon] = useState('');
console.log(`favicon state: ${favicon}`);
function handleOnClick() {
  setFavicon('favorite');
  setTimeout(() => setFavicon(''), 3000);
}
Here’s what we’re doing:
- Creating a new instance of state called
favicon - That state has a default of an empty string, as we’ll use this later for a dynamic string value
- We’re logging out that value so we can test and make sure it’s working
- We’re defining a
handleOnClickfunction that when fired, will update the state to a string calledfavoritethen 3 seconds later set it back to an empty string
And finally, we can add the button to trigger this:
<p>
  <button onClick={handleOnClick} style={{
    color: 'white',
    backgroundColor: 'blueviolet',
    padding: '.6em .8em',
    border: 0,
    cursor: 'pointer'
  }}>
    ❤️ Smash that Like button!
  </button>
</p>
If we open that up in the browser and look in our web log, we should see an empty console log statement, but when we click the button, we should see a string of favorite followed 3 seconds later by another empty log statement.
So now, let’s use that to dynamically change our favicon!
To do this, we’re going to create yet another favicon.
Here’s the image I’ll use, which you can feel free to convert over at Favicon Generator like the previous examples.

Download at https://github.com/colbyfayock/my-favicon-app/blob/main/public/favicon-favorite-1024×1024.png
Now similar to before, we want to use the two files, favicon-16x16.png and favicon-32x32.png but we want to rename them to:
- favicon-favorite-16×16.png
- favicon-favorite-32×32.png
When ready, drop those in the public directory.
Next, we’re going to update our favicons in the Head component with the following:
<Head>
  <title>Home</title>
  <link rel="icon" type="image/png" sizes="32x32" href={favicon ? `/favicon-${favicon}-32x32.png` : `/favicon-32x32.png`} />
  <link rel="icon" type="image/png" sizes="16x16" href={favicon ? `/favicon-${favicon}-16x16.png` : `/favicon-16x16.png`} />
</Head>
What we’re doing here is dynamically setting the value of our favicons, so that when there is no favicon state, we return it like we did previously, but when there is a state, we include it as part of the path to the favicon.
But now, when we go ahead and smash that Like button (click the button), we can now see it updates the favicon dynamically!
What else can we do?
Shared layout
As I mentioned in Step 3, using the _app.js file for dynamic content has it’s drawbacks.
I like to recommend using a shared Layout component that gets used to wrap all pages. It also gives a bit more flexibility with controlling the Layout from the page, such as changing headers on a specific page.
Check out how I used a shared Layout component for spacejelly.dev!
https://github.com/colbyfayock/spacejelly.dev/blob/main/src/components/Layout/Layout.js
Optimize images
While the images are small, it’s always a good idea to optimize the images, especially transparent PNGs, to make sure you’re delivering as little data as possible for your visitors to download. It also makes it faster!
You can use tools like TinyPNG to make sure you’re serving your images as small as possible without sacrificing quality.