

What is a Web Scraper?
A web scraper is a tool that uses code to fetch a website’s source, optionally load that website, then scans the content to look for a particular piece of information.
Some common uses might be to check prices of a product, gather data for research, or in the world of AI, collect information to train models.
Web scrapers can come with a negative connotation, as some bad actors use it in unethical ways, but there’s plenty of use cases that make web scraping a viable way, particularly when respecting a website’s request to be crawled or not.
What are we going to build?
We’re going to build a Web Scraper using Next.js’s API Routes. Why Next.js? If you’re reading this, you likely already have your own Next.js application already set up and it’s an easy way to add a new endpoint, but it’s also a good way to quickly set up a new environment.
You can use other similar environments, frameworks, or even just Vercel functions directly to create a similar tool.
As far as what we’re going to scrape, we’ll test grabbing bits of information from a page by using Puppeteer inside of our function. We’ll even see how we can collect a screenshot of that website.
Note: While this should work in other providers, I’ve only tested deploying this to Vercel.
Step 1: Creating a new Next.js API Route
Getting started, we’ll want to create a new API route where we’ll manage our scraper.
Tip: You should be able to follow along in any Next.js app, whether existing or new, or whether using the Pages or App router, or even this starter, though filenames may vary. I’ll be using the App Router for this walkthrough.
Heading to your app directory create a new folder called api and inside, create an additional folder called scraper.
Inside app/api/scraper add a file route.ts and add:
export async function POST() {
  return Response.json({
    hello: 'world'
  })
}
Here we’re creating a new POST endpoint where we’re simply responding with some JSON to test things out.
If you start up your development server, your endpoint will be available at http://localhost:3000/api/scraper.
Tip: In order to test this out, you’ll either want to set up something in your UI that can make a request to your new endpoint (like the Starter linked above) or use a tool like Postman.
When using our endpoint, we’ll want to be able to dynamically POST information to our endpoint that we’ll use for the scraping, such as a website URL.
We can access the request’s body based on how we pass the data and grab our dynamic value. Let’s set it up as JSON.
export async function POST(request: Request) {
  const { siteUrl } = await request.json();
  return Response.json({
    siteUrl
  })
}
If we start to test this out, like making a POST request:
const results = await fetch('/api/scraper', {
  method: 'POST',
  body: JSON.stringify({
    siteUrl: 'https://spacejelly.dev'
  })
}).then(r => r.json())
We should now see our results get returned in the response!

Next, let’s get Puppeteer set up, which is what we’ll use to perform the scraping inside our endpoint!
Step 2: Using Puppeteer in a Next.js API Route
Ultimately when running our code, we need some kind of mechanism to scrape a website.
The most simplest way to do this is to make a fetch request to the website itself and download its content, but that’s not necessarily what we want.
By grabbing the response HTML, we’re grabbing the page before any JavaScript can load, and we all know the world is run by JavaScript, so that might not be the most meaningful page (unless they’re so modern they’re server rendering the entire page!).
So instead, we can use a tool like Puppeteer, which actually spins up an instance of Chrome, loads the page, and allows us to traverse it to grab whatever information we need.
Warning: this is the trickiest part of the tutorial, as it requires specific configuration to get it working, but lets move on.
Shoutout to Stefan Judis’s article which helped me with some of the configuration bits.
The tricky thing about all of this is serverless functions have a size limit. That means we can’t just stuff the entire Chrome browser in there. It also means we can’t just stuff the entire Puppeteer package in there, as all of that will be too big, so we need to get creative.
Installing & Configuring Puppeteer
We’ll use two packages to specifically help us achieve these:
- @sparticuz/chromium-min
- puppeteer-core
For those familiar, @sparticuz/chromium-min is basically a modern version of chrome-aws-lambda, and for those not, its a Chromium binary meant to be used inside of a lambda function.
Puppeteer is the framework that we’ll use to automate Chromium. puppeteer-core is Puppeteer but without a bundled version of Chrome, which is important for the size.
To use these, we need to match the versions of what version of Chromium our Puppeteer version uses.
Head to the Chromium support page: https://pptr.dev/supported-browsers
Then we’re going to try to find what version of Chrome matches the version of Puppeteer that we’re going to install, which you can find on npmjs if you’re just looking for the latest version: https://www.npmjs.com/package/puppeteer-core
For instance, at the time of writing this, the latest Puppeteer version is 23.0.1, which would match with Chrome 127.0.6533.88, or just 127.
The twist with this, is that the latest published version of @sparticuz/chromium is only 126, so we’ll need to look for the Chrome version that matches 126, which is 22.13.1.
So in my case, I’m going to install those versions:
npm install @sparticuz/chromium-min@126.0.0 puppeteer-core@22.13.1Then, we can simply import them at the top of our API Route:
import chromium from '@sparticuz/chromium-min';
import puppeteer from 'puppeteer-core';
Setting Up Puppeteer
Using these together, it’s a lot of configuration, so let’s move along:
const isLocal = !!process.env.CHROME_EXECUTABLE_PATH;

const browser = await puppeteer.launch({
  args: isLocal ? puppeteer.defaultArgs() : chromium.args,
  defaultViewport: chromium.defaultViewport,
  executablePath: process.env.CHROME_EXECUTABLE_PATH || await chromium.executablePath('<Your Chromium URL>'),
  headless: chromium.headless,
});
In the above, we have 2 things we need to configure.
First, CHROME_EXECUTABLE_PATH needs to be the local path to your Chrome instance. This is how we tell Puppeteer where to load Chrome from.
You can find this relatively easy by opening up a new tab, going to chrome://version, and copying the Executable Path.
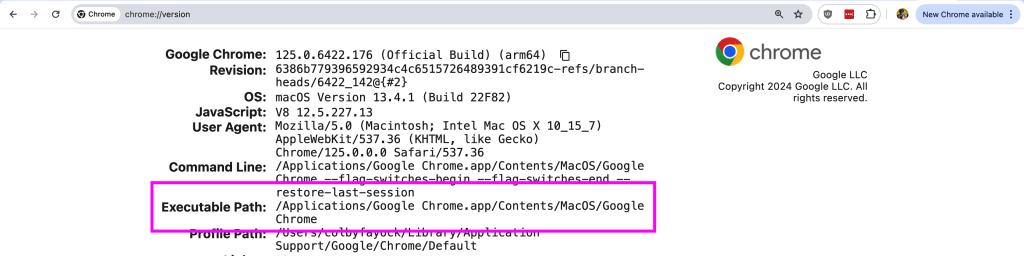
Set that value as the environment variable in your .env.local, we’ll only need that for our local environment.
Next, if you noticed the executablePath has two potential values, our local Executable Path, or chromium.executablePath.
To get around the issue of Puppeteer and Chromium being too big, instead of bundling it with the package, we’re going to specify a URL to the file that can be downloaded from within the environment.
We can find this file published directly on the Sparticuz/chromium package’s GitHub under Releases and the release version that we’re working with.
Again, following the versions I installed, we’re looking for version 126, so we can find the 126 release and download the pack file.
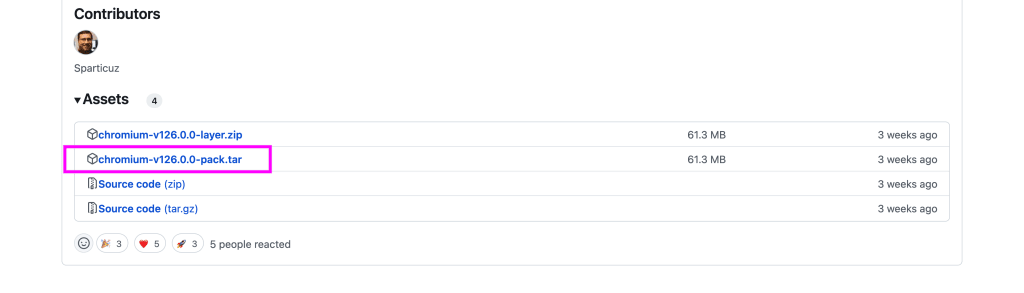
Upload this file to storage of your choice, like AWS, where you could end up with a URL like:
https://<Bucket Name>.s3.amazonaws.com/chromium-v126.0.0-pack.tarWhich you can then replace <Your Chromium URL> in the snippet above.
As far as the rest of the configuration:
- The
argsproperty will change depending on if we’re local or deployed, which will help allow our API to work when deployed to a service like Vercel defaultViewportandheadlesswe’re passing straight from Chromium
Damn, that was a lot, right?
Next up, the fun part!
Using Puppeteer to Scrape Page Data
Because we’re now working with Puppeteer, we can use any of its APIs to automate Chrome.
Let’s start with an easy one, grabbing the page title.
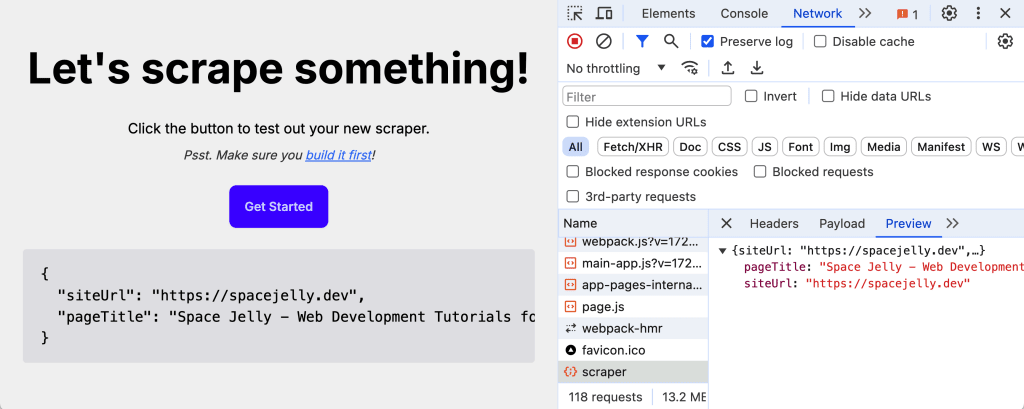
const page = await browser.newPage();
await page.goto(siteUrl);
const pageTitle = await page.title();
await browser.close();
Here we open up a new page, go to our dynamic siteUrl, grab the title, and importantly close the browser.
Where now, let’s send that back with our API response:
return Response.json({
  siteUrl,
  pageTitle,
});
And if we try to test out our API, we should now see the page title in our response!
Now at this point, you should be able to fully deploy this, but you might run into an issue…
Timeouts!
Step 3: Configuring Vercel Function Timeouts
Depending on the provider you’re using to deploy your endpoint, you might run into a specific issue.
Puppeteer can sometimes take too long, especially if the website is slow to load.
Vercel for instance has a default timeout of 10s for hobby (free) accounts, which makes it easy to hit.
Luckily, we can extend the timeout so that we can safely scrape our data.
Note: Please do pay attention to how long your API requests run as it may run up your bill or may make you eventually actually have a bill.
To configure the timeout for Vercel using Next.js API routes, we can simply export a constant.
At the top of app/api/scraper/route.ts add:
export const maxDuration = 20; // Or whatever timeout you wantAnd once you redeploy, you should have more breathing room for making your request!
What’s next?
Taking Screenshots with Puppeteer
Now that we have full access to the Puppeteer API, we can do things like taking screenshots!
Taking a screenshot is as simple as:
const screenshot = await page.screenshot();Where once you have your screenshot data collected, you can upload it to somewhere like Cloudinary and return the URL in the response!